
If you run an eCommerce store on WooCommerce, importing products with images efficiently is crucial to keeping your business moving forward. In this guide, we’ll walk you through the entire process of WooCommerce import images with products easily, making sure you avoid common mistakes and optimize for the best results.
Importing products into WooCommerce can save you a lot of time, especially if you have a large product catalog. However, importing images alongside your products is where many store owners face challenges.
If you get the product data right, but the images are missing, it can lead to frustration and confusion. By following the steps in this article, you’ll be able to import WooCommerce products with images quickly and effectively.
Understanding WooCommerce Product Imports
Before getting into how to do it, let’s first understand what WooCommerce product imports are. WooCommerce product imports allow store owners to easily upload bulk product listings, including product titles, descriptions, prices, and images, all in one go.
Using a CSV file to import products with images into WooCommerce is one of the easiest methods to ensure all your products and their associated images appear on your store seamlessly.
Whether you’re just starting or migrating a large store, using the WooCommerce product import tool is a quick and straightforward way to populate your store without manually adding each product.
By importing WooCommerce products with images, you save valuable time and ensure that the images are displayed as part of the product page, enhancing the shopping experience for your customers.
Preparing Your Product Data for Import
To get started with importing WooCommerce products with images, the first thing you need is a well-structured CSV file. This file will contain all the data related to your products. While it’s possible to import products without images, images play a crucial role in eCommerce.
Ensuring that each product in your CSV file is linked to the correct image URL is the key to a successful import.
Steps to Prepare Your CSV File
- Product Data Structure: The first step in preparing the data for import is to ensure that you have the right columns in your CSV. This includes product names, descriptions, prices, categories, and most importantly, image URLs.
- Organizing Product Images: For each product, you need to make sure that you have the correct URL for the product images. If you’re using images hosted on your server, they should be accessible via direct links. If the images are hosted externally, you can add their URLs in the CSV file as well.
- Format the Images Correctly: Make sure that the image format you’re using is compatible with WooCommerce. Generally, PNG, JPEG, and GIF are the most common formats supported. Always ensure that your images are named clearly, and you use the right extension to avoid errors during the import.
By following these steps, your CSV file will be ready for importing products with images into WooCommerce.
Using WooCommerce’s Built-in Importer: A Step-by-Step Guide
WooCommerce’s built-in product importer is a powerful tool that simplifies the process of importing products and images to your online store.
This step-by-step guide will show you exactly how to import WooCommerce products with images using this tool, ensuring a smooth and hassle-free experience.
Step 1: Prepare Your CSV File
Before using the WooCommerce built-in importer, you need a properly formatted CSV file. This file should include all the product information, such as titles, descriptions, prices, categories, and most importantly, the image URLs.
Here’s how to prepare the CSV file for import:
1. Create a CSV File: Use spreadsheet software like Excel or Google Sheets to create a CSV file.
2. Add Product Details: In your CSV file, include columns like:
- Product Name: The name of the product.
- Description: A detailed description of the product.
- Price: The product’s price.
- Category: The category under which the product will be listed.
- Image URL: The URL of the product image (ensure this is a direct link to the image, not just a path).
3. Save the File: Once all your product data is entered, save the file as a CSV.
Step 2: Access the Product Import Tool in WooCommerce
Once your CSV file is ready, it’s time to import it into WooCommerce. Here’s how to access the built-in import tool:
1. Log into Your WooCommerce Store: Go to your WooCommerce dashboard by logging into your WordPress site.
Related Read: Types of WooCommerce Login for your Customers.
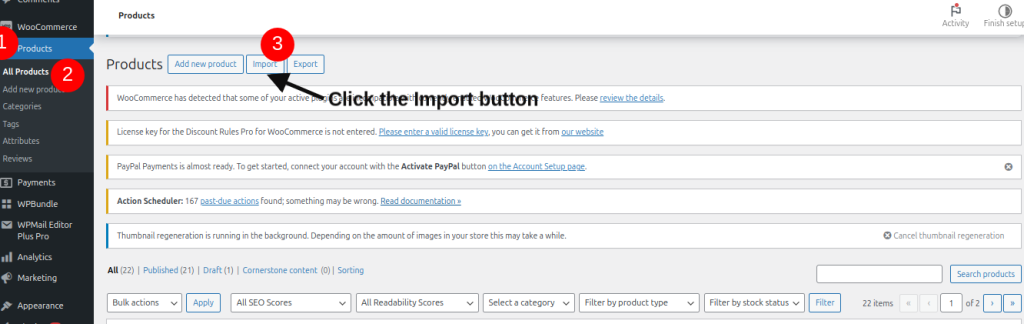
2. Navigate to Products: In the left-hand menu, hover over or click on “Products.”
3. Click on Import: Under the “Products” tab, you’ll see the “Import” button. Click on it to access the import tool.
Step 3: Upload Your CSV File
With the import tool open, the next step is to upload your CSV file. Here’s how to do it:
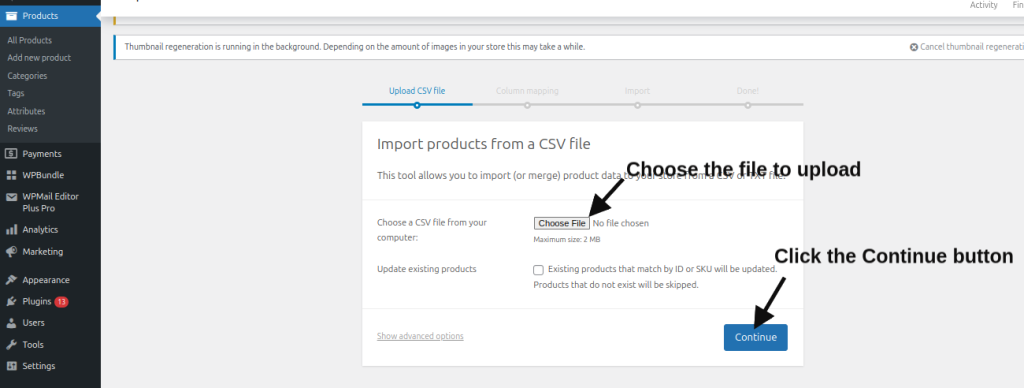
1. Click on Choose File: On the import screen, you will see an option to choose a file. Click the “Choose File” button.
2. Select Your CSV File: Navigate to the location where your CSV file is saved and select it.
3. Upload the File: After selecting the file, click the “Continue” button to begin the upload process.
Step 4: Map Your CSV Fields to WooCommerce Product Fields
Once your CSV file is uploaded, WooCommerce will attempt to automatically map the columns from your CSV to the correct product fields in WooCommerce. It’s crucial to check that each column is correctly mapped to avoid errors during the import process.
1. Check Auto Mapping: WooCommerce will display a preview of the fields and try to match them to the right product fields. Check if the “Image URL” column is mapped correctly to the WooCommerce product image field.
2. Manually Map Fields if Necessary: If WooCommerce hasn’t mapped a column correctly, you can manually map it. For example, ensure that your “Image URL” field is matched to the correct WooCommerce image field.
To manually map, click on the dropdown next to each field and select the correct WooCommerce field. If necessary, you can also create custom fields for more complex imports.
Step 5: WooCommerce Import Images with Products
Now that the mapping is complete, it’s time to import the products and images into your store:
1. Run the Import: After verifying the mapping, click the “Run the Importer” button. WooCommerce will start importing the products, including their images, from the CSV file.
2. Wait for the Process to Finish: Depending on the size of your product catalog, the import process may take some time. Don’t close the page or navigate away until it’s complete
Step 6: Review Your Imported Products
Once the import process is finished, it’s time to review the imported products and ensure everything is correct:
- Go to Your Products Page: Navigate to the “Products” section in your WooCommerce dashboard.
- Check the Imported Products: Browse through the list of imported products to ensure they have been added correctly.
- Verify Product Images: Visit the front end of your website and check if the product images are displaying properly. If any images are missing, double-check the “Image URL” field in your CSV file for any errors.
Step 7: Troubleshoot Any Issues
- Missing Images: If the images didn’t import, double-check the “Image URL” column in your CSV file. Make sure the URLs are correct and accessible. If the images are hosted on an external server, ensure they are public and can be accessed by your WooCommerce store.
- Incorrect Mapping: Sometimes, the auto-mapping feature doesn’t map all fields correctly. If the product details are incorrect, you can re-import the CSV with the correct mappings.
- Large File Imports: If you have a large product catalog and run into timeouts, consider splitting your CSV file into smaller chunks and importing them one at a time.
By following these step-by-step instructions, you can easily import WooCommerce products with images using the built-in importer. The process is straightforward, but ensuring your CSV file is properly structured and the image URLs are correct is key to a smooth import.
With the right preparation, you can have your products live in your store in no time, complete with images.
Using Third-Party Plugins for Enhanced Functionality
For larger stores or more complex product imports, using third-party plugins is highly recommended.
These plugins can provide additional features like scheduling imports, handling product variations, and more robust image handling during the import process.
Best Plugins for Importing WooCommerce Products with Images
- WP All Import: This is one of the best plugins for importing products into WooCommerce. It allows you to map custom fields, handle large product inventories, and most importantly, import images alongside product data. You can even import images from external URLs.
- Product CSV Import Suite: This plugin offers a great solution for importing complex product data into WooCommerce, including products with images, attributes, and variations. It simplifies the import process and works seamlessly with larger stores.
- WooCommerce CSV Importer: WooCommerce’s very own product CSV importer can also be extended through various add-ons, providing more advanced functionality for bulk product imports, especially when you need to import WooCommerce products with images. Thus, you can bulk import WooCommerce product with images.
Troubleshooting Common Import Issues
Even though importing WooCommerce products with images is straightforward, you may occasionally run into problems. Here are some common issues and how to resolve them.
Missing Images
One of the most common issues when importing products with images is that the images don’t show up. This often happens due to incorrect URLs in the CSV file. Ensure that the image links are accessible and point directly to the image files.
Mapping Errors
Another issue can occur when the fields in the CSV file aren’t mapped properly. Double-check the mapping process and ensure that the “Image URL” column is correctly mapped to the image field in WooCommerce.
Import Failures with Product Variations
When importing WooCommerce variable products (products with different sizes or colors), the WooCommerce product image import process can become tricky. To resolve this, ensure that each variation has the correct image URL assigned in the CSV file. Some plugins, like WP All Import, allow you to map images to specific variations, ensuring that each variation shows its corresponding image.
Optimizing Product Images During Import
Product images are essential not just for a good user experience, but also for SEO. Optimizing images during the import process will ensure your website runs smoothly and your products show up in search engines.
Image Size and Format Recommendations
To keep your website fast, always use optimized image sizes. WooCommerce recommends images around 800×800 pixels for product images. Always ensure the image is in the right format, with JPEG being the most efficient for most products.
Image Compression
Large images can slow down your website, which is why image compression is key. Consider compressing your images before importing them to ensure that they don’t negatively affect your site’s speed.
SEO Best Practices for Image Alt Text
While importing product images, ensure you use SEO-friendly alt text. This not only helps with accessibility but also allows search engines to better understand the content of your images. Adding relevant keywords in the alt text, such as “blue running shoes,” can improve your SEO rankings.
Verifying the Success of Your Import
Once you’ve imported your products with images, it’s important to verify that everything was successful.
- Check the Product Page: Go to the front end of your store and view your products. Make sure that each product page is displaying the correct images.
- Check for Missing or Broken Images: Ensure that none of your product images are broken. If an image is missing, it’s likely due to a URL issue in your CSV file. You can correct this by updating the image URLs.
- Test Image Load Times: Slow image load times can affect user experience. Ensure that your product images load quickly after import by testing them on different devices and browsers.
Conclusion
Importing WooCommerce products with images doesn’t have to be difficult. By following the steps outlined in this guide, you can import products and their images quickly and efficiently. Whether you’re using WooCommerce’s built-in importer or a third-party plugin, the key is preparing your product data carefully and ensuring that all image URLs are correct.
To ensure smooth future imports, always double-check your CSV file, use optimized image formats, and consider using a powerful plugin like WP All Import for complex imports. Following these best practices will save you time and help you build a better eCommerce store.
Related Reads:
- How to Export Products from WooCommerce to Other Websites?
- How to Migrate WooCommerce Store Data to Another Site?
- Best WordPress eCommerce Plugins to Use in 2025
Frequently Asked Questions:
To WooCommerce import images with products, you can use the WooCommerce product import template, ensuring your CSV file contains the correct image URLs. Once your CSV is ready, simply upload it using the WooCommerce import tool to import products with images in bulk.
To add a product image in WooCommerce, navigate to the product page, click on the “Product Image” section, and upload your desired image. You can also use the WooCommerce import images with products feature when importing products in bulk via a WooCommerce product import template.
For bulk uploading images to WooCommerce, you can use the WooCommerce import multiple images feature. Prepare a CSV file with product data and image URLs, then upload it using the WooCommerce import products CSV template for a seamless bulk upload process.
To upload an image to a WooCommerce product page, simply go to the product edit screen, click on “Set Product Image” and upload or select an image. Alternatively, you can import images with products free using a CSV file and the WooCommerce product import template.