Offering coupon discounts is a great way to boost your WooCommerce store’s revenue. But wouldn’t it be great if you could launch them exactly when you want, without any last-minute panics? WooCommerce can actually schedule your coupons for you.
Imagine this: you’ve crafted the perfect discount to drive sales, but a launch-day mix-up leaves your coupon inactive. Potential customers miss out, and you lose valuable revenue. This is where coupon scheduling comes in as a powerful feature.
WooCommerce coupons are digital discount codes you offer to customers to incentivize purchases. They can be a percentage discount, a fixed amount off, or even free shipping. By scheduling your coupons, you can ensure they activate at the perfect time for targeted promotions, like flash sales or seasonal campaigns.
In this blog post, we’ll show you two ways to schedule your WooCommerce coupons: using the built-in options and with the help of a “Discount Rules for WooCommerce -Pro” plugin. We’ll walk you through the step-by-step process for each method so you can create stress-free promotions and increase your sales.
Schedule Smart Coupons In WooCommerce Using The Discount Rules Plugin To Simplify Your Promotional Sales Event.
Why To Schedule Coupons In WooCommerce?
Here’s why scheduling your WooCommerce coupons is a game changer:
- Stress-Free Launches: No more struggling to activate coupons at the last minute. Schedule them in advance and ensure they launch at the right time, freeing you to focus on other crucial tasks.
- Targeted Promotions: Create targeted sales by scheduling coupons for specific times. Scheduling gives you complete control to boost traffic during flash sales or holiday promotional sales.
- Increased Sales & Conversions: Timely promotions with readily available coupons can significantly improve conversion rates. Customers are more likely to complete purchases when a discount is readily available.
- Improved Customer Experience: A seamless checkout process with accessible coupon codes builds customer trust and loyalty. Scheduling ensures your discounts are always active when advertised, creating a positive shopping experience.
- Reduced Errors: Automating coupon activation and deactivation eliminates the risk of human error. Scheduling also eliminates the chance of forgetting to launch or deactivate a promotion, keeping your sales on track.
How To Schedule WooCommerce Coupons?
WooCommerce offers you the flexibility to schedule your coupons in two ways: utilizing the built-in options for a basic setup or leveraging a free plugin for more advanced control.
Method 1: Using The Default Settings
To schedule a coupon in WooCommerce with default settings:
Creating A Coupon Code
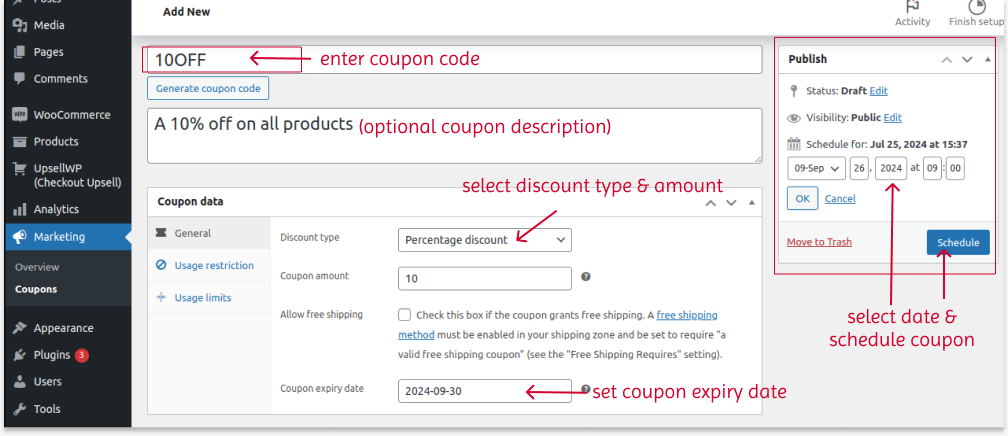
- Go to “WooCommerce” dashboard -> “Marketing” -> “Coupon”.
- Click “Add Coupon”.
- Create your coupon code.
- In the “General” tab
- Select discount type and coupon amount.
- Optionally enable the “free shipping” option.
- In the “Usage Restrictions” (optional) tab
- Set minimum and maximum amount to enable coupon
- Choose specific products, categories, or users to apply coupons.
- In the “Usage Limits” (optional) tab
- Set the usage limits per coupon or per person.
Scheduling A Coupon
- Go to the “Publish” tab on the right side of the coupon interface.
- Edit the “Publish Immediately” option.
- Set the date and time to activate the coupon at a specific time.
- Click “OK” and “Schedule” to schedule the coupon.
Setting Coupon Expiry Date
- In the same “General” coupon tab, you can find the “Coupon Expiry Date” option, where you can set the expiry date of the scheduled coupon to become inactive.

That’s it! You’ve successfully scheduled your coupon for your upcoming promotional event so you can focus on other tasks.
To know more about creating a coupon in WooCommerce using the default feature, check here: How to create a coupon in WooCommerce?
What if you’ve planned to offer smart coupons or auto-apply coupons? You will need a versatile coupon plugin to create and schedule these coupons.
Method 2: Using The “Discount Rules” Plugin
Using the “Discount Rules for WooCommerce -Pro” plugin, you can offer a coupon discount only for specific customers or customer groups over subtotal and apply even more purchase conditions. It allows you to create different coupon discounts, such as percentage or fixed discounts, BOGO deals, bulk discounts, and more
Schedule Auto-Apply Coupon URL In WooCommerce Using The Discount Rules Plugin To Enhance Customer Experience.
You can check this installation guide for instructions to install and activate the plugin in your WordPress dashboard.
To create and schedule advanced coupons in WooCommerce using the “Discount Rules” plugin:
- Go to “WooCommerce” -> “Discount Rules”.
- Click “Add New Rule”.
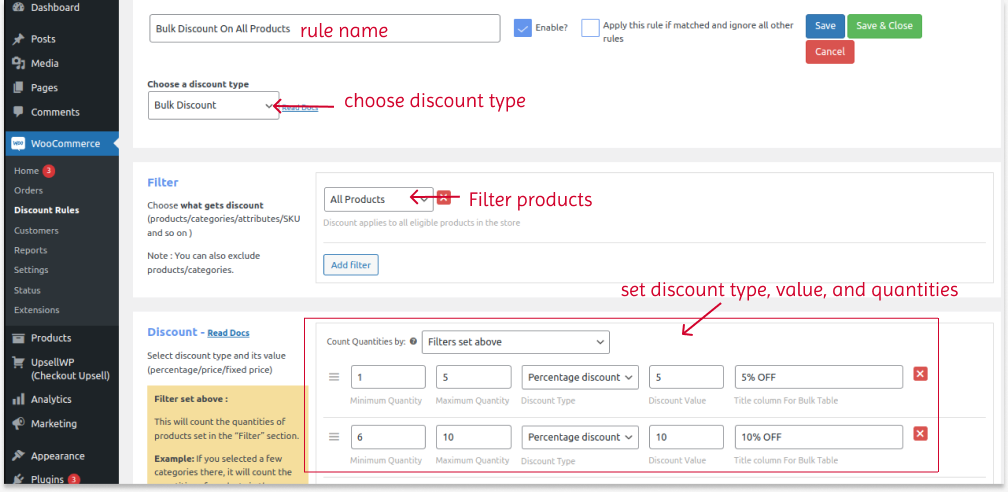
- Enter the rule name.
- Select the discount type. For example: “Bulk Discount”.
- Filter the specific products or categories from the “Filter” section to apply discounts.
- In the “Discount” section, select the discount type and set values based on the quantity range. For example, Offer 1 to 5 items at a 5% discount and 6 to 10 items at a 10% discount.

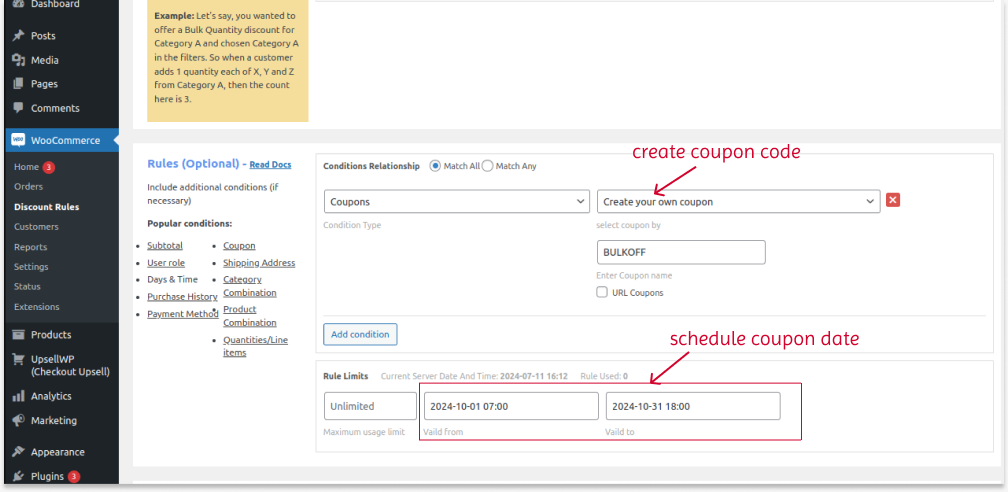
- In the “Rules” section, select “Coupon” as a condition type and create your coupon code.
- You can also add other purchase conditions to the coupons, such as subtotal, specific user role, or other.
- Scroll down to the “Rules Limits” section and set the “Rule Valid From” and “Rule Valid To” date and time.
- You can also set “Rule Limits” to restrict users from using it for more times.
- Save and enable the rule.

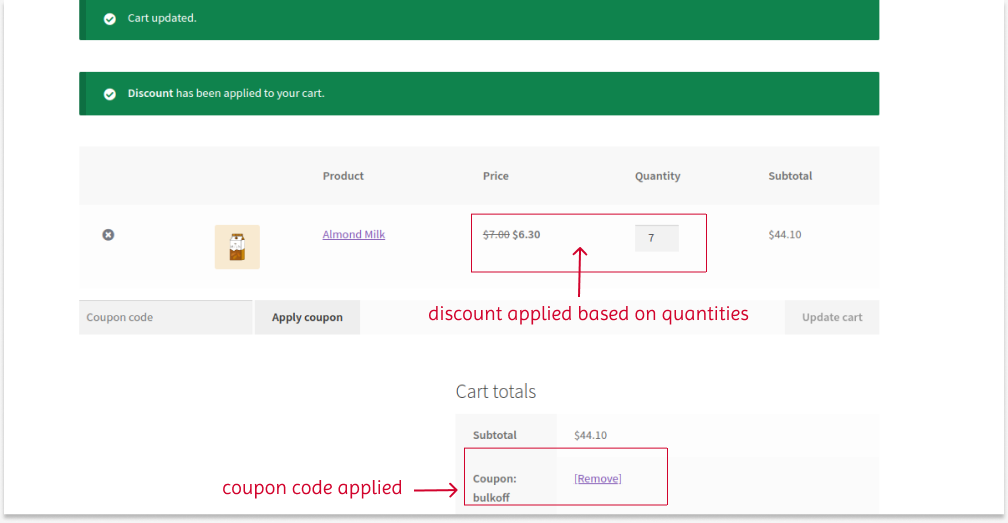
The bulk discount will be activated on the scheduled date, and customers can claim it by applying the coupon code at checkout. This coupon rule has also ended on the selected date.

You can apply different coupon scenarios like BOGO coupon deals, auto-apply coupon URLS, coupon over amount, and more to personalize your offer.
Check the detailed steps to implement and schedule coupons in different ways: The Complete Guide To WooCommerce Coupons.
Schedule Advanced Coupons In WooCommerce Easily Using The Discount Rules Plugin To Increase Sales & Conversions.
Conclusion
Forgetting to activate coupons on special promotion days can lead to potential customer and revenue loss. To overcome this issue, you can schedule a coupon strategy using the default feature.
With these detailed steps, you can easily schedule and automate your coupons to focus on other crucial tasks, simplify your coupon management, and drive more sales on sale events.
You can also utilize the “Discount Rules for WooCommerce -Pro” plugin to extend the basic coupon functionalities and customize coupon discounts.
Also Read
- How to Create Bulk Discounts in WooCommerce? (Different Types)
- How to Create WooCommerce Coupons for Specific Users and Roles?
- 11 WooCommerce Coupon Plugins to Create Advanced & Smart Coupons (2024)
Frequently Asked Question
You can add an automatic discount in WooCommerce only using a discount plugin like “Discount Rules for WooCommerce -Pro.” Install and activate it in your WordPress dashboard.
1. Go to “WooCommerce” -> “Discount Rules.”
2. Add a new rule.
3. Choose the discount type.
4. Filter products to apply discounts.
5. Set the discount type and value.
6. Optionally set conditions for the discounts and save the rule.
To bulk edit WooCommerce products:
1. Go to the “WordPress/ WooCommerce” dashboard -> “Products” -> “All Products.”
2. Choose all the products that you want to edit in bulk.
3. On the top dropdown menu, select “Bulk Actions -> Edit” and click “Apply.”
4. Now, you can bulk edit product details, such as regular price, sale price, tags, and more.
5. Finally, update the changes.
The “Discount Rules for WooCommerce -Pro” plugin allows you to set multiple prices per product.
1. Go to “WooCommerce” -> “Discount Rules.”
2. Add a new rule.
3. Choose the discount type as “Bulk Discount.”
4. Filter products to apply discounts.
5. In the “Discount” section, you can set product prices based on the quantities. For example, 1 to 5 items at a 5% discount and 6 to 10 items at a 7% discount. Set the discount type and value.
6. Optionally set conditional rules to discounts and save the rule.
You can fix multiple prices for the same product based on its quantities.
You can also create a “Variable Product” in WooCommerce and set different prices based on the product variations.
Using the “Discount Rules for WooCommerce -Pro,” you can automatically apply coupons to products without making customers enter coupon codes.
1. Go to “WooCommerce” -> “Discount Rules.”
2. Add a new rule and choose the discount type.
3. Filter products and set the discount type & value.
4. In the “Rules” section, choose “Coupon” as a condition, create a coupon code, and enable the “URL Coupons” option. Save the rule.
You can add a product to multiple categories in WooCommerce.
1. Go to “WordPress” dashboard -> “Products” -> “Add New.”
2. Enter the product name and description.
3. Set the product’s regular and sale price.
4. On the right side, select multiple categories where you want to include the product.
5. Publish it.
You can also edit existing products and add more categories.


