Who does not love discounts on their favorite products? WooCommerce discount is the secret attention-grabbing element for your online store to acquire and retain customers and increase sales.
87% of abandoned shopping carts are recovered with discounts, and 67% of customers prefer discounts to shop online. So, you can use this evergreen sales strategy to promote your products and increase sales.
The default WooCommerce coupon feature needs customers to enter coupon codes at checkout, which is not an effective one-fit strategy for all online stores.
That’s why you can use the WooCommerce discount plugin like “Discount Rules for WooCommerce -Pro” to create automatic discounts that enhance customers’ checkout experience and increase your sales and revenue.
In this blog, we will discuss the detailed steps to add discounts in WooCommerce. We can also explore different discount types to create a unique sales strategy and solve every store’s needs.
Recover up to 47% of abandoned carts by offering personalized discounts using Discount Rules’s pre-built discount campaigns.
7 WooCommerce Discount Types
Creating different discounts in WooCommerce can be a great way to make your offer unique from competitors. Here are the seven different types of discounts to consider while creating your sales campaign:
- Percentage discounts: You can reduce the price of a product by a certain percentage, such as 15% on all products.
- Fixed discounts: Fixed discounts can reduce the product cost by a fixed amount, such as $10 off t-shirts.
- Category discounts: To increase sales, you can apply discounts only to specific categories without providing discounts to all products. For example, you could offer a 5% discount on “Men’s outfits.”
- Product discounts: Instead of categories, you can apply discounts only to specific products, such as a $10 discount on the cap.
- Cart discounts: You can enable discounts only when customers reach a specific amount in their cart total. For example, if they Spend $100, they get a 10% discount.
- Bulk Discount: Product prices are set based on their count. For example, Buy 1 to 3 t-shirts with $5 off and Buy 4 to 7 t-shirts with $10 off.
- BOGO Offers: Buy One, Get One (BOGO) deals are an attractive strategy. You can offer free or discounted products when customers buy another product at its original price. For example, you can offer Buy One, Get One Free (or Buy One and Get One at 15% off).
You can also create advanced and smart discount rules, such as:
- Discounts based on specific user roles, products, or categories.
- Discounts for first-time customers
- Discounts based on cart quantity or total
- Discounts based on purchase history and more.
You can customize these discounts based on customers’ purchase criteria and improve customer satisfaction.
Create multiple discounts for different customer groups using advanced discount templates in Discount Rules Pro.
How to Add a Discount in WooCommerce?
Adding a WooCommerce discount requires a discount plugin. In this tutorial, we will create discounts with different scenarios using the ‘Discount Rules for WooCommerce Pro’ plugin.
Check this installation guide to download and install this plugin to your WooCommerce store.
After installing the Discount Rules plugin, open WordPress Dashboard and go to WooCommerce -> Woo Discount Rules -> Add New Rule to create a new discount for your WooCommerce store.

Let’s see how to add a 10% discount in WooCommerce and discuss some more scenarios for your store.
Scenario 1: Storewide Discount in WooCommerce
Example: 10% discount on All Products in the Store.
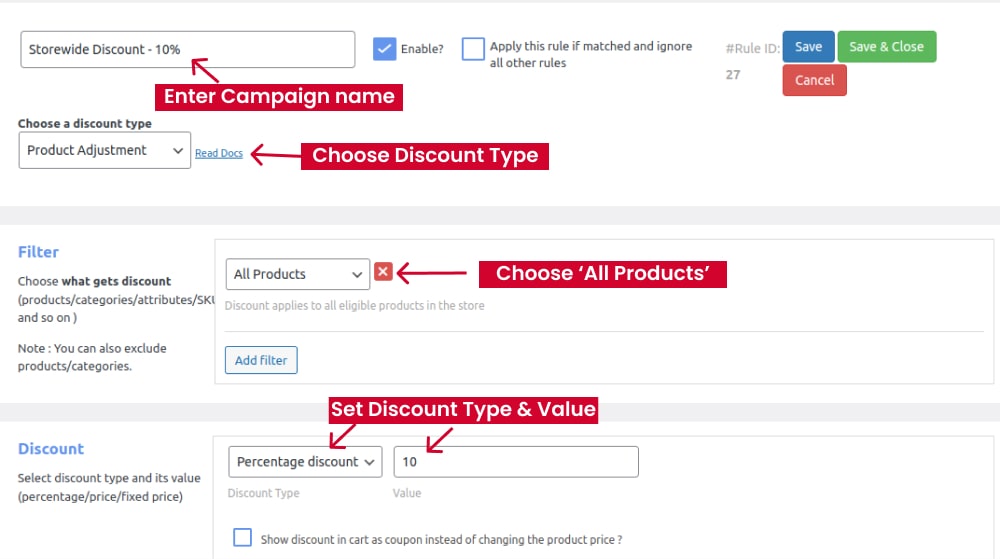
- Go to ‘Add New Rule’ and select Discount Type as ‘Product Adjustment.’
- In the ‘Filter’ section, choose ‘All Products’ to provide storewide discounts.
- In the ‘Discount’ section, select ‘Discount Type’ as ‘Percentage Discount’ and ‘Discount Value’ as ‘10.’
- Save the rule to activate it.
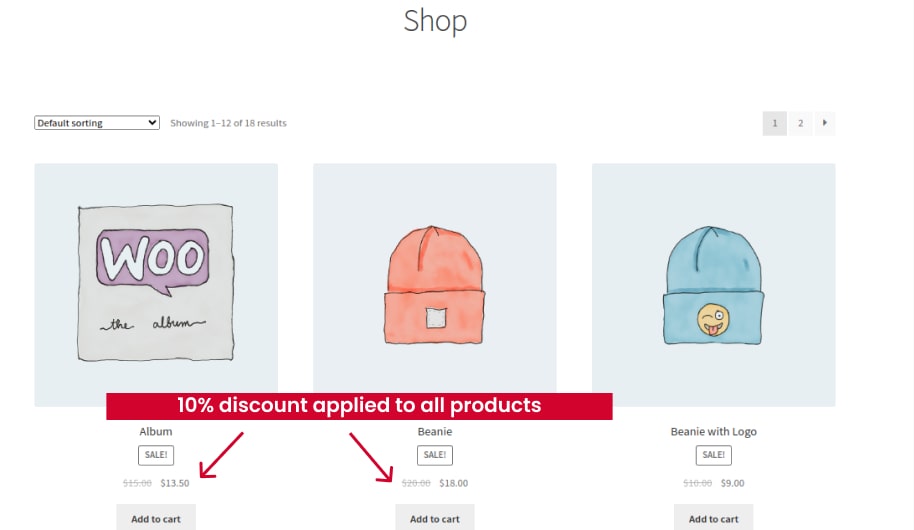
Now, a 10% discount is applied to all products in the store.
Scenario 2: Percentage Discount for Specific Product
Example: 15% discount on T-shirt
- After clicking ‘Add New Rule,’ provide a name for the discount.
- Select ‘Product Adjustment’ as the Discount Type.
- Under the ‘Products’ filter, choose ‘T-shirt.’
- In the Discount section, set the ‘discount type’ to ‘Percentage Discount’ and input the value as ’15.’ Save your settings.
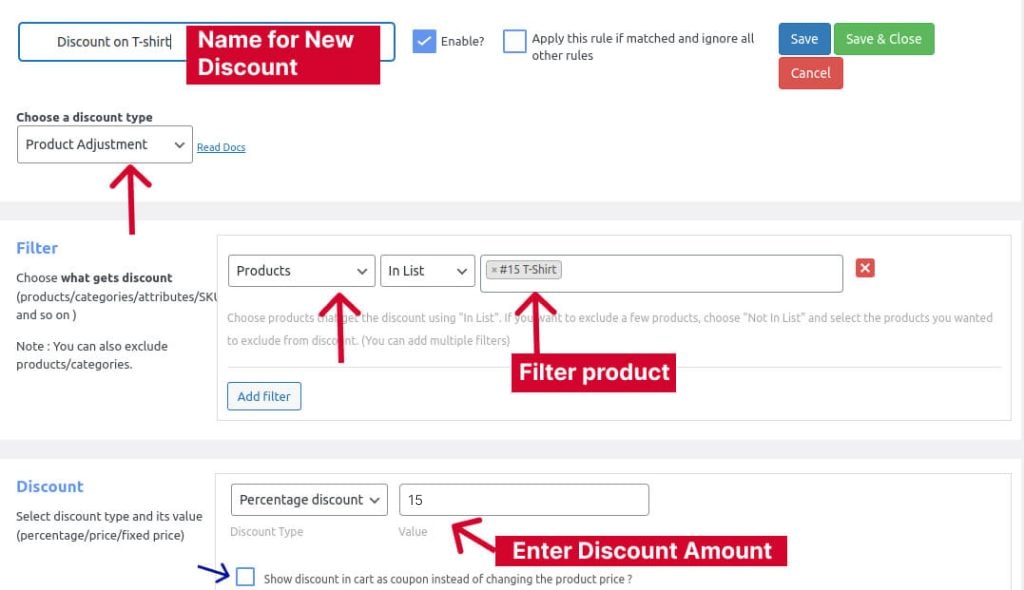
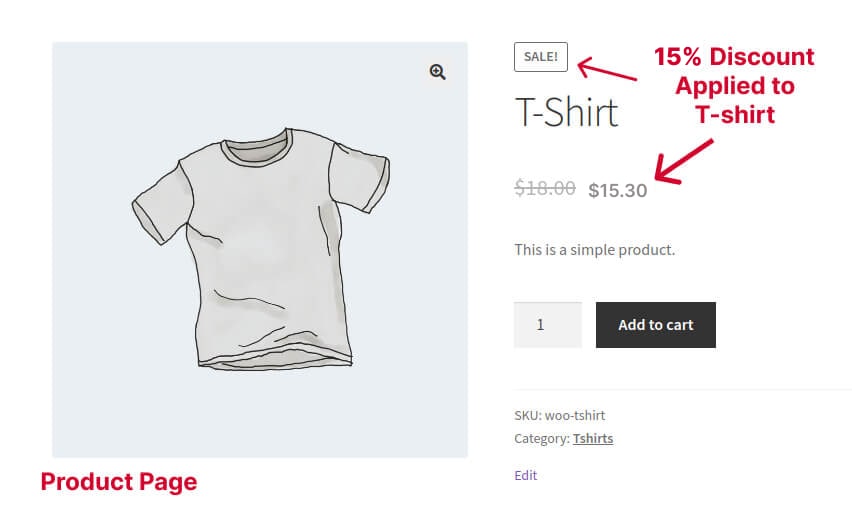
This will apply a 15% discount to the specific product on the product page. You can also enable a checkbox to display this discount in the Cart orders, rather than changing the product price on the product page.
Scenario 3: Fixed Discount For Specific Category
Example: $20 discount on the ‘Accessories’ category.
Show fixed discounts for specific categories using these steps:
- Choose ‘Product Adjustment’ as a discount type and filter the ‘Accessories’ category.
- Select ‘Fixed Discount’ and enter the discount value ‘20’.
- It will apply a 20% discount on all products in the ‘Accessories’ category.
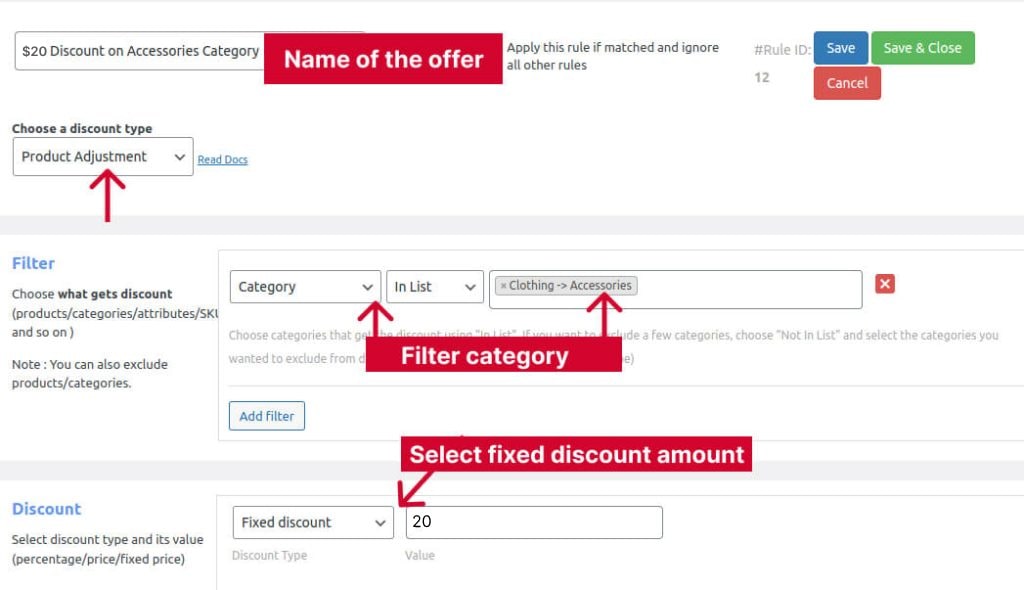
Scenario 4: Bulk discount for All Products
Example: Buy 5 to 10 and Get 5% Discount, Buy 11-15 and Get 10% Discount, Buy 16-20 and Get 15% Discount, and so on for All Products.
With the following WooCommerce discount configuration, create bulk discount offers on your store:
- Select ‘Discount Type’ as ‘Bulk Discount’ and set the filter to ‘All products’.
- Set ‘Count Quantities By’ as ‘Filters Set Above’ and enter the product quantity with a discount amount.
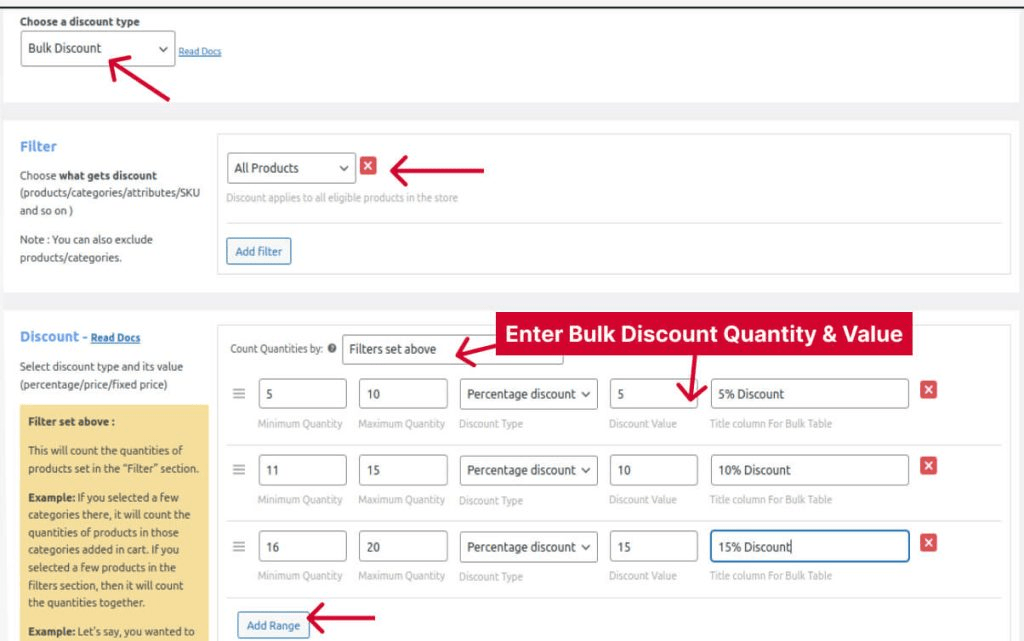
Now, when customers buy any products in more quantities, a suitable discount will apply to their orders.
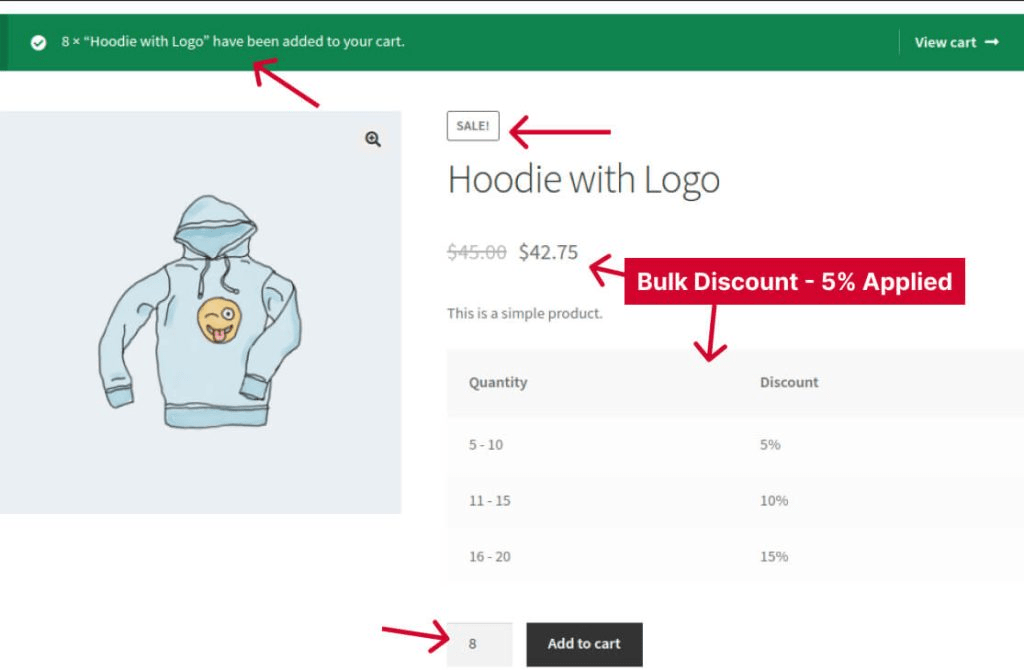
You can customize the Bulk Discount table – its design and text from the ‘Woo Discount Rules’ settings option. Also, you have more ways to create bulk pricing offers in WooCommerce with different scenarios.
Scenario 5: Buy X Get X Discount on All Products
Example: Buy One Get One Free, Buy Two Get Two Free, and so on for All Products.
Follow these steps for creating Buy X Get X discounts:
- Choose ‘Discount Type’ as ‘Buy X Get X’ and filter ‘All Products.’
- In Discount, enter the main and free quantity and choose ‘Free’ as ‘Discount Type.’
- Finally, click the ‘Recursive’ box to continue the same offer for Buy 2 Get 2, Buy 3 Get 3, and so on. If you want to offer only for one time, then uncheck the Recursive box.
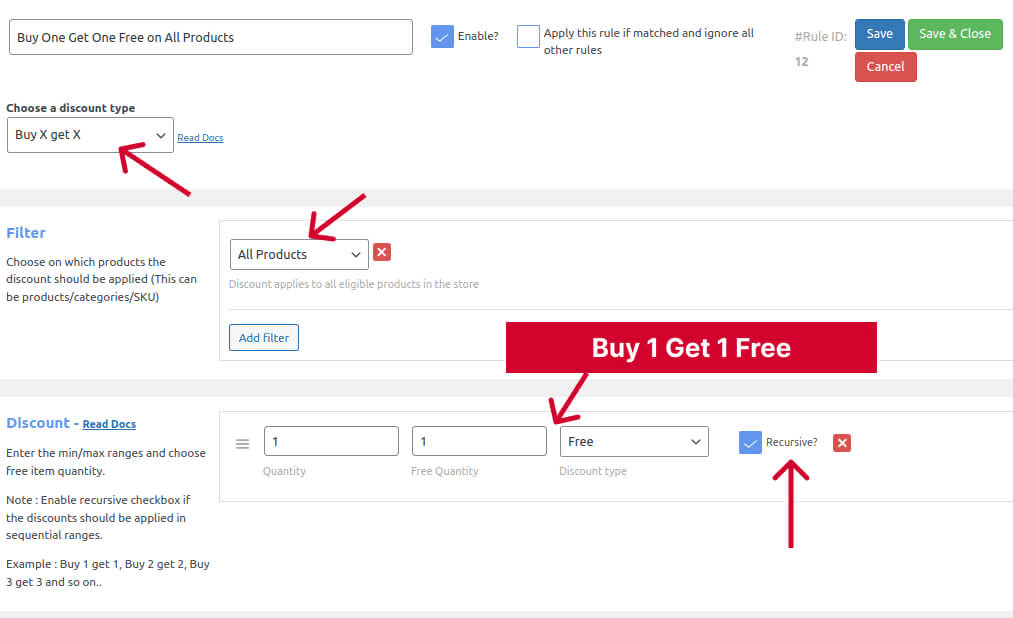
You can use the Buy X Get X formula for specific products or categories. Also, you can create different scenarios like:
- Buy two and get one at a 5% discount
- Buy two and get 1one free and more.
Scenario 6: Buy X Get Y on Specific Product
Example: Buy a t-shirt and get a free cap. Configure your Buy X Get Y discount rule using the below steps:
- Choose the ‘Discount Type’ as ‘Buy X Get Y.’
- Now, select the ‘X’ product in the filter section.
- In the discount section, select ‘Discount Type’ as ‘Buy X Get Y– Products’ and choose the ‘Y’ product that you want to provide for free or discounted price.
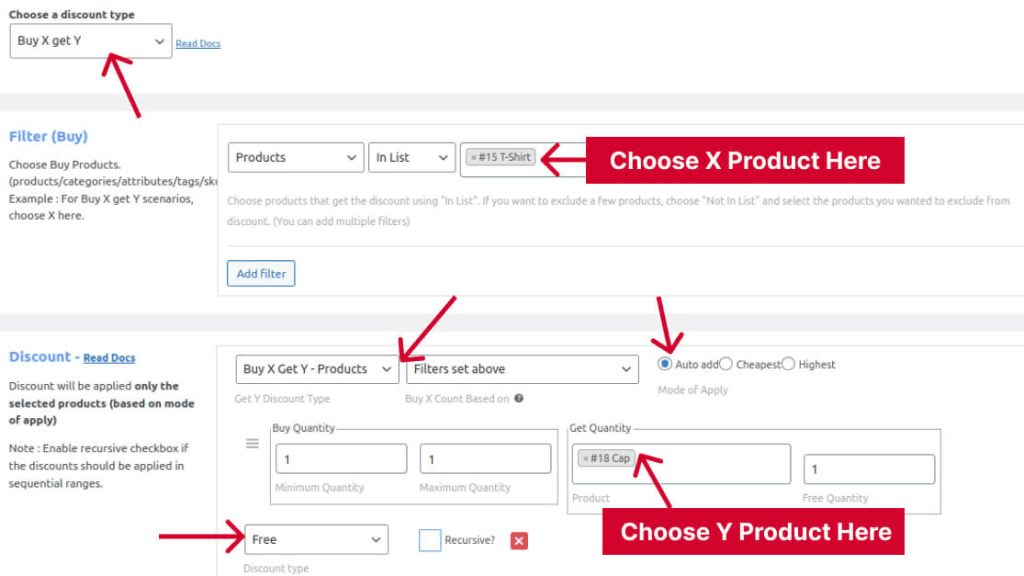
You can also create various Buy X Get Y discount scenarios.
Scenario 7: Discounts Based on Specific Purchase Conditions
Example: Let’s take a cart total-based discount condition – a $25 fixed discount when you spend $500.
Follow this WooCommerce discount setup to set conditions for the cart discount:
- Choose ‘Discount Type’ as ‘Cart Adjustment’ and filter products.
- Choose ‘Fixed Discount’ and Enter ‘$25’.
- In the Condition box, select ‘Condition Type’ as ‘SubTotal’ and Enter ‘SubTotal Amount’ as ‘500’.
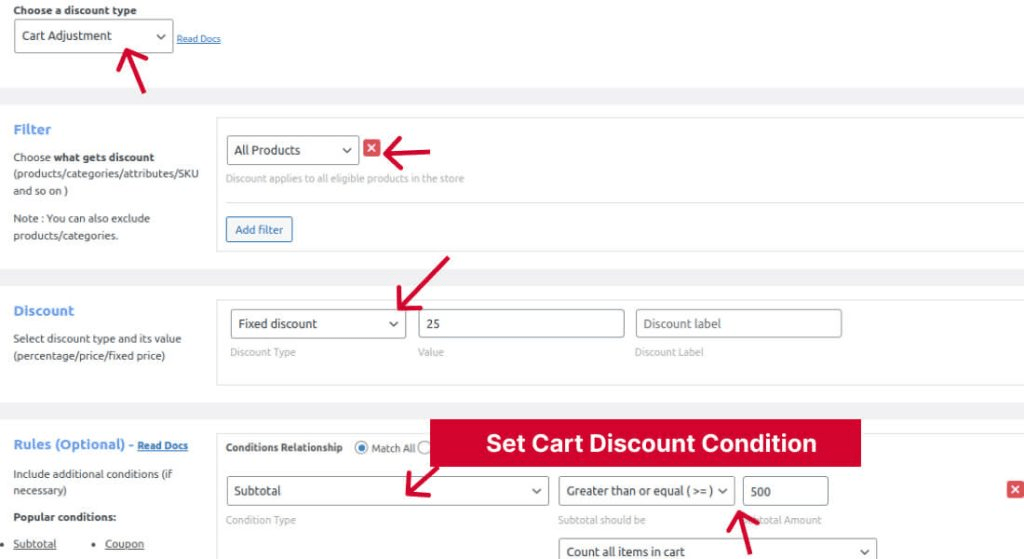
The cart discount is applied now. You can create different conditions for cart discounts.
WooCommerce Discounts vs WooCommerce Coupons
This is how discounts differ from coupons in WooCommerce:
Discounts: Discounts allow customers to automatically enjoy the offer without the need for a coupon code. This can be particularly effective for site-wide sales or promotions.
Coupons: Coupons, on the other hand, require customers to enter a designated coupon code during the checkout process to claim the offer. This approach can be a powerful tool for tracking the success of specific marketing campaigns and understanding customer behavior.
Note: You can learn more about coupons in this “Complete Guide to WooCommerce Coupons.”
Offer customized discounts and coupons using the Discount Rules Pro to boost your sales and customer loyalty.
Conclusion
Creating a discount in WooCommerce is a valuable strategy for attracting and retaining customers. Offering the right discount type helps you reach your target customers, increase revenue, and enhance customers’ shopping experience.
You must choose the best-performing discount strategy for your store to encourage customers to purchase more.
The ‘Discount Rules for WooCommerce Pro’ plugin provides features for creating customized discount offers. It can simplify your discount campaign process.
Also Read:
1. How to offer free shipping in WooCommerce?
2. How to create customer-specific discounts in WooCommerce?
Frequently Asked Question
WooCommerce discounts are promotional price reductions that you can apply to products in your WooCommerce-based online store. These discounts are designed to attract and retain customers, boost sales, and enhance the overall shopping experience. You can create a variety of discount types, such as percentage discounts, fixed amount discounts, buy-one-get-one (BOGO) deals, and more, to incentivize customers to make purchases.
Discounts in WooCommerce are essential for many reasons:
(1) It acquires new customers and retains existing ones to buy more products.
(2) It recovers cart products from abandonment.
(3) The personalized discounts add value to customers’ purchases and enhance their engagement and loyalty with your store.
(4) The discounts with conditions will help you reach target customers and increase sales and revenue.
WooCommerce dynamic pricing and discounts refer to low pricing strategies for products or categories that encourage customers to purchase more items.
WooCommerce store owners can reduce product prices or provide discounts based on their sales, customer behaviors, user roles, order quantities, and more.
You can create a coupon code in WooCommerce by going to your WordPress dashboard -> Marketing -> Coupons.
If you are looking for advanced coupons, you will need a plugin like Discount Rules for WooCommerce, which can help you offer customized coupons for user roles, specific customers, and more.
Using the Discount Rules PRO plugin for WooCommerce, you can create a custom discount for the cart. The plugin lets you create a discount rule that automatically applies a discount to the cart. You can apply discounts based on total, products, categories, or user role conditions.
Follow these steps to add a discount sale tag in WooCommerce using the ‘Discount Rules for WooCommerce Pro’ plugin:
1. Navigate to the WordPress Dashboard -> WooCommerce -> Woo Discount Rules.
2. Select the Settings option in the Discount Rules plugin.
3. Go to Product -> On-sale badge.
You can turn on or off the sale tag for your discounts and offers.
Add a free shipping to a WooCommerce product with these steps:
1. Open the ‘Discount Rules’ plugin dashboard.
2. Add a New Discount Rule and choose ‘Free Shipping’ as a ‘Discount Type.’
3. Now, choose the products as conditions and select the product you want to provide free shipping.
You can offer free shipping using various conditions of your WooCommerce store.
Discounts in WooCommerce are typically set up in your WordPress admin dashboard, specifically in the WooCommerce settings. You can create discounts based on different criteria, including product categories, specific products, user roles, or cart conditions. Customers who meet your defined criteria will see discounted prices during their shopping experience.
Yes, WooCommerce allows you to offer percentage-based discounts easily. You can specify the discount percentage, and when customers add eligible products to their cart, the system will automatically calculate and apply the discount. Percentage discounts are a common and effective way to entice customers to make purchases.
While WooCommerce offers a wide range of discount options, it’s important to be mindful of potential limitations. Some complex discount scenarios may require advanced plugins or custom development. Additionally, extensive use of discounts may affect your store’s profitability, so it’s crucial to strike a balance between attracting customers and maintaining profitability.
Incorporating coupon code discounts in WooCommerce includes a few steps below:
1. Go to the WordPress Dashboard and navigate to ‘Marketing -> Coupons.’
2. Click ‘Add Coupon’ and enter your own code.
3. In ‘Coupon Data,’ set your discount type and coupon amount.
4. Finally, click ‘Publish’ to activate the coupon discount code in your WooCommerce store.
To create automatic discounts in WooCommerce, you can use plugins like ‘Discount Rules for WooCommerce Pro.’


