When you display products by category in your WooCommerce store, it improves your customers’ shopping experience by helping them find what they’re looking for more easily.
You have several helpful options for displaying your product categories, from the simplest built-in solutions to fully customized category showcases.
In this comprehensive tutorial, we’ll explore five easy methods to category display—from no-code solutions using WooCommerce’s native features to custom code implementations that give you complete control over the look and functionality of your category pages.
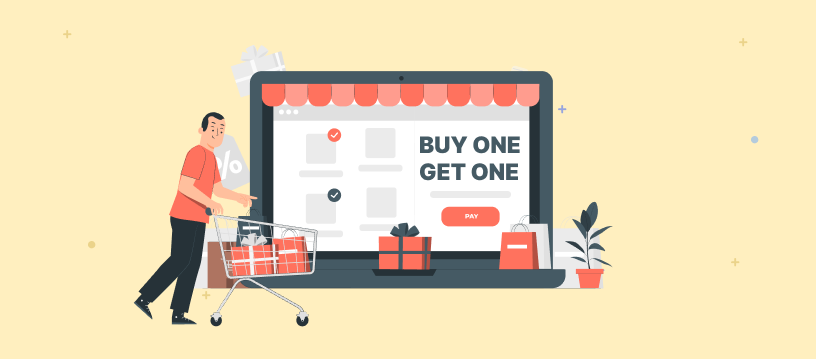
Create category-specific discounts, bulk offers, and BOGO deals that will delight your customers using flycart’s discount rules easily.
Method 1: Using the Default WooCommerce Category Pages
WordPress and WooCommerce automatically create category pages when you set up product categories.
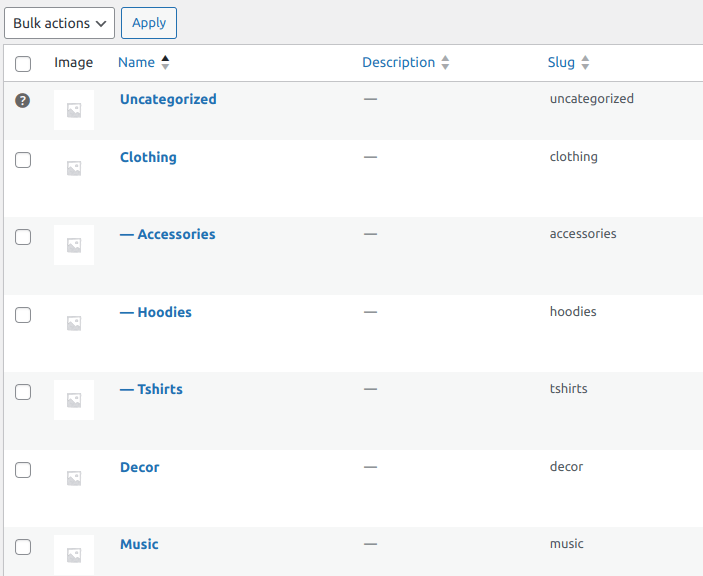
1. Create product categories
- Go to Products -> Categories in your WordPress dashboard
- Add a category name, slug (URL-friendly version of the name), and description for each category.
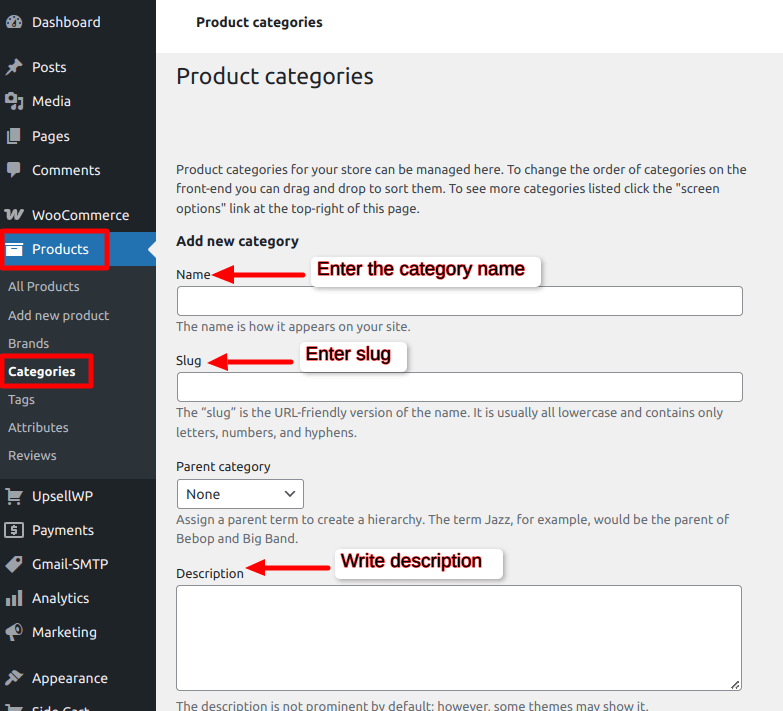
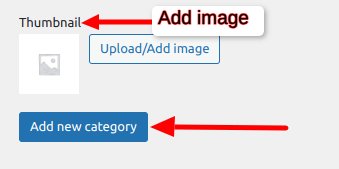
- Optionally upload a category thumbnail image
- Click “Add new category”
2. Assign products to categories
- Edit each product or use bulk edit to assign products to the appropriate categories
- You can assign a product to multiple categories if needed
3. Access your category pages
- Go to Appearance -> Customize -> WooCommerce ->Product Catalog.
- Under shop page display, choose what to display on the main shop page, like products, subcategories, or both.
- Under Category display choose what to display on the product category pages, like products, subcategories, or both.

The default category pages use your theme’s layout and can be accessed from your shop page or menu. This is the simplest method, as it requires no coding.
Related reading: Learn how to offer discounts on specific categories in WooCommerce using Flycart’s Discount Rules plugin. – Related Reading
Method 2: Creating a Custom Category Display with Shortcodes
WooCommerce provides shortcodes that allow you to display specific product categories anywhere on your site.
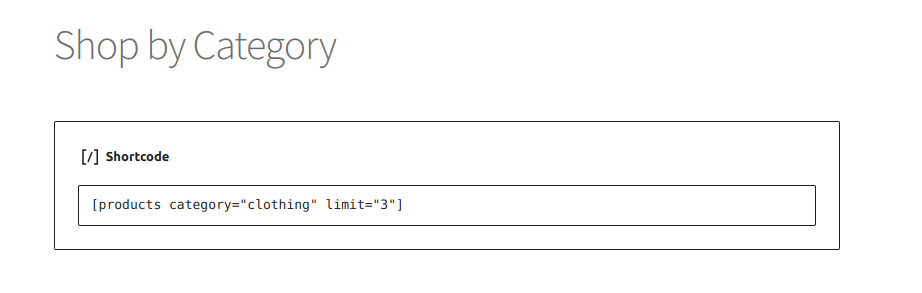
1. Create a new page
- Go to Pages -> Add New
- Give your page a title (e.g., “Shop by Category”)
2. Use the WooCommerce shortcode
- Add this shortcode: [products category=”category-slug” limit=”3″] to display all products from a specific category
- Replace “category-slug” with your actual category slug
- The “limit” parameter controls how many products to display
3. Advanced shortcode options
- Show products from multiple categories: [products category=”category-1,category-2″ limit=”12″]
- Order products by specific parameters: [products category=”category-slug” orderby=”price” order=”ASC” limit=”12″]
- Display products in columns:[products category=”category-slug” limit=”12″ columns=”4″]
4. Add the page to your navigation menu
- Go to Appearance -> Menus
- Add your new page to the appropriate menu
This method gives you more control over which categories to display and where they appear on your site.
Method 3: Creating a Custom Categories Grid Page
To create a visually appealing grid of all your product categories:
1. Create a new page
- Go to Pages -> Add New
- Give it a title like “Shop by Category”
2. Use the product categories shortcode
- Add this shortcode to display a grid of all your categories: [product_categories number=”0″ columns=”4″]
- “number=0” shows all categories
- “columns=4” displays them in 4 columns
3. Customize the display
- Show only parent categories: [product_categories number=”0″ parent=”0″ columns=”3″]
- Show specific categories by ID: [product_categories ids=”21,45,78″ columns=”3″]
- Hide empty categories: [product_categories number=”0″ columns=”4″ hide_empty=”1″]
This creates a visual directory where customers can browse through all your product categories at once.
Now that you’ve organized your categories, let’s boost your sales! Create targeted promotions for specific product categories with Flycart’s Discount Rules plugin.
Method 4: Using Widgets in Sidebars or Other Widget Areas
If your theme supports widgets, you can use them to display product categories:
- Go to Appearance → Widgets
- Find the “Product Categories” widget
- Drag it to your sidebar or another widget area
- Configure the widget settings
- Title: Give it a name like “Browse by Category”
- Display type: Choose between dropdown or list
- Show product counts: Toggle on/off to show how many products are in each category
- Show hierarchy: Toggle on/off to display parent-child category relationships
- Click “Save”
This approach works well for displaying categories in sidebars while customers browse other parts of your store.
Also read: Discover multiple techniques to display discounts on WooCommerce Product and Cart Pages.
Method 5: Using Code to Create a Custom Category Display
For more advanced customization, you can use PHP code in your theme files:
1. Create a template file (e.g., template-categories.php)
2. Add this code to display product categories:
    <?php
    /*
    Template Name: Product Categories
    */
    get_header();
    ?>

    <div class="container">
        <h1>Shop by Category</h1>

        <div class="product-categories">
            <?php
            $categories = get_terms( array(
                'taxonomy' => 'product_cat',
                'hide_empty' => true,
            ) );

            if ( !empty($categories) ) {
                foreach ( $categories as $category ) {
                    // Get category image
                    $thumbnail_id = get_term_meta( $category->term_id, 'thumbnail_id', true );
                    $image = wp_get_attachment_url( $thumbnail_id );

                    // Get category link
                    $link = get_term_link( $category, 'product_cat' );

                    echo '<div class="category-item">';

                    if ( $image ) {
                        echo '<a href="' . esc_url( $link ) . '"><img src="' . esc_url( $image ) . '" alt="' . esc_attr( $category->name ) . '" /></a>';
                    }

                    echo '<h2><a href="' . esc_url( $link ) . '">' . esc_html( $category->name ) . '</a></h2>';
                    echo '<p>' . esc_html( $category->description ) . '</p>';
                    echo '<p><a href="' . esc_url( $link ) . '" class="button">View Products</a></p>';
                    echo '</div>';
                }
            }
            ?>
        </div>
    </div>

    <?php get_footer(); ?>
3. Create a new page
- Go to Pages -> Add New
- Give it a title
- Select “Product Categories” from the Template dropdown in the Page Attributes section
- Publish the page
4. Add some CSS to your theme’s style.css file for better styling:
    .product-categories {
        display: flex;
        flex-wrap: wrap;
        gap: 20px;
    }

    .category-item {
        flex: 0 0 calc(33.33% - 20px);
        border: 1px solid #eee;
        padding: 20px;
        text-align: center;
        transition: all 0.3s ease;
    }

    .category-item:hover {
        box-shadow: 0 5px 15px rgba(0,0,0,0.1);
    }

    .category-item img {
        max-width: 100%;
        height: auto;
    }

    .category-item .button {
        display: inline-block;
        padding: 10px 20px;
        background-color: #333;
        color: #fff;
        text-decoration: none;
        margin-top: 10px;
    }
This method gives you complete control over the layout and design of your category display.
Tips for Optimizing Your Category Displays
- Use clear, descriptive category names that customers will understand
- Add category images to make browsing more visual and engaging
- Write helpful category descriptions to guide customers
- Implement a hierarchical structure with parent and child categories for stores with many products
- Consider the user journey – place category navigation where it’s most useful
- Test your category pages on mobile devices to ensure they’re responsive
- Monitor analytics to see which categories get the most traffic and optimize accordingly
Troubleshooting Common Issues
If your category pages aren’t displaying correctly, check these common issues:
- Missing products? Make sure products are assigned to the correct categories
- Styling problems? Your theme might need custom CSS adjustments
- Pagination issues? Check your WooCommerce settings for “Products per page”
- Category links not working? Try resetting your permalink structure
- Images not showing? Ensure you’ve uploaded category thumbnail images
Flycart’s Discount Rules for WooCommerce plugin helps over 70,000+ store owners create powerful, category-based discount strategies
Final Words
Implementing effective product category displays in your WooCommerce guides customers seamlessly from browsing to checkout.
The methods we’ve covered offer solutions for every skill level and store size, allowing you to choose the approach that best fits your unique needs.
Most importantly, always consider your customers’ perspective. Categories that make perfect sense to you as a store owner might not be intuitive to your shoppers. Collect feedback, conduct usability testing, and continuously refine your approach.
Other helpful resources:
- How to Sell WooCommerce Digital Download Products?
- How to Set Up WooCommerce Shipping Options
- How to Set Up WooCommerce Dynamic Pricing and Discounts?
- 5 Best WooCommerce Product filter plugins (Free + Paid)
- 5 Best WooCommerce Subscription Plugins in 2025
- 5 Best WooCommerce Discount Plugins (Free & Paid)
- 7 Best Bulk Discount Plugins For WooCommerce Stores
- 5 Best WooCommerce Coupon Code Generator