Offering quantity-based discounts to your products and displaying them on a WooCommerce tiered pricing table is a great way to inform customers about the offers, which, in turn, increases your sales indirectly.
In the ‘tiered pricing’ strategy, the product price decreases as the quantity of products purchased increases. The final prices are shown on a Quantity-based pricing table in the WooCommerce store.
Since WooCommerce doesn’t have this feature, you need to install a tiered pricing table add-on to your WooCommerce store. With the Discount Rules for WooCommerce – PRO plugin, you can easily add a tiered pricing table to your WooCommerce store even without coding.
Below is your setup guide to create a tiered pricing table for WooCommerce store. In addition to displaying a table, store owners can create additional conditions and show flexible discount tables to customers.
Help your customers make faster purchasing decisions by showing a structured tiered pricing table using the Discount Rules plugin.
Benefits of Displaying WooCommerce Tiered Pricing Table
Several businesses use a WooCommerce tiered pricing table, which offers many benefits. Here is a list of some of them.
- Increased Sales Volume: Displaying a product in a tiered pricing table will motivate customers to buy more of it, thereby increasing the sales volume in your WooCommerce store.
- Transparency: Showing a clear picture of all the pricing slabs helps customers make an informed decision.
- Stock Clearance: If you have excess stock in your inventory, offering quantity-based pricing and showing them on a tiered pricing table encourages customers to buy more.
- Encourage Buying: Pricing tables are a visual cue that encourages customers to buy more products and increases the sales volume in your WooCommerce store.
- Targeted Discounts: Increase customer retention by providing dynamic pricing in your WooCommerce store. The resulting pricing table becomes flexible and varies based on each customer.
How to Display WooCommerce Tiered Pricing Table
Adding a WooCommerce Tiered Pricing table to your store requires installing a plugin like Discount Rules for WooCommerce — PRO.
Once you’ve done this, you must create a discount rule using the plugin and enable the pricing table on the product page. Here’s the step-by-step procedure to add a WooCommerce tiered pricing table.
Step 1: Install the Discount Rules Plugin in WooCommerce
To add a tiered Pricing table to your store, you need to install a WooCommerce pricing table plugin, ‘Discount Rules’ first.
- Go to your WordPress Dashboard and click “Plugins”.
- Select “Add New Plugin” and tap on the search tab.
- Search for the “Discount Rules for WooCommerce” plugin and click “Install Now”.
Once the plugin is downloaded, it will be integrated with your WooCommerce store.
Step 2: Create a Bundle/Bulk Discount Rule in WooCommerce
The tiered pricing structure can only be shown for Bundle and Bulk discounts. Here’s how we create these discount types using Discount Rules.
- Open WordPress -> WooCommerce -> Discount Rules.
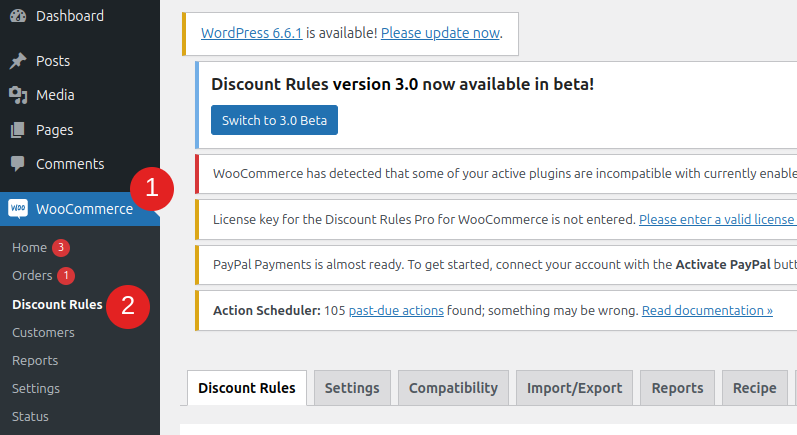
- Set the discount type as either Bulk Discount or Bundle (Set) Discount. Here’s an example of both the rules.
a) Bulk Discount
Bulk Discount involves setting the maximum and minimum quantity for the products. Customers who buy any quantity within those limits will get the required discount. Let us create a bulk discount in WooCommerce for “Football”.
*Football Buy 4 Get 10% Discount, Buy 8 Get 15% Discount, Buy 12 Get 20% Discount*
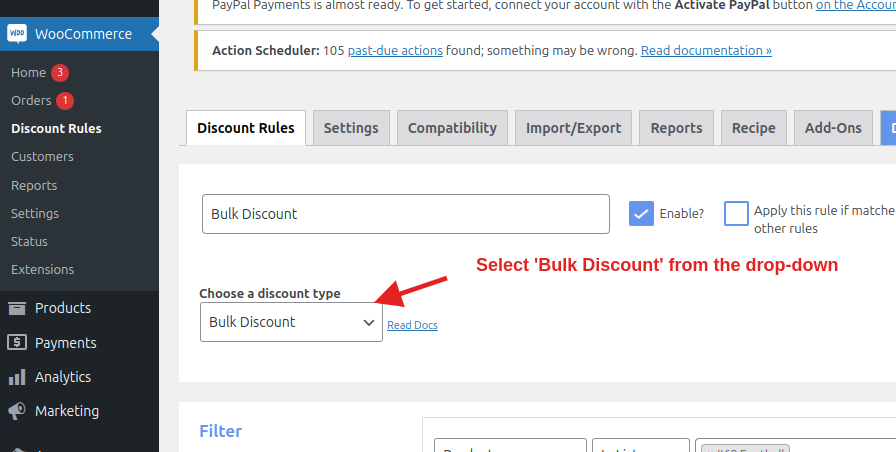
- Select “Bulk Discount” from the discount type drop-down.
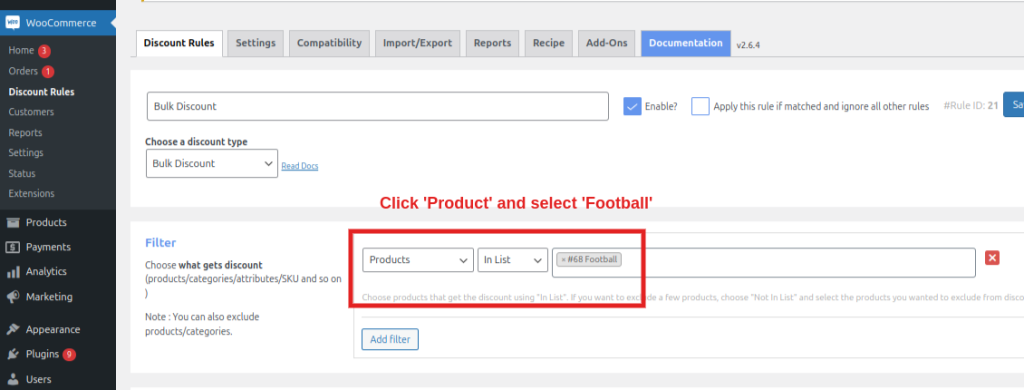
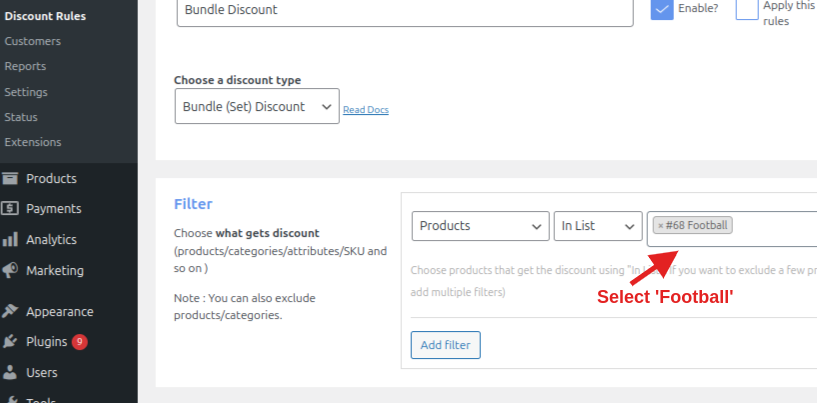
- In the Filter section, select “Products” -> Football.
- Now, enter the product’s minimum and maximum purchase quantities along with the discount percentage. The image below shows how these values need to be entered.
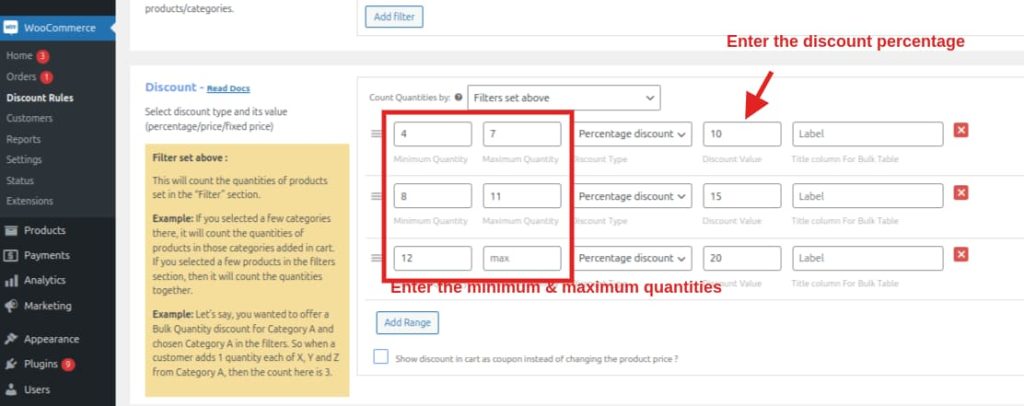
Tip: Click “Add Range” to add as many ranges as possible.
- Click “Save” and create the bulk discount rule.
Make your bulk discounts visible to your customers by displaying prices in a tiered pricing table that increases conversions using the Discount Rules plugin.
b) Bundle Discount (Set)
Unlike Bulk, WooCommerce Bundle Discount (Set) requires you to enter only the maximum product quantity. Customers need to buy the entire bundle to get the required discount. If they fall short, the discount won’t be applied. Let us create a WooCommerce Bundle discount for Football.
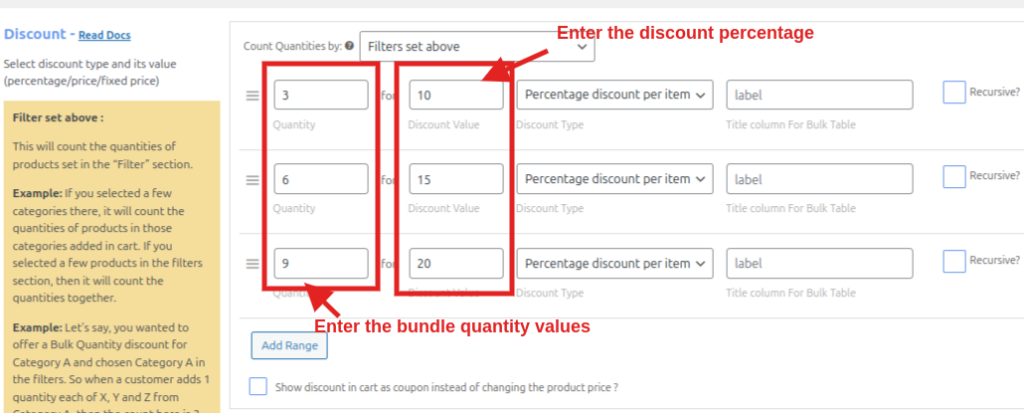
*Buy 3 Get a 10% Discount, Buy 6 Get a 15% Discount, Buy 9 Get a 20% Discount on each item*
- Select “Bundle (Set) Discount” as the discount type.
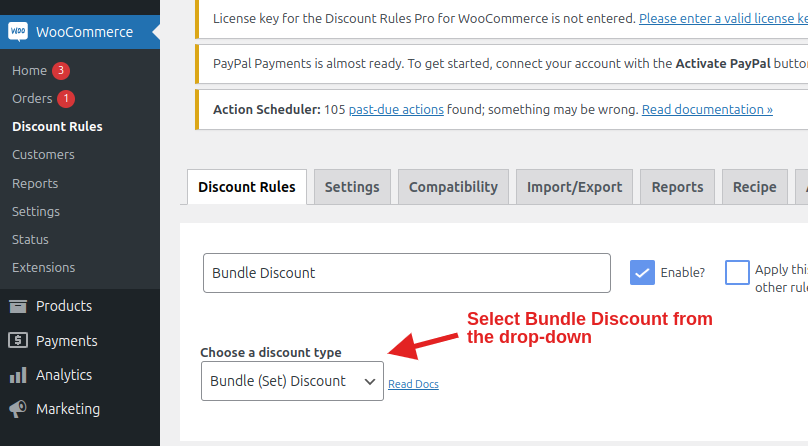
- Click “Products” and select “Football”.
- In the Discount section, enter the quantity and the discount values. The below image shows how the values are applied.
- Once the values are updated, click “Save” at the top and create the rule. The created rule will be applied to your WooCommerce store.
Tip! You can also setup product variations discount pricing and display the WooCommerce Tiered pricing table for variable products.
Step 3: Enable WooCommerce Tiered Pricing Table
Follow these steps to enable tiered pricing on the WooCommerce product page.
- Go to WordPress -> WooCommerce -> Discount Rules -> Settings.
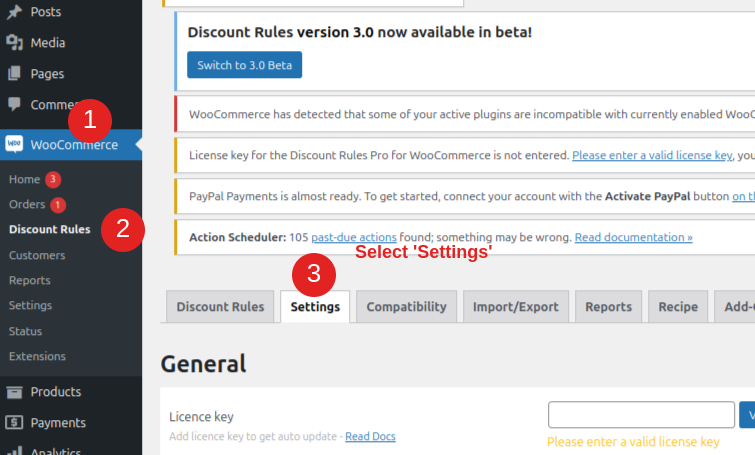
- Scroll down to the “Product” section and enable the “Show discount table”.
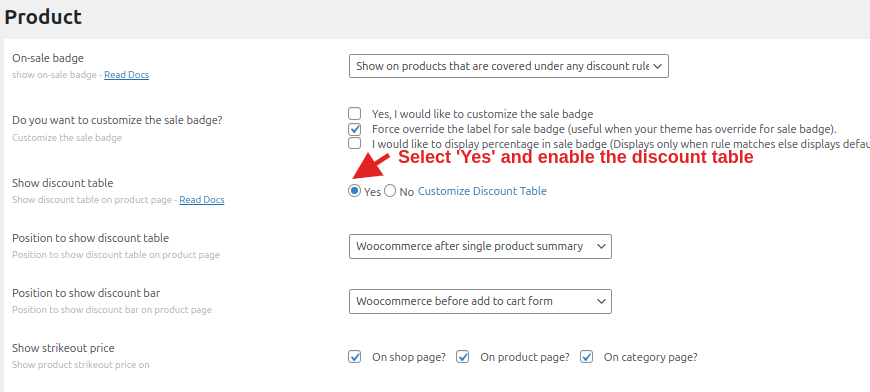
If you’ve enabled the Bulk Discount rule, the WooCommerce tiered pricing table will look like this.

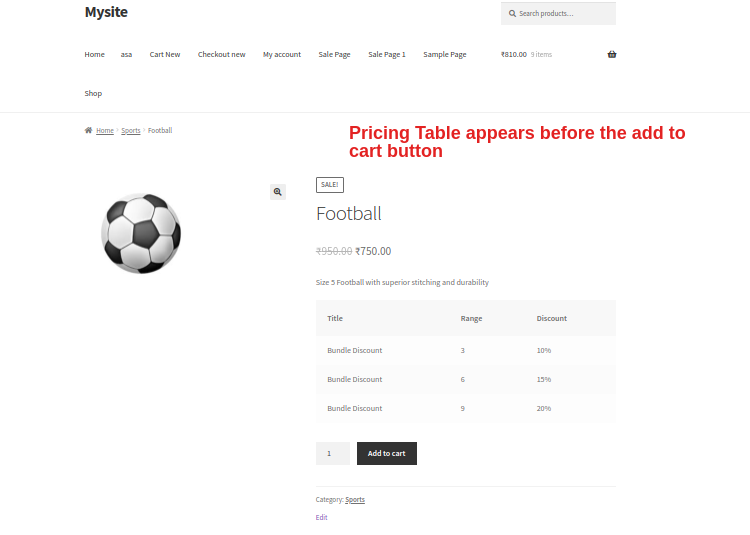
For the Bundle (Set) discount rule, this is how the pricing table will look like.

The above discount matrix shows information such as the discount Value and order quantity in multi-tiers.
Step 4: Select Tiered Pricing Table Position
Discount Rules plugin lets you display a tiered pricing table wherever you want to. This flexibility allows you to strategically place the tiered pricing where it can maximize visibility and boost sales.
- From your WordPress Dashboard, click “WooCommerce” -> Discount Rules.
- Select “Settings” and get to the “Product” section.
- Click on the “Position to show discount bar” drop-down and select any position you want. Below is the list of all the table positions available.
- WooCommerce before single product summary
- WooCommerce product meta end
- WooCommerce product meta start
- WooCommerce after add to cart form
- WooCommerce after single product
- WooCommerce before add to cart form
- WooCommerce after single product summary
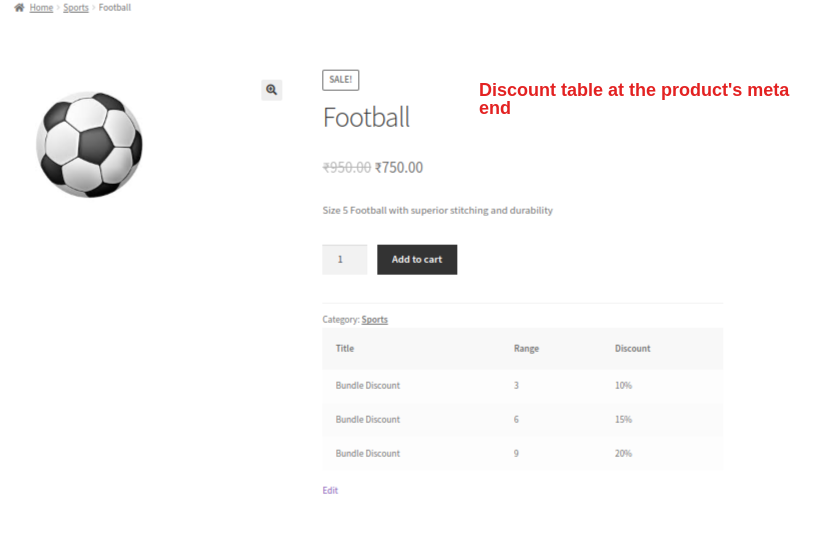
Here’s what the tiered pricing table will look like on some of the positions.
WooCommerce before add to cart form
WooCommerce product meta end
Step 5: Set Additional Discount Conditions on Pricing Table
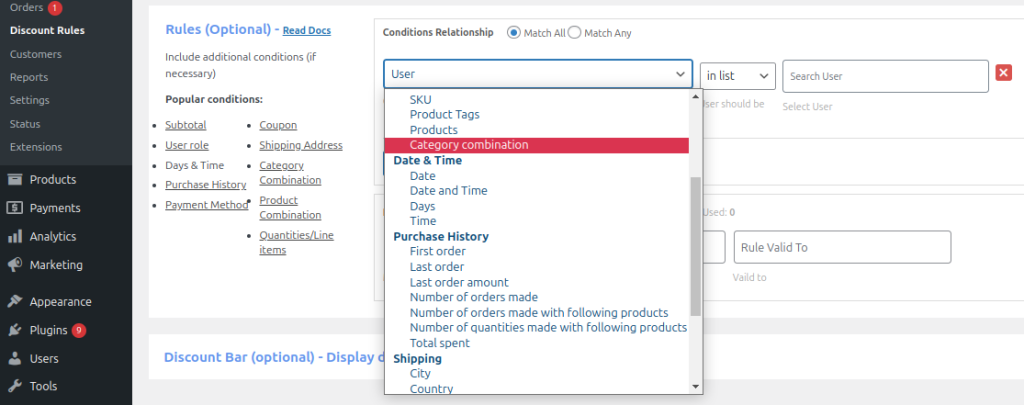
Users can set additional restrictions to the tiered pricing table based on different user roles, shipping addresses, payment methods, specific product categories, etc, and create a more targeted discount campaign.
As a result, customers will see a WooCommerce dynamic discount table that changes depending on each user, location, or product.
The image below shows some discount conditions you can set in the Discount Rules plugin and create a Dynamic Pricing Table.
Here’s an example of how to offer discounts only to ‘Specific Users’. Let’s assume you have a preset bundle/bulk discount in WooCommerce. Now,
- Go to WooCommerce -> Discount Rules -> Select the Bundle/Bulk discount rule you created.
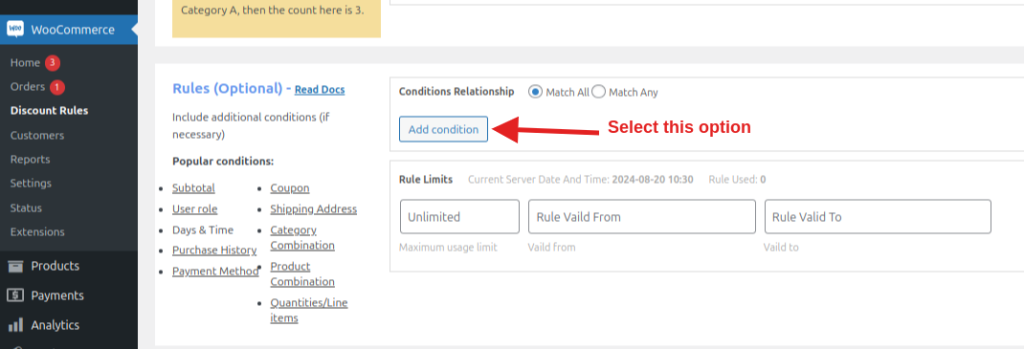
- Scroll to the “Rules (Optional)” section and click “Add Condition”.
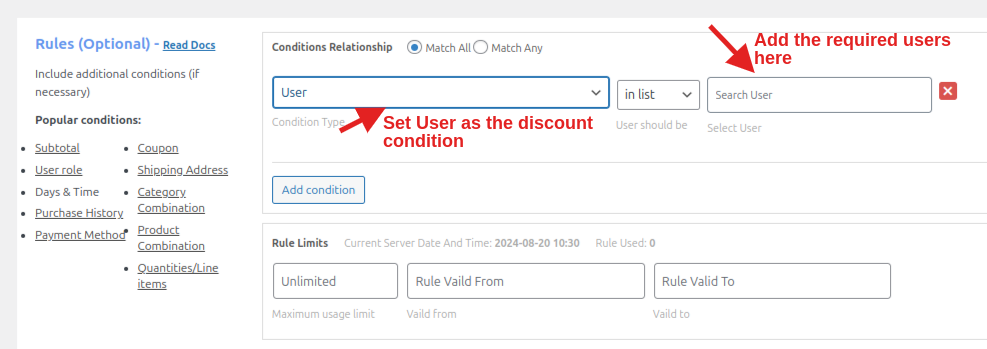
- Select “User” from the drop-down and enter the User name in the search user field. You can add as many users as you want.
- Once you’ve done this, click the “Save” button at the top. After this, only the selected users will receive the discount and be shown a WooCommerce flexible discount table.
Similarly, you can create tiered pricing with custom rules and display the table for specific user roles, seasonal discounts, B2B customers, etc.
How to Customize WooCommerce Tiered Pricing Table
Customizing a WooCommerce Pricing Table involves adding or removing specific options from the tiered pricing table. Follow the below steps to configure the discount table to your needs.
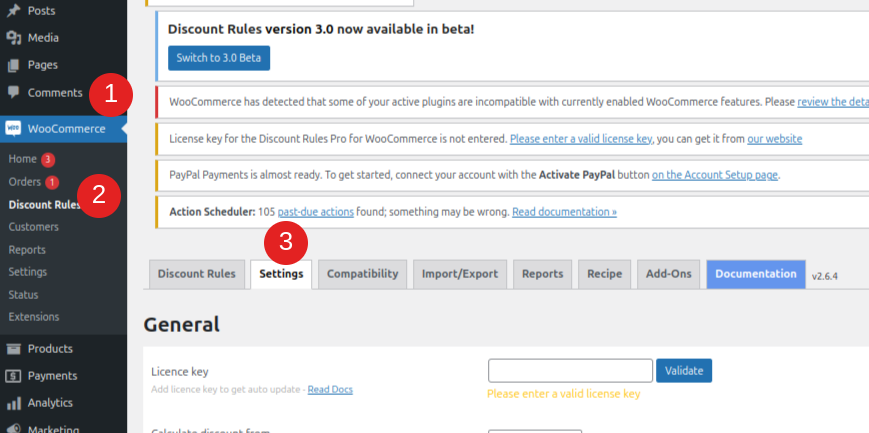
- Select “Discount Rules” and go to its “Settings”.
- Get to the “Product” section and click “Customize Discount Table”.
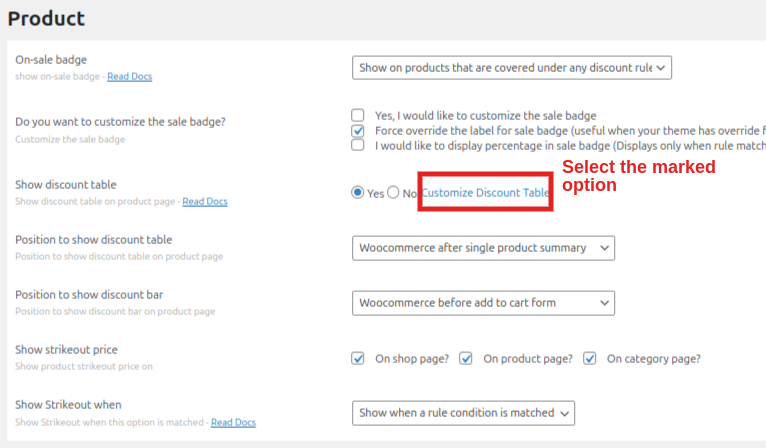
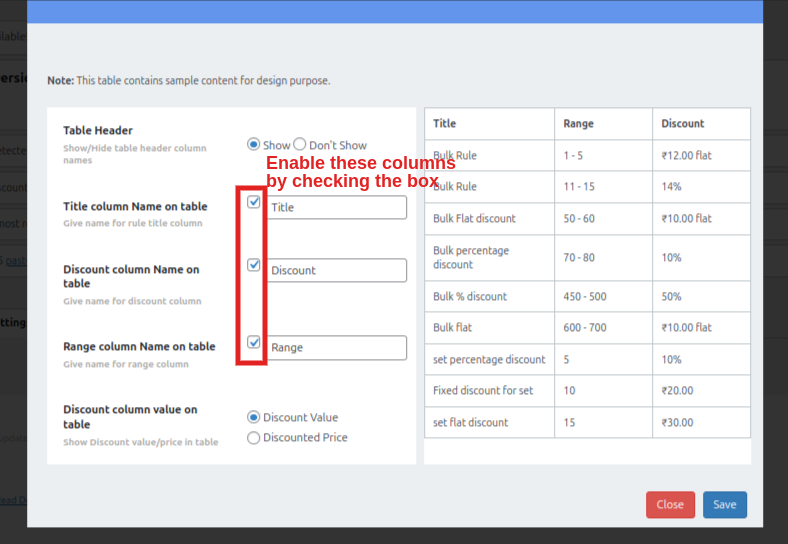
- The Discount Table has three columns: Title, Range, and Discount. By clicking on the check box marked in the image below, you can either remove or add the respective columns.
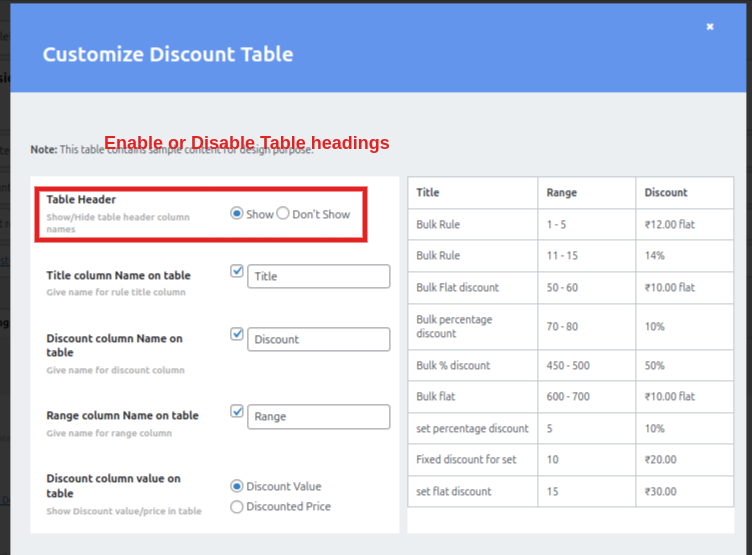
- You can also display/hide headings on the discount table.
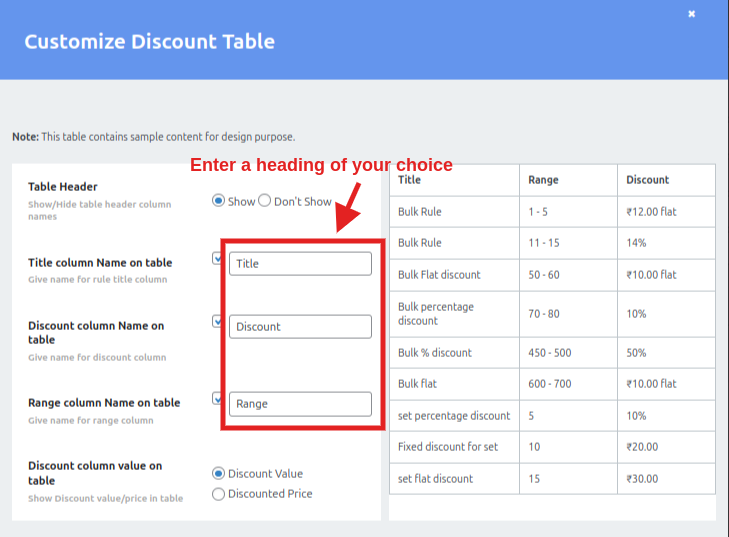
- Enter the name of your choice in the below field and chage the heading name of each column.
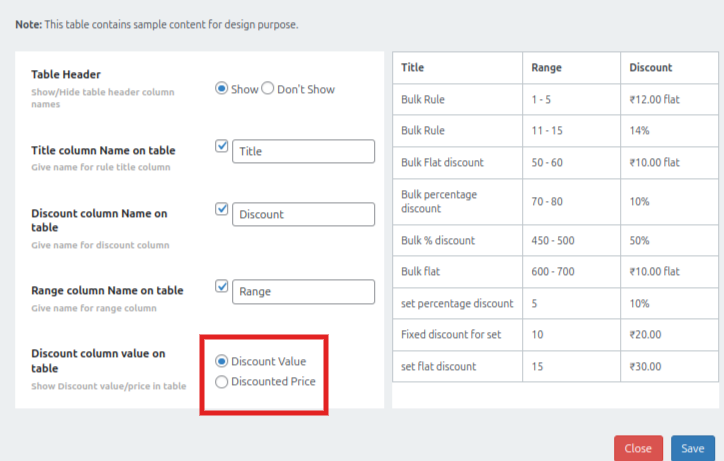
- If you want to display the discount value offered in the Discount column, choose the “Discount Value” option. Choose “Discounted Price” if you want to show the final price of the product.
Once you have made all the changes, click the “Save” button and apply them to your WooCommerce store.
Increase conversions by strategically placing your tiered pricing table in your WooCommerce store using the Discount Rules plugin.
Conclusion
By displaying a WooCommerce tiered pricing table, customers can easily understand all the discount slabs available for the product. This pricing strategy in WooCommerce encourages customers to know all the discount levels and encourages them to buy more.
Discount Rules for WooCommerce—PRO is one of the best plugins for creating a tiered pricing table in WooCommerce. With this, customers can easily add a discount table, position it on the product page, and customize it to their needs.
Related Articles
- How to Setup WooCommerce Tiered Pricing?
- How to Create Bundle Products in WooCommerce?
- How to Setup WooCommerce Quantity Discounts?
Frequently Asked Question
A pricing table in WooCommerce displays the discount values along with the quantities that need to be purchased in a table. WooCommerce doesn’t have this feature by default, so the store needs to use a plugin like the Discount Rules to create a tiered pricing table.
To display the discount bar on your WooCommerce product page, you must use a plugin like Discount Rules for WooCommerce – PRO. After installing this, go to “WooCommerce” -> “Discount Rules” and select the rule for which you want to show the discount bar. Then,
1. Scroll to the bottom and select “Discount Bar”.
2. Click “Yes” provided beside the “Show Discount bar” option.
3. Select “Save” and apply the changes to your WooCommerce store.
Yes. You can offer discounts and show tiered pricing tables for various digital goods that are either subscriptions or downloadable.
To create a Quantity discounts & pricing table for WooCommerce,
1. Install the Discount Rules for WooCommerce – PRO plugin in WordPress.
2. Create a Bundle/Bulk discount rule for a specific product or category.
3. Then, go to Discount Rules Settings and enable the discount table.
Now, a table with volume pricing is shown in your WooCommerce store.


