If you run a WooCommerce store, product attributes play a crucial role in helping shoppers find exactly what they want. Whether you sell T-shirts with size & color options, shoes with different materials, or electronics with storage capacities, attributes bring structure, clarity, and personalization to your store.
Most beginners underestimate the power of WooCommerce attributes. But the truth is:
- They improve filtering and search
- They make product pages more informative
- They help you create product variations
- They power advanced features like swatches, filters, dynamic pricing, and product comparisons
- They boost conversions and reduce friction in the buying journey.
In this detailed guide, you’ll learn everything about WooCommerce product attributes, including how to add them, how to use them for variations, how to display them better, and how to manage them at scale.
Let’s dive in.
Optimize your WooCommerce catalog by using smart attributes to improve discovery, boost SEO, and increase conversions with the Discount Rules plugin.
Table of contents
- What are WooCommerce Product Attributes?
- Types of Product Attributes in WooCommerce
- 1. Global Attributes
- 2. Custom (Local) Attributes
- Attribute Terms
- Why Use Product Attributes for WooCommerce Stores?
- How to Create Global Attributes in WooCommerce? (Step-by-Step)
- How to Create Custom Attributes in WooCommerce?
- How to Assign Attributes to Products in WooCommerce?
- How to Use Attributes to Create WooCommerce Product Variations?
- Change Product Attribute Price in WooCommerce
- How to Display WooCommerce Product Attributes on Product Pages?
- Filter and List Products by Attribute in WooCommerce
- Best Plugins for WooCommerce Attribute Management
- Conclusion
- Frequently Asked Questions
What are WooCommerce Product Attributes?
WooCommerce product attributes are descriptive characteristics of a product, such as:
- Size
- Color
- Material
- Brand
- Weight
- Dimensions
- Fabric type
- Storage capacity
- Style
These attributes are displayed on product pages so shoppers can understand the product better, filter options more efficiently, and choose the right variant before purchasing.
Why Attributes Matter for WooCommerce Stores?
Attributes are not just “extra product information.” They directly influence:
- User navigation
- Product filtering
- Product variations
- SEO performance
- Product comparison
- Dynamic discounting
Without well-planned attributes, your store feels unstructured, makes customers work harder, and loses sales.
Types of Product Attributes in WooCommerce
WooCommerce offers two powerful attribute types. Understanding the difference is crucial for maintaining consistency and scaling your store.
1. Global Attributes
Global attributes are store-wide attributes that can be reused across multiple products.
For Example,
- “Color” applied to hundreds of apparel items
- “Size” used for T-shirts, shoes, jackets
- “Brand” across electronics, accessories, and gadgets
Why Use Global Attributes?
Global attributes ensure consistency across your store:
- You don’t need to recreate attributes for every product
- All related products appear in attribute-based archives
- Filters and swatches work smoothly
- SEO improves because attribute archives rank in Google
- Management becomes easier as your catalog grows.
2. Custom (Local) Attributes
Custom attributes are created directly inside a product page and apply only to that product.
For Example,
A custom attribute for a handmade necklace:
- Gemstone: Ruby, Sapphire
- Chain Type: Rope Chain, Box Chain
When to Use Custom Attributes?
- When the attribute is unique to one product
- When you don’t want it displayed store-wide
- When preparing limited-edition or temporary products
Attribute Terms
Terms are the actual values of each attribute.
Examples:
- Color → Red, Blue, Green
- Size → S, M, L, XL
- Material → Cotton, Polyester
- Storage → 64GB, 128GB
These terms create structured product variation options.
Why Use Product Attributes for WooCommerce Stores?
Here’s why WooCommerce product attributes are essential for a high-converting store:
1. Better Product Organization
Product attributes allow you to group similar products and present options in a clean, organized way. Instead of listing separate products for each size or color, you provide them all under one product using variations.
2. Improved Shopping Experience
Customers can instantly see product details like:
- Material type
- Dimensions
- Fabric
- Weight
- Size fit
This reduces confusion and increases purchase confidence.
3. Faster Filtering and Search
WooCommerce attributes enable filter widgets like:
- Filter by Size
- Filter by Color
- Filter by Material
- Filter by Brand
This makes large stores easy to navigate.
4. Higher SEO Visibility
Attributes help Google understand your products better through attribute-based URLs:
- examplestore.com/color/red
- examplestore.com/size/large
These pages often rank for high-intent search terms like “red cotton t-shirt”.
5. Foundation for Product Variations
Attributes are required to create variable products, like:
- Size S / M / L
- Color Black / White
- Storage 128 GB / 256 GB
Without attributes, you cannot set different images, inventory, or pricing for each variant.
How to Create Global Attributes in WooCommerce? (Step-by-Step)
Global attributes ensure consistent structure across your store. Here’s how to add them in WooCommerce:
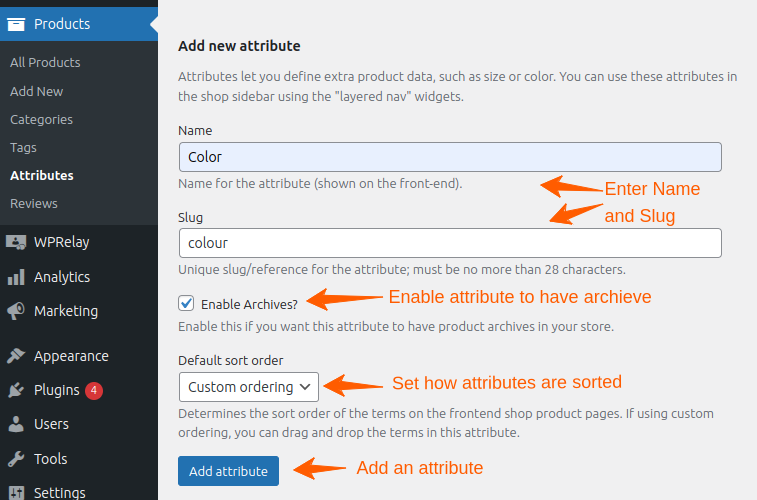
- Go to your “WordPress dashboard → Products → Attributes.”
- Fill the details:
- Name: Example — Color
- Slug: color
- Enable Archives: Check this if you want pages like yoursite.com/color/blue.
- Default Sort Order: Choose alphabetical, custom order, or numeric.
Click “Add Attribute.”
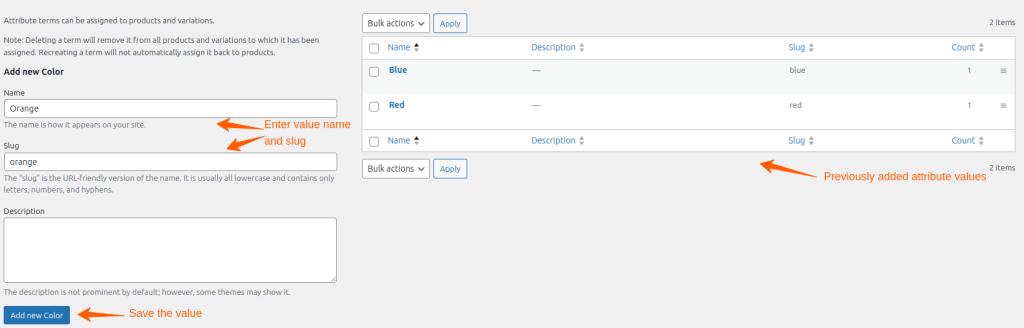
- Once the attribute is created, click “Configure Terms.”
- Add values like:
- Red
- Blue
- Green
Each term gets its own SEO-friendly URL and filtering functionality.
How to Create Custom Attributes in WooCommerce?
Custom attributes are created inside individual product pages.
- Go to “Products → All Products → Edit a product.”
- Scroll to “Product Data → Attributes → Add.”
- Define Your Attribute:
- Enter “Name.” (e.g., Material)
- Add values separated by a pipe symbol (Cotton | Polyester)
- Check “Visible on product page.”
- Click “Save.”
Custom attributes are ideal for one-off product details.

How to Assign Attributes to Products in WooCommerce?
Once your attributes are ready, assign them to products.
- Go to “Products → Edit Product.”
- Go to “Product Data → Attributes.”
- Select “Global Attributes”: Choose from the dropdown:
- Color
- Size
- Material
- Pick appropriate values from the attribute terms.
- Enable “Visible on product page” to display them for customers.
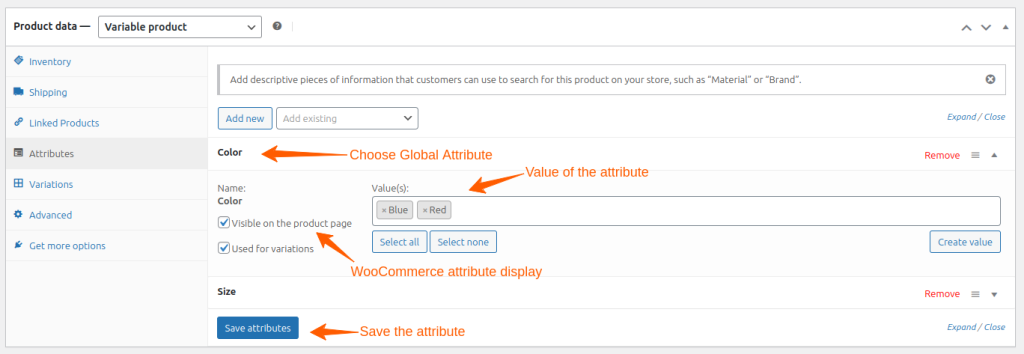
- Finally, save attributes.
By following these steps, you can easily add WooCommerce attributes. As a result, the product catalog of your store will be better.
How to Use Attributes to Create WooCommerce Product Variations?
Attributes are the building blocks for variations (e.g., size & color combinations).
Here’s how to use them for variable products.
- In “Product Data → select Variable Product.”
- Go to the “Attributes tab → choose relevant attributes → check Used for Variations → click Save.”
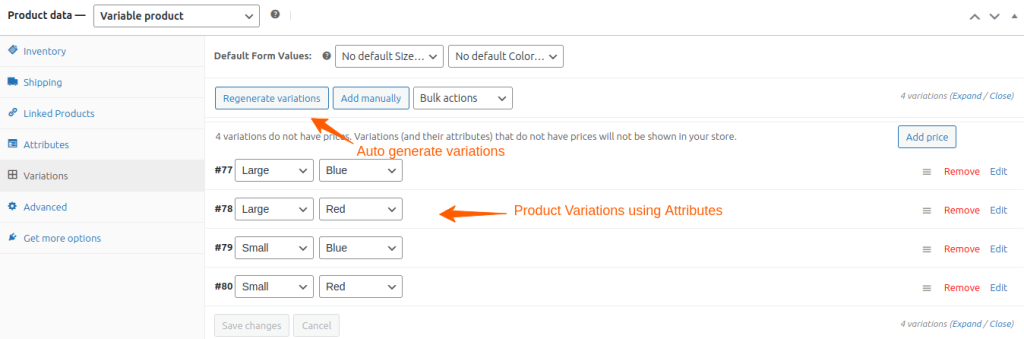
- Go to the Variations tab:
- Click “Create variations from all attributes”
- WooCommerce auto-generates combinations
- Or add variations manually.
- For each variation, add:
- Price
- SKU
- Stock
- Image
- Shipping dimensions
- Weight
This gives customers complete clarity.
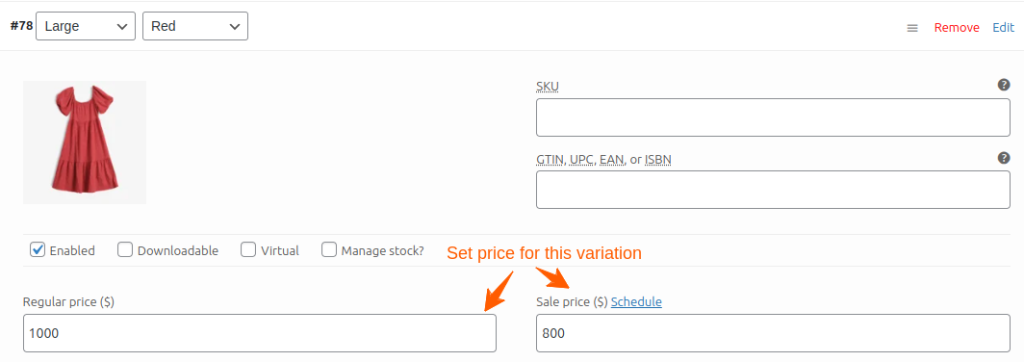
Change Product Attribute Price in WooCommerce
You can set different prices for each variant:
- Go to “Product → Variations.”
- Click on the “variation.”
- Add “Regular Price and Sale Price.”
This is useful for:
- Larger sizes cost more
- Premium colors or materials are priced higher.
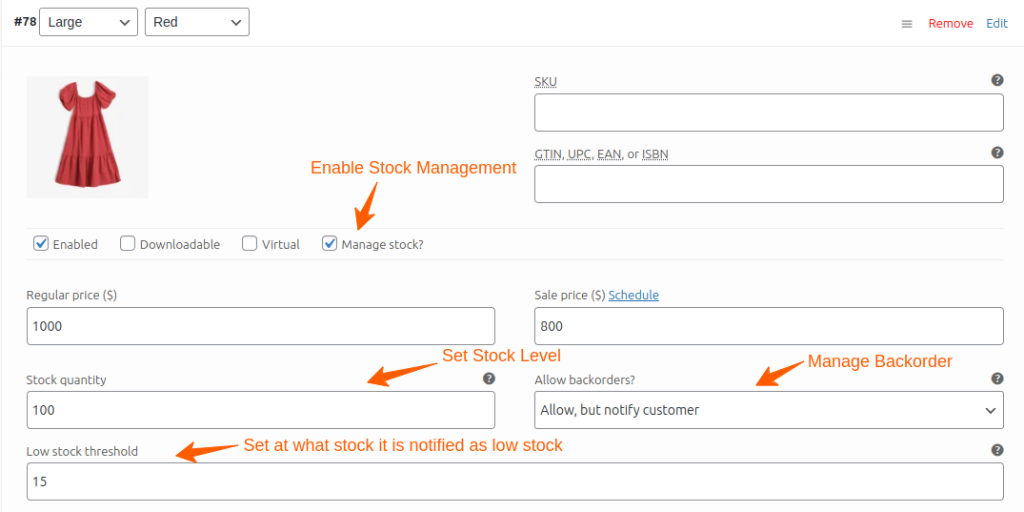
MManaging Stock for Product Variants in WooCommerce
WooCommerce allows individual inventory for each attribute combination.
- Open a “variation → enable ‘Manage Stock’.”
- Set Stock Levels by adding:
- Stock quantity
- Low stock threshold
- Backorder options
This ensures accurate availability for each variant.
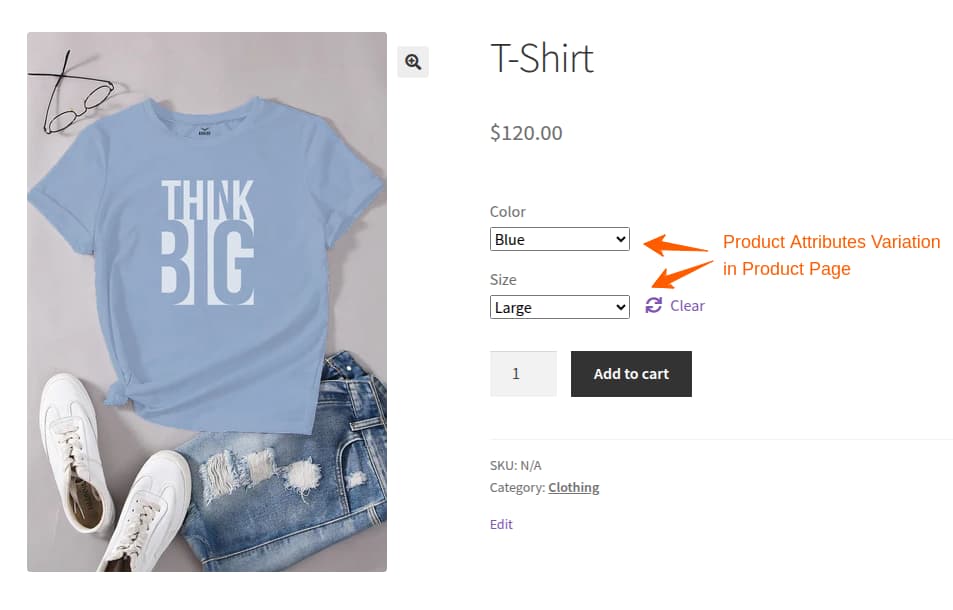
How to Display WooCommerce Product Attributes on Product Pages?
WooCommerce offers several ways to display attributes.
1. Default WooCommerce Attribute Display
You can display attributes by enabling “Visible on the product page.”
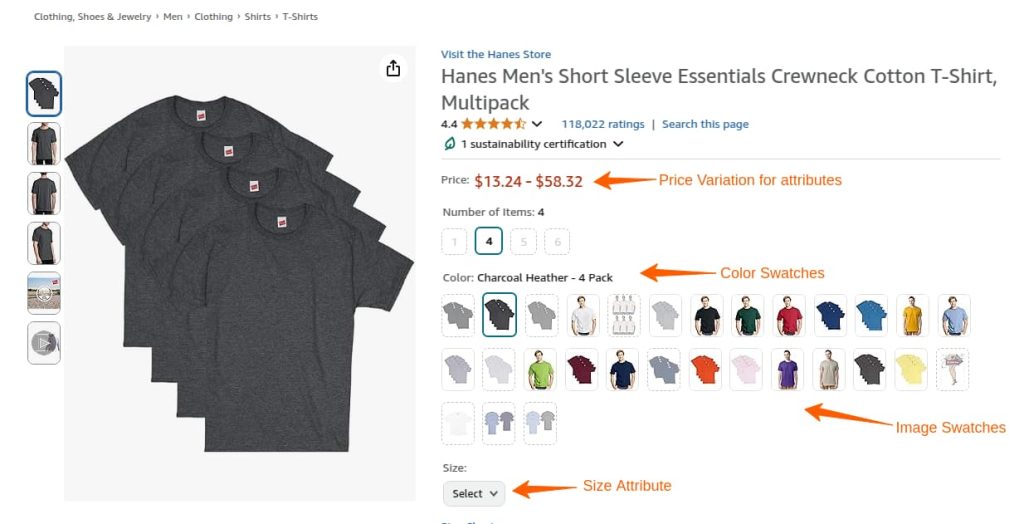
2. Use Attribute Swatches for Better UX
Instead of dropdowns, use:
- Color Swatches
- Image Swatches
- Button Swatches.
Swatches help customers visualize choices better and increase conversions.
Popular plugins for this:
- Variation Swatches for WooCommerce
- WooCommerce Attribute Swatches
Related Reading: Display tiered pricing table in WooCommerce.
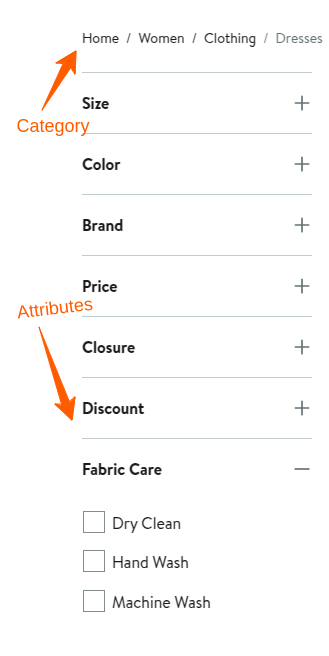
Filter and List Products by Attribute in WooCommerce
Attribute filtering helps customers quickly narrow down choices.
1. Default WooCommerce Filters
WooCommerce includes basic filters like:
- Filter by attribute
- Dropdown filters.
But these aren’t visually appealing and reload pages each time.
2. Use an AJAX Product Filter Plugin
Advanced filters update instantly without page reload.
Filter types include:
- Checkboxes
- Radio buttons
- Color swatches
- Image swatches.
These create a smooth shopping experience.
3. Use Shortcodes and Widgets
WooCommerce lets you display filters anywhere:
- Sidebar
- Header
- Custom landing pages.
This helps guide shoppers to relevant products.
Best Plugins for WooCommerce Attribute Management
Here are the top plugins for managing attributes effectively.
1. Variation Swatches for WooCommerce
Transforms boring dropdowns into attractive swatches.
Benefits:
- Color, image, and text swatches
- Better UX
- Higher conversion rates.
2. Discount Rules for WooCommerce -PRO
Allows dynamic discounts based on attributes.
Examples:
- 10% off for “Blue” products
- Extra discount on the “XL” size
- BOGO deals for specific attributes.
Perfect for promotions and inventory clearance.
3. Bulk Edit Products, Prices & Attributes for WooCommerce
Ideal for large stores.
Benefits:
- Bulk edit attribute values
- Update prices for all variations
- Schedule bulk changes.
Set different prices for each attribute using Discount Rules to create flexible, profit-boosting attribute-based pricing and boost sales of each attribute.
Conclusion
WooCommerce product attributes are essential for organizing your store, improving customer experience, boosting SEO, and enabling product variations. Whether you’re selling apparel, electronics, handmade products, or furniture, attributes help customers make faster, informed purchase decisions.
By using the steps and best practices in this guide, you can create a clean, structured product catalog that maximizes conversions and reduces frustration.
Also Read
- Set Multiple Prices Per Product in WooCommerce
- Creating WooCommerce Add to Cart Links for All Product Types
- Display Products by Category in WooCommerce
Frequently Asked Questions
The best option is to use a dynamic pricing and discount plugin, such as Discount Rules for WooCommerce. These plugins let you create “automatic discounts,” meaning customers will see reduced prices instantly in the cart or product pages without entering a coupon code.
You can apply:
Percentage discounts
Flat discounts
Bulk-based reductions
“Buy More, Save More” tiered discounts
Role-based storewide discounts.
This method increases conversions because customers don’t need to remember or type coupon codes.
Yes, discount plugins apply global rules to all variations automatically. Every variation inherits the discount unless you set exclusions for certain attributes (like color or size). This makes it effortless to run sales for stores with hundreds of variations.
Yes. Attributes power layered navigation filters, enabling customers to refine results by color, size, material, brand, and more.
When attributes are well-organized, shoppers can instantly narrow down choices, leading to faster product discovery and higher conversions. Many stores also use attribute-based filtering widgets to create Amazon-like shopping experiences.
Global attributes are created in WooCommerce settings and can be reused across multiple products. They’re ideal for store-wide standardization (e.g., shared sizes or consistent color options).
Custom attributes are created only for a specific product and cannot be reused elsewhere. These are best for unique, product-specific details that don’t apply to the rest of your catalog.
Most growing stores rely on global attributes for consistency and better management.