Almost 60% of carts are abandoned due to high shipping costs. Do you want to convert your store’s abandoned carts into revenue? WooCommerce free shipping based on location helps you urge target customers to complete a sale without leaving their cart.
Applying free shipping to all customers will not increase profit margins. So, offering free shipping to specific locations, such as countries, cities, or regions, might help you increase brand awareness, reach target customers, drive traffic, and increase sales.
WooCommerce has a built-in free shipping option for specific locations. Using a free shipping plugin like “Discount Rules for WooCommerce -Pro,” you can elevate your strategy even more by setting purchase conditions for your free shipping offer.
In this blog, you’ll learn how to set up free shipping in WooCommerce based on specific locations using default settings and the “Discount Rules” plugin. Ultimately, you will create a profitable strategy to increase sales in specific regions.
Offer Free Shipping To Specific Countries/ States/ Zip Codes Using The Discount Rules Plugin & Grow Your Brand Awareness.
How To Setup Free Shipping In WooCommerce Based On Locations?
(A) Using Default Free Shipping Settings
With the default settings, you can easily set up free shipping to specific locations in WooCommerce.
- Go to “WooCommerce” -> “Settings” -> “Shipping”.
- In the “Shipping Zones,” click “Add Zone”.
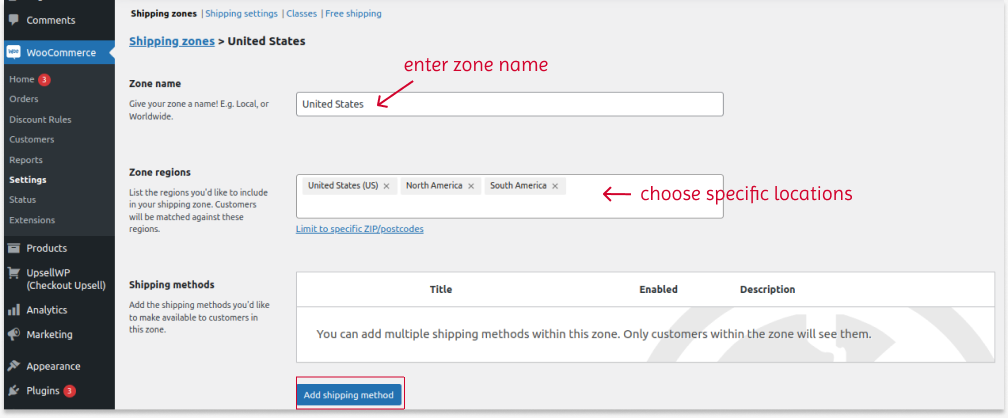
- Enter the “Zone Name” and select specific “Zone Regions“.
- Click the “Add Shipping Method” button.

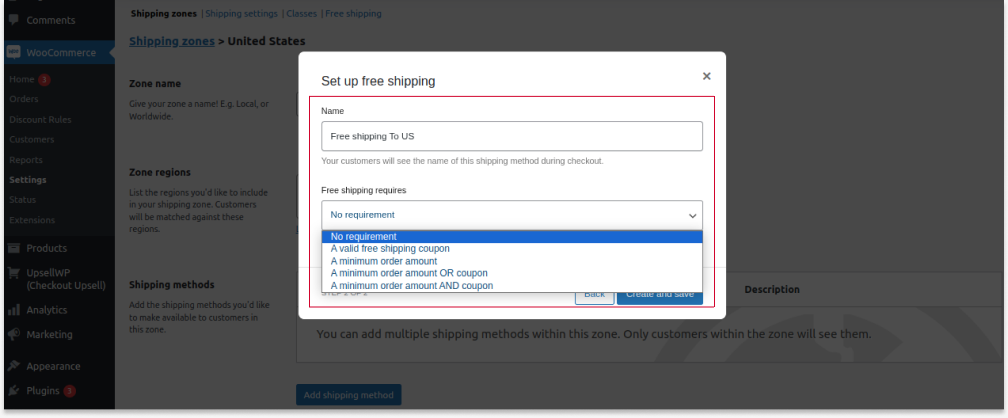
- In the “Create Shipping Method” option, choose “Free Shipping” and continue to the next option.
- In the “Setup Free Shipping” option, provide a “free shipping name” for reference and optionally set purchase “requirements” for free shipping, such as a coupon, minimum order amount, or both.
- Create and save changes.

Free delivery deals will be applied to selected locations, and you can easily increase sales in particular locations.
The Two Free Shipping Requirements:
The “Free Shipping Requires” option is optional; you can apply free shipping without it. Yet, if you want to set requirements, follow these:
(i) If you have selected the “Minimum order amount” requirement and set the minimum order value, customers in the specific locations must reach the specific cart value to get free shipping.
(ii) If you have selected the “Coupon” requirement or both, you must create a coupon code and enable the “free shipping coupon” option. This allows customers to enter their coupon code at checkout to receive their free shipping offer.
To create a free shipping deal with a coupon, follow the detailed steps here: How To Set Up A Free Shipping Coupon In Woocommerce.
(B) Using The “Discount Rules For WooCommerce -Pro” Plugin
Though you can offer free shipping to specific zones in WooCommerce with default features, you can only set two purchase conditions: coupon or minimum amount.
What if you want to enable free delivery deals only for the first order? Or how do you enable free shipping only to specific customers or customer groups?
You can use the “Discount Rules for WooCommerce -Pro” plugin to set advanced purchase conditions.
Offer Free Shipping To Specific Customers Using Discount Rules To Enhance Customer Experience And Loyalty.
Check the installation guide to install and activate the “Discount Rules” plugin on your WordPress dashboard. Here is how you can set free shipping using the plugin with the following conditions:
- Go to “WooCommerce” -> “Discount Rules”.
- Click “Add New Rule”.
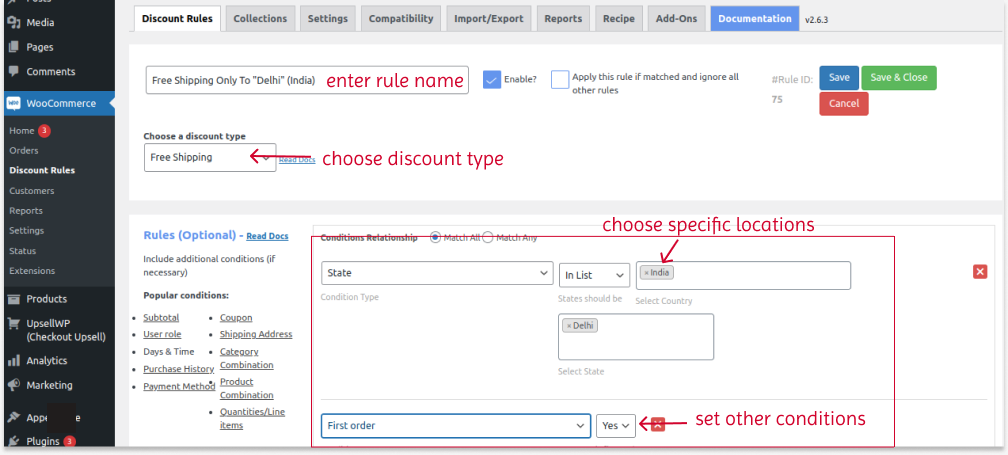
- Enter the rule name for reference.
- Choose the discount type, “Free Shipping”.
- In the “Rules” section:
- Select the first condition as “Country/ State/ City” and select the specific locations for free shipping.
- Select the second condition to set purchase conditions, such as purchase history, customer, cart, or more. For example, Choose “First Order” and “Yes”.
- Save and enable the rule.
The free shipping will be applied only to first-time orders in specific locations.

You can also apply free shipping based on specific products or categories, purchase history, cart item quantities, and more.
Check this detailed guide to implement various free shipping scenarios using the default settings and plugin: The Complete Guide To WooCommerce Free Shipping.
Conclusion
Offering free shipping based on locations helps you grow brand awareness in specific regions, reach target customers, and increase sales. It is not a blunt fact; it is proven that customers prefer free shipping over product discounts to avoid additional charges.
You can use the default WooCommerce features to filter specific locations to offer free shipping or download the “Discount Rules for WooCommerce -Pro” plugin to elevate your strategy.
Offer Free Shipping To First-Order Customers Using Discount Rules To Attract Customers And Increase Sales.
Also Read
- WooCommerce Coupon – The Detailed Guide
- How to add discounts in WooCommerce?
- How to Offer Free Gifts in WooCommerce?
Frequently Asked Question
To add a free shipping bar in WooCommerce, install and activate the “Discount Rules for WooCommerce -Pro” plugin.
1. Go to “WooCommerce” -> “Discount Rules.”
2. Add a new rule.
3. Choose the discount type, “Free Shipping.”
4. In the “Rules” section, choose the specific locations and set purchase conditions to offer free shipping.
5. Scroll down to the “Discount Bar” section and click “Yes” in the “Show Discount Bar” option.
6. Customize badge text and background color.
7. Add “badge text” and save changes.
The “Free Shipping” text/ message will be displayed on the filtered product pages.
“Discount Rules for WooCommerce -Pro” is one of the best free shipping plugins for WordPress. It is specifically designed for the WooCommerce platform.
To add shipping charges to WordPress/ WooCommerce:
1. Go to “WooCommere” -> “Settings” -> “Shipping.”
2. In the “Shipping Zone,” select an existing zone or add a new zone.
3. Filter specific zones and choose “shipping method” as “flat rate.”
4. Set the shipping charges and save changes.
The shipping charges will be applied to selected regions.
To add free shipping to a single product in WooCommerce, install and activate the “Discount Rules for WooCommerce -Pro.”
1. Go to “WooCommerce” -> “Discount Rules.”
2. Add a new rule.
3. Select the “Free Shipping” discount type.
4. In the “Rules” section, select “Products” and filter the specific product.
5. Save changes.
Free shipping will be enabled only when customers add a specific product to their cart.
To restrict shipping locations in WooCommerce:
1. Go to “WooCommerce” -> “Settings” -> “Shipping.”
2. In the “Shipping Zone” section, add a new zone.
3. Select the specific shipping locations you want to restrict in the “Zone Regions” option.
4. Without adding a shipping method, save changes.
The selected regions will be restricted from shipping locations.


