WooCommerce, being one of the most popular platforms for online stores, provides a wide range of WooCommerce shipping options to suit different business needs.
Here is a step-by-step guide for you on setting up WooCommerce shipping options. We will guide you through various shipping settings in WooCommerce, including flat rate shipping, local pickup, and table rate shipping.
When you are through, you’ll be providing a seamless, secure shipping service that’s a fit for your business.
A Basic Overview About WooCommerce Shipping Settings and Configuration
WooCommerce has many shipping settings that can be customised for your store. Understanding these settings is key to offering the right WooCommerce shipping options to your customers.
1. Shipping Zones
Shipping zones are for targeting specific geographic areas.
You can define zones by countries, states or even cities. This allows you to offer region specific WooCommerce shipping rates. For example you may charge different rates for domestic and international orders.
2. Shipping Methods
When the zones are created, then the next step is to add shipping methods to each of the zones.
The main WooCommerce shipping methods include flat rate shipping, free shipping, local pickup, and local delivery. For a particular zone, you can enable different shipping options that the residents need.
3. Shipping Classes
Shipping classes are useful when you have products that require different WooCommerce shipping rates.
For example, heavy items like furniture may have a different rate than smaller items. You can create shipping classes in WooCommerce and assign them to specific products. This ensures that each product has its own shipping cost.
4. Advanced Shipping Settings
If you need more flexibility, WooCommerce also supports advanced shipping options.
Using plugins like WooCommerce advanced shipping packages or WooCommerce table rate shipping, you can set conditions based on weight, product quantity, or price to create custom shipping rates. This is particularly useful for businesses with complex shipping needs.
5. Testing and Adjusting Settings
After configuring your shipping settings, it’s important to test them before going live.
You can place test orders to see if the correct WooCommerce shipping rates are applied at checkout. Make adjustments as needed to ensure a seamless experience for your customers.
By exploring and configuring these WooCommerce shipping settings, you’ll be able to offer tailored shipping options that suit your business model and improve the customer experience.
How To Set Up Your WooCommerce Shipping Options?
To set up your WooCommerce shipping options:
Step 1: Access WooCommerce Shipping Settings
Before stepping into the configuration, you need to access your shipping settings.
- Go to WordPress Dashboard.
- Navigate to WooCommerce -> Settings.
- Click the Shipping tab at the top.
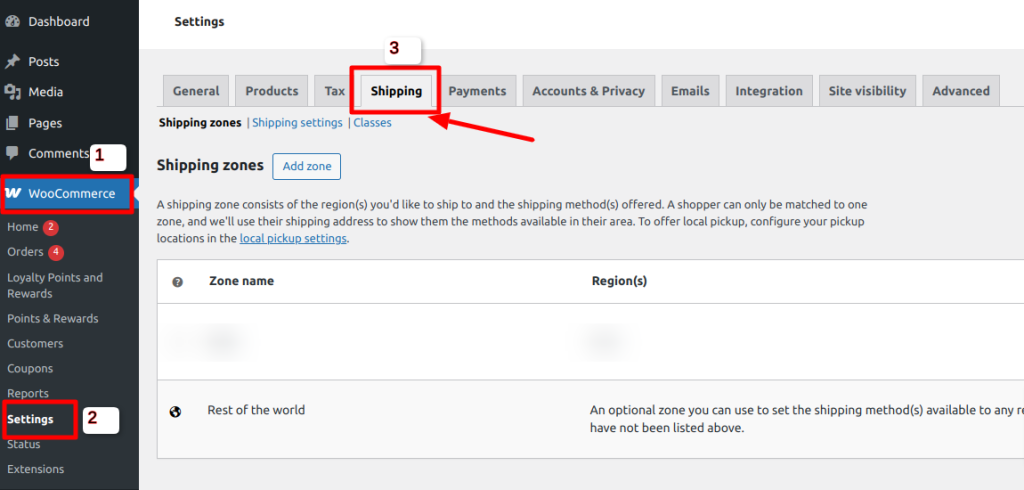
This is where you’ll configure all your shipping zones, methods, and classes.
Step 2: Set Up Shipping Zones
Shipping zones allow you to define different shipping rules for specific locations.
- Under the Shipping tab, click Shipping Zones.
- Click Add Zone.
- Enter a Zone Name (e.g., “United States” or “Europe”).
- Select the Regions this zone applies to countries, states, or zip codes.
- Click Add Shipping Method to define how customers in this zone will receive their orders.
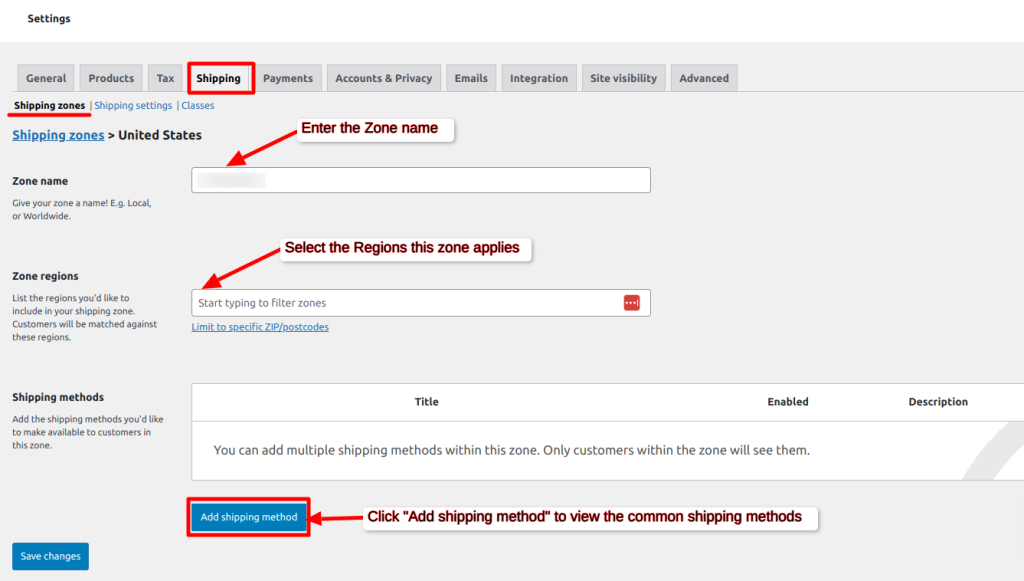
Common shipping methods you can include:
- Flat rate shipping: A fixed cost for all orders.
- Free Shipping: Customers don’t pay shipping if they meet a certain condition (like a minimum order amount).
- Local Pickup: Customers can pick up orders directly from your physical location.
You can create multiple zones if you want different shipping rules for various regions (e.g., one for domestic, one for international).
Step 3: Configure Shipping Methods
Now that you’ve added a zone, it’s time to define how shipping works for customers in that region.
1. Under Shipping Methods, choose the method you want to add.
2. Configure the settings based on your business needs:
Flat Rate Shipping:
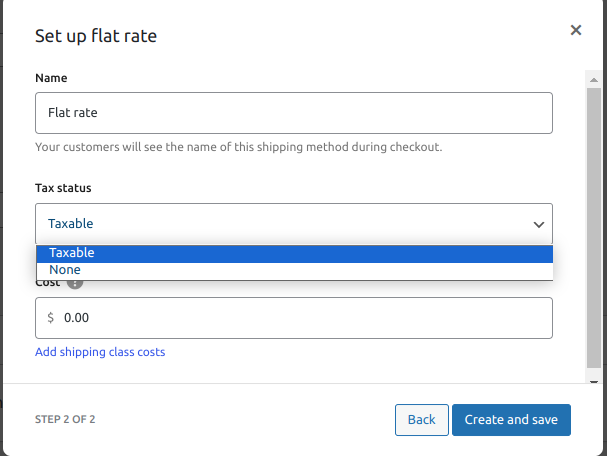
- Set a standard price (e.g., $5 per order or $10 per item).
- If needed, add handling fees or tax options.
Free Shipping:
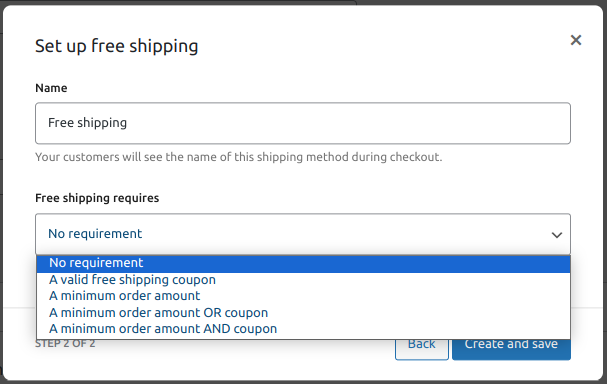
- Choose a requirement (e.g., “Minimum Order Amount of $50” or “Valid Free Shipping Coupon”).
Local Pickup:
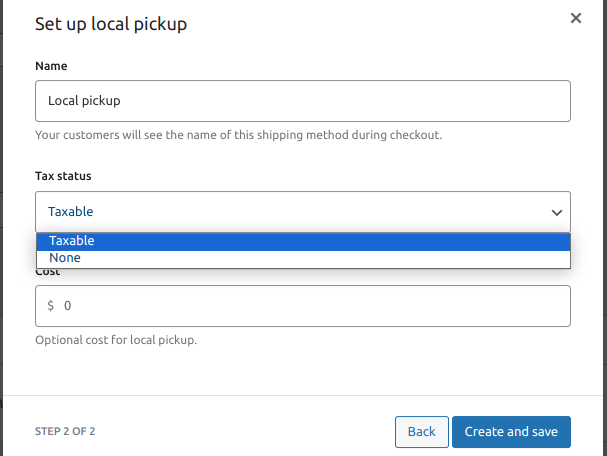
- If needed, add tax options.
- Set a pickup fee (if applicable).
3. Click Create and save once you’ve configured your shipping method.
Step 4: Add Shipping Classes for Specific Products
Shipping classes help when you need different rates for different products. For example, heavy products may have a higher shipping fee than small items.
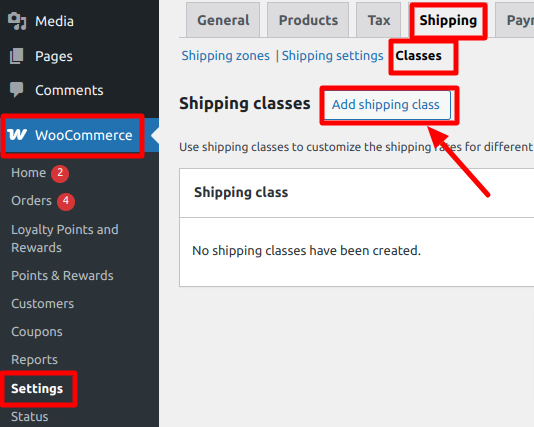
- Navigate to WooCommerce -> Settings -> Shipping.
- Click Classes -> Add Shipping Class.
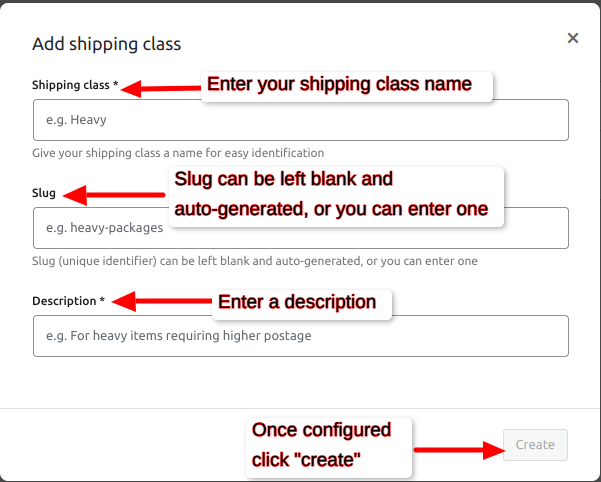
- Enter a Shipping Class Name (e.g., “Heavy Items”).
- Optionally, enter the slug or its auto-generated.
- Enter a description to clarify the purpose of the class.
- Click Save Shipping Classes.
Assign a Shipping Class to a Product:
- Go to Products -> All Products.
- Click Edit on the product to assign it a shipping class.
- Scroll to the Product Data section and click Shipping.
- Select the Shipping Class from the dropdown.
- Click Update to save the changes.
Now, this product will follow the specific shipping rules you define under WooCommerce shipping options.
Step 5: Enable Advanced Shipping Features (Optional)
For more flexibility, consider using advanced WooCommerce shipping settings and plugins.
A. Use Table Rate Shipping for WooCommerce
If you need variable shipping rates based on factors like weight, number of items, or order total, install a WooCommerce table rate shipping plugin such as:
- Table Rate Shipping by WooCommerce (Premium)
- Table Rate Shipping Method for WooCommerce by Flexible Shipping (Free & Premium)
How to Set Up Table Rate Shipping:
- Install and activate a WooCommerce table rate shipping plugin.
- Navigate to WooCommerce -> Settings -> Shipping -> Table Rate Shipping.
- Define your shipping rules (e.g., different rates based on order weight or product category).
- Click Save Changes to apply the new shipping rates.
B. Enable WooCommerce USPS Shipping with Print Label
If you want real-time USPS shipping rates and label printing, install the WooCommerce USPS Shipping Plugin.
- Install and activate the WooCommerce USPS Shipping plugin.
- Go to WooCommerce -> Settings -> Shipping -> USPS.
- Enter your USPS API credentials.
- Enable real-time rates and configure shipping label settings.
- Click Save Changes.
Now, WooCommerce will display USPS shipping rates at checkout and allow you to print labels directly from your dashboard.
Step 6: Test Your Shipping Settings
Before you go live, it’s important to test your shipping options.
- Add different products to your cart and go to checkout.
- Check if the correct shipping zones and rates apply.
- Test products from different categories to make sure shipping classes are working.
- Check that table rate shipping and USPS labels are functioning correctly.
If you see an error like “no shipping options available”, make sure you’ve set up at least one method for each zone.
Step 7: Optimize and Monitor Your Shipping Strategy
Once everything is set up, consider these tips to optimize your shipping:
- Offer Free Shipping for Larger Orders – Encourage customers to buy more by offering free shipping over a certain amount.
- Use Live Carrier Rates – Offer accurate real-time rates with services like FedEx WooCommerce Shipping with Print Label.
- Offer Multiple Shipping Options – Let customers choose between standard or express delivery.
- Automate Label Printing – Save time by automating label printing through plugins.
Final Words
Running your online business depends much on choosing WooCommerce shipping options.
Configuring your WooCommerce shipping settings can enable you to avoid a terrible customer experience, simplify order fulfilment, and give consumers choice in terms of delivery of products.
By taking the time to properly configure your WooCommerce shipping options, will help you to make sure your store is ready to meet different client needs.