To create a WooCommerce store, you need to download the WooCommerce plugin on your WordPress. More than 35% of all online stores use WooCommerce to build their websites and sell their products, which is a testament to this platform’s effectiveness. If you want to create a WooCommerce store, download the plugin and build your online store.
Regarding the WooCommerce vs. Shopify debate, WooCommerce always stands out because of the flexibility and control it gives store owners. This makes WooCommerce one of the best plugins for small businesses.
WooCommerce store creation is relatively easy, and you can do it with some technical knowledge. The following article will provide a step-by-step guide to install WooCommerce in WordPress and creating a WooCommerce store.
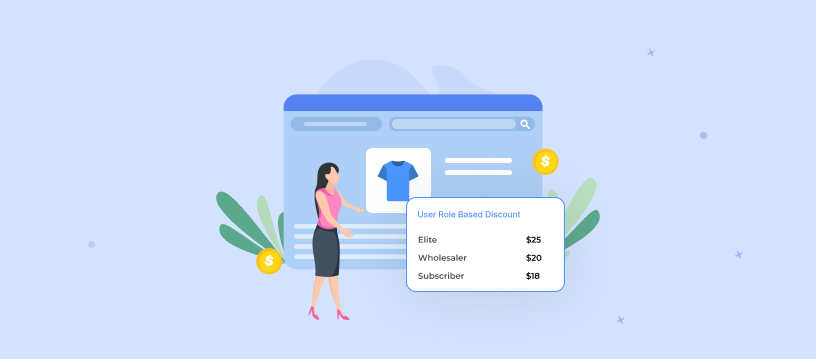
Increase your customer base and boost sales by providing a variety of product discounts using the Discount Rules for WooCommerce – PRO plugin.
What is WooCommerce?
WooCommerce is an open-source e-commerce platform for WordPress. Users can create an online store and sell their products and services. Small and large businesses can build a WooCommerce store on WordPress and sell physical, digital, etc.
To launch a WooCommerce store in WordPress, you need to get a hosting provider and a domain name for your website. After starting a WooCommerce store, you can add products, create payment gateways and shipping methods, and customize your website to your will.
Prerequisites to Create a WooCommerce Store
As mentioned, to create an online store with WooCommerce, you need a hosting provider and a domain name. After this, download and install WordPress. The following are the prerequisites for WooCommerce store building in WordPress.
Step 1: Choose a Host and Domain
To run a WordPress website, you must first purchase a web hosting provider. These hosts save all your website’s data and run it on their servers. There are many hosting services in the market, and WordPress even offers its own hosting services.
There are two types of hosting providers: “Managed Hosting ” and ” Self-Hosting”.
- Managed Hosting: This is where a third-party server hosts and manages the server for you. This includes server maintenance, updates, security, etc., allowing WooCommerce store owners to focus on their websites. This is very suitable for small WooCommerce businesses running on limited resources.
- Self-hosting: As the name suggests, self-hosting involves hosting and maintaining the server yourself without the assistance of any third-party providers. Many big businesses opt for this as it gives them complete control over the data.
Our WooCommerce hosting recommendations include Elementor WooCommerce Hosting, Hostinger, GoDaddy, and Bluehost WooCommerce. Choose a WooCommerce hosting provider, subscribe to one of its plans, and get the hosting account credentials.
With these hosting credentials, you can access your web hosting dashboard, create a WooCommmece store, and manage your WooCommerce website.
Then, choose a WooCommerce domain name for your online store. A domain name is the unique web address for your online store. You must buy it separately if it is not included in the hosting package.
Step 2: Install ‘WordPress’ to Create a WooCommerce Store
This step involves installing WordPress and creating a website using it. You can install WordPress either manually or automatically.
Some hosting providers offer ‘One-click Installation’, which automatically installs WordPress and creates an account for you. In contrast, other hosting providers require you to install WordPress manually and create an account in it.
Now, you have laid a foundation for an online store setup in WordPress, and you can install WooCommerce in WordPress and create a WooCommerce store.
How to Create a WooCommerce Store in WordPress
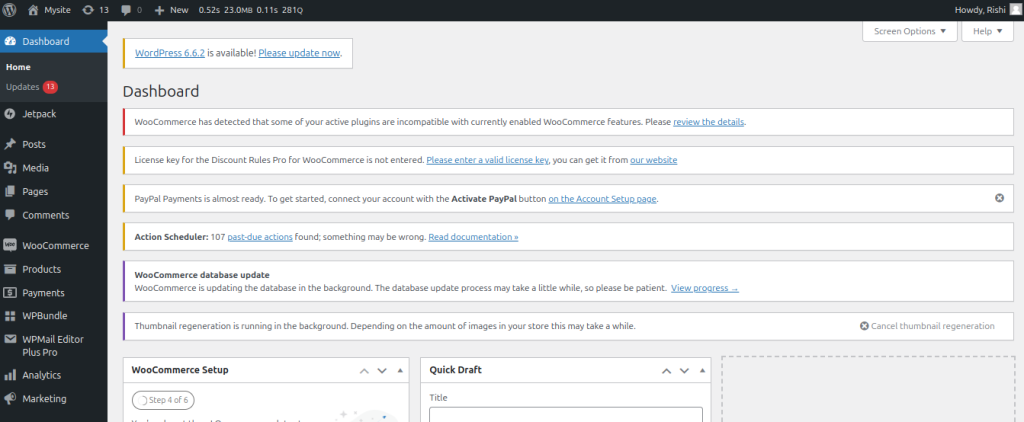
The following are the steps to install and build a WooCommerce store in WordPress. Go to your WordPress Dashboard; the image below shows how it looks.
Once you get there, follow the WooCommerce store setup guide provided below and create a WooCommerce store.
Step 1: Install WooCommerce in WordPress
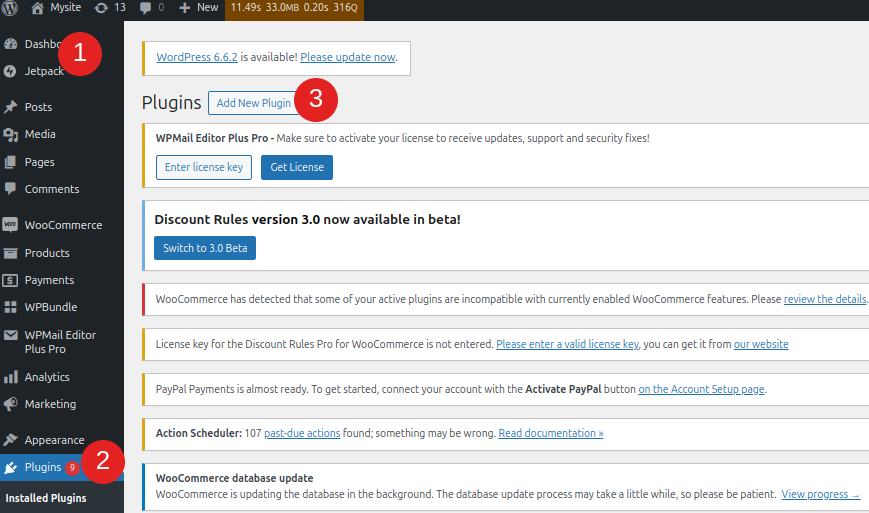
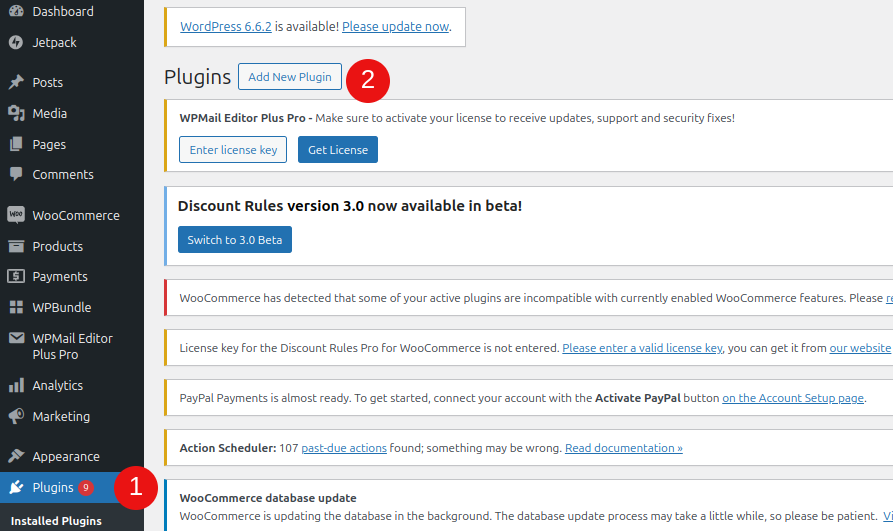
- Go to your WordPress Dashboard -> Click “Plugins” -> Add New Plugin.
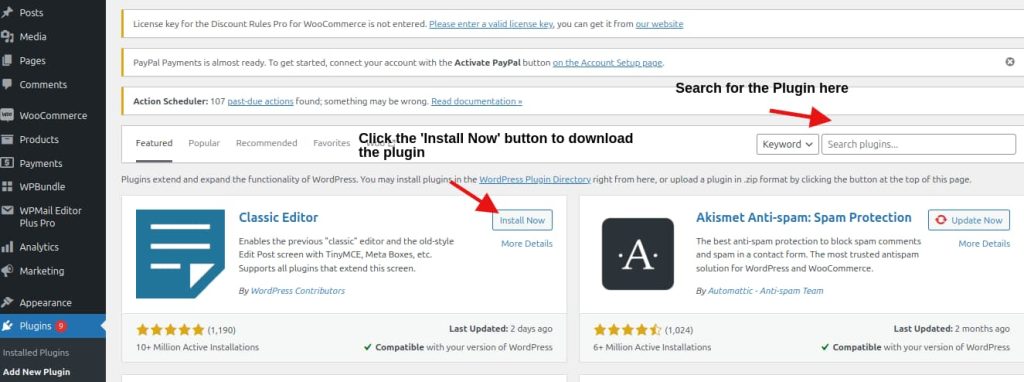
- Enter “WooCommerce” in the “Search plugins” tab and search for it.
- Look for WooCommerce in the search results and click the “Install Now” button. Now, this WordPress eCommerce plugin will be downloaded and installed.
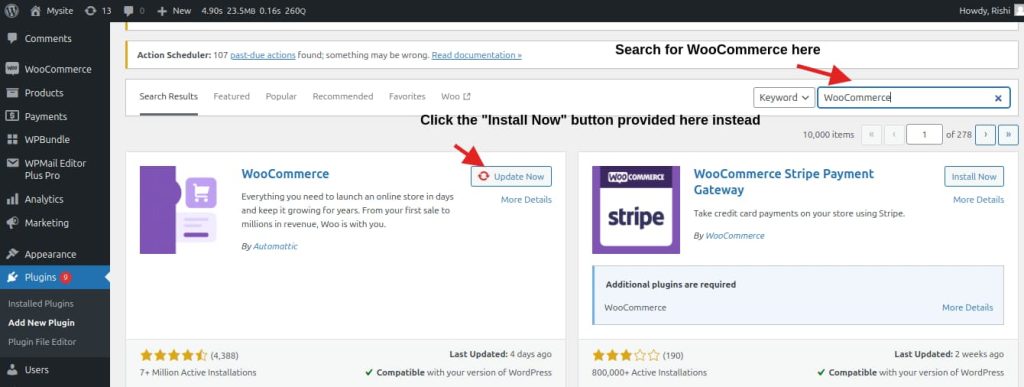
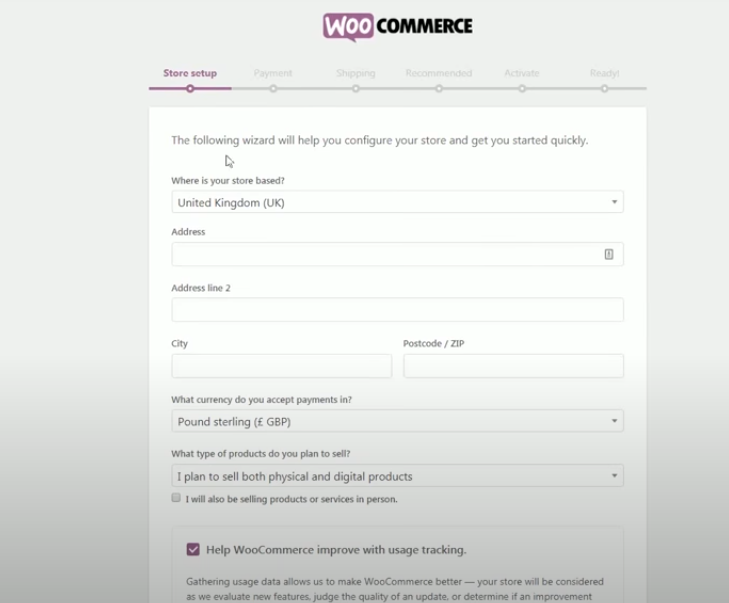
- After installing it, click the “Activate” button and proceed to the WooCommerce setup wizard. Here, you will be guided through entering all the details and creating a WooCommerce store in WordPress.
You’ll be asked to provide details about your business and store, such as its name, the products you sell, and its location.
You can skip this step manually by following the setup of your WooCommerce store guidelines provided below. Now, WooCommerce will be added to WordPress; you can see it on the left-hand menu. After you create a WooCommerce store, you can configure its settings to suit your needs.
How to Configure WooCommerce Settings in WordPress
To make a WooCommerce store fully functional, store owners must configure certain settings. These include the payment system, taxation, shipping, products, etc. The following steps elaborate on how to set up a WooCommerce shop page and create a WooCommerce store in WordPress.
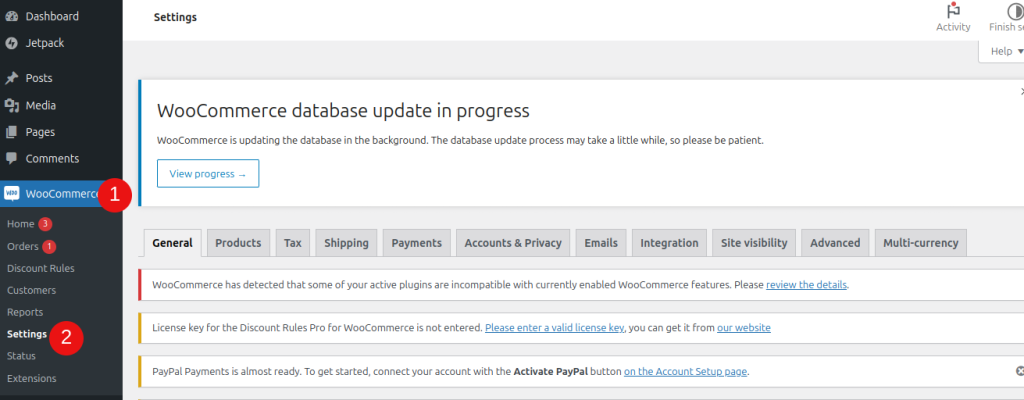
Go to your “WordPress Dashboard” -> “WooCommerce” -> “Settings” and select a sub-section you want to change.
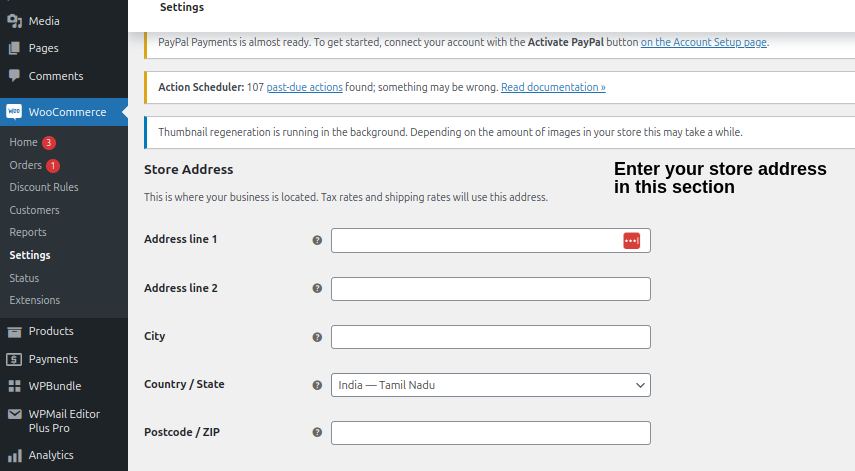
1. WooCommerce General Settings
The following options are included in this section.
- First is the store Address, where you’ll enter your WooCommerce store’s exact address, its City, Country, and its ZIP code.
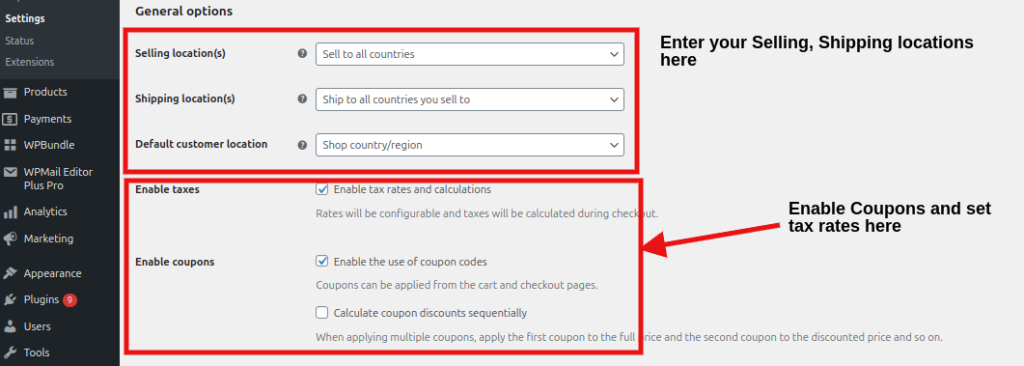
- Next, set the “Selling” and “Shipping” locations. You can select all the countries or choose specific countries. For shipping, you also have the option to disable shipping calculations entirely.
- Then, select the “Default customer location”. Setting it to “Geolocate” will automatically track your customer’s location.
- After this, select whether you want to enable taxes and coupons applied to your products.
- Choose the “Currency” in which your products are displayed in your store. After making the necessary adjustments, click the “Save changes” button at the bottom and move to the next step.
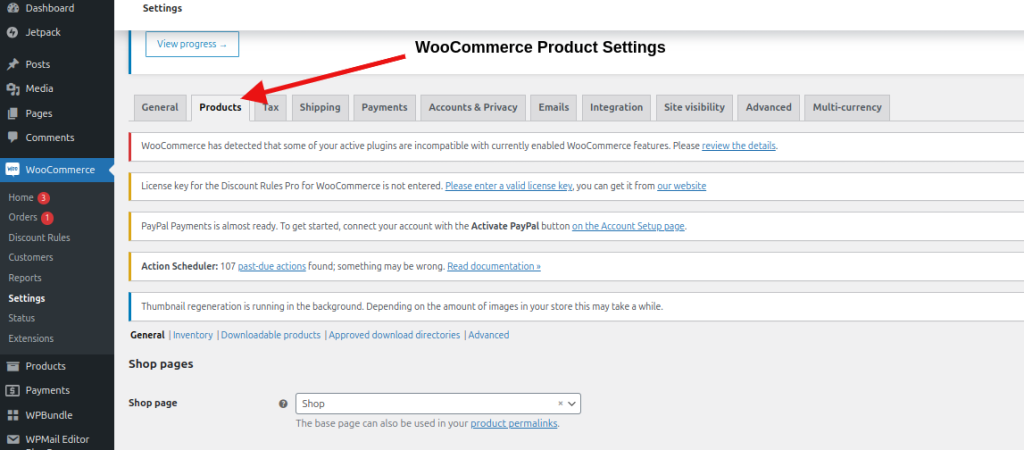
2. WooCommerce Products Settings
This section lets you choose how your products will be displayed and managed on your WooCommerce store. It also has many sub-sections, such as General, Inventory, etc.
a) General
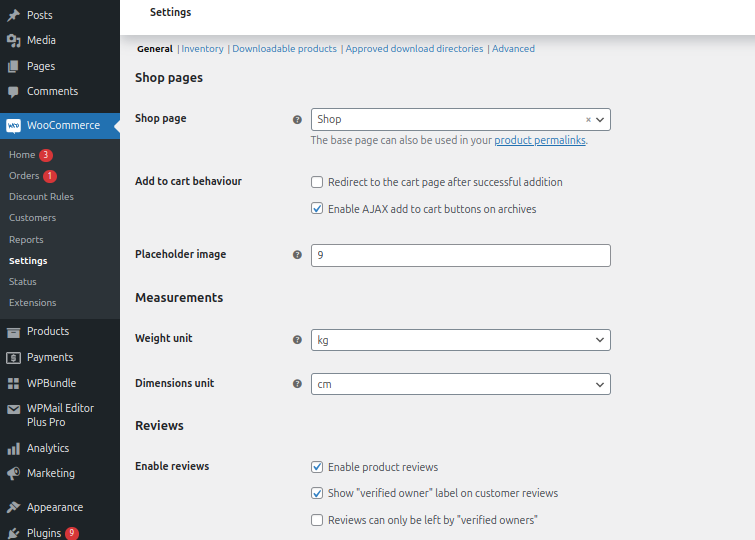
- Shop pages: Select the WooCommerce shop page where all your product archives will be.
- Measurements: Select the unit where the products will be displayed in your store. For weight, you have options like Kilos, Pounds, etc. For dimensions, you can select centimeters, meters, etc.
- Reviews: Enable WooCommerce product reviews and choose whether reviews can be given only by verified owners. Star ratings can also be enabled for products.
b) Inventory
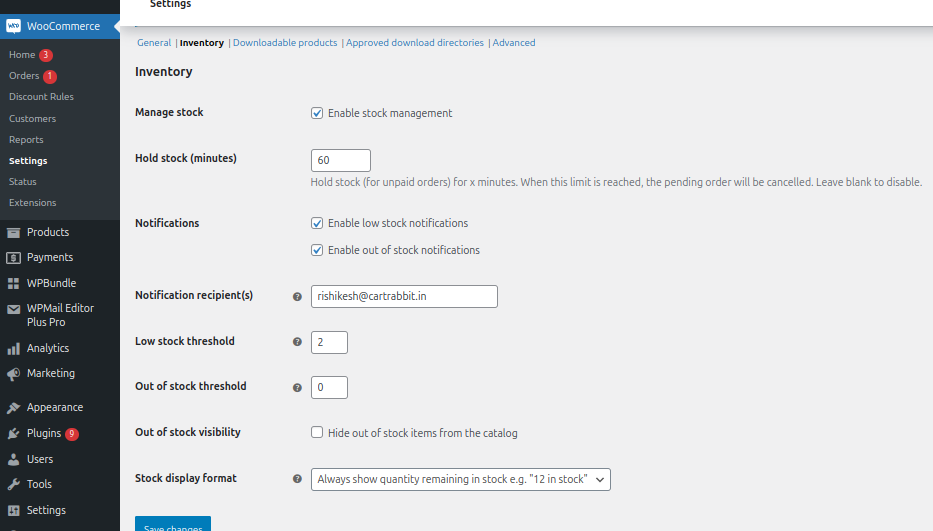
- First, tick the “Enable stock management” option and enable WooCommerce inventory management.
- Set the “Hold stock(minutes)”. You can enter whatever minutes you want, and when the time is reached, all the pending orders will be canceled.
- Under the “Notifications” section, enable low-stock and out-of-stock notifications and set their threshold values.
c) Downloadable products
The following options would be helpful when you sell downloadable products in your WooCommerce store.
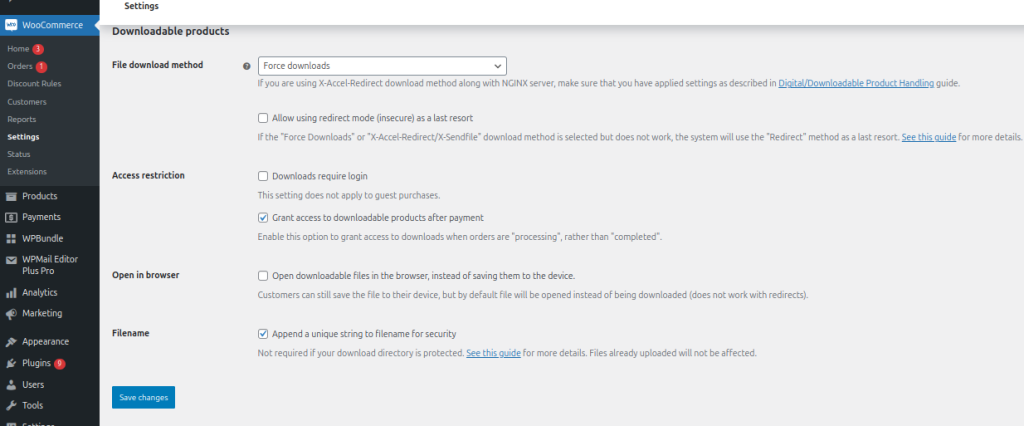
- Download Method: Select how the downloadable products can be downloaded from your store. You can allow force download, X-accel-redirect, or redirect(Insecure)
- Access Restrictions: Set whether downloads require a login and allow/disallow access to downloadable products after payment.
Besides these, you can add/remove download directories and do product matching by SKU.
Tip: With plugins like Discount Rules, you can create WooCommerce Quantity-based discounts and increase sales.
3. WooCommerce Payment Methods
- Store owners can provide different types of payment methods to the store owners. The list of payment methods available is shown in the image below.
- Toggle on the “Enabled switch” and turn on whatever payment method you want to.
- You can arrange the payment methods by clicking the three-lined icon and dragging it to your desired position. The payment methods are displayed to the customers in the same order you set here.
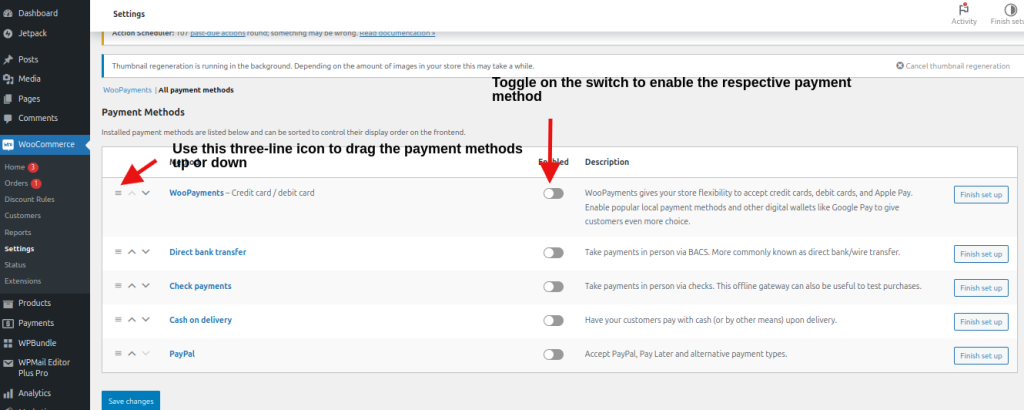
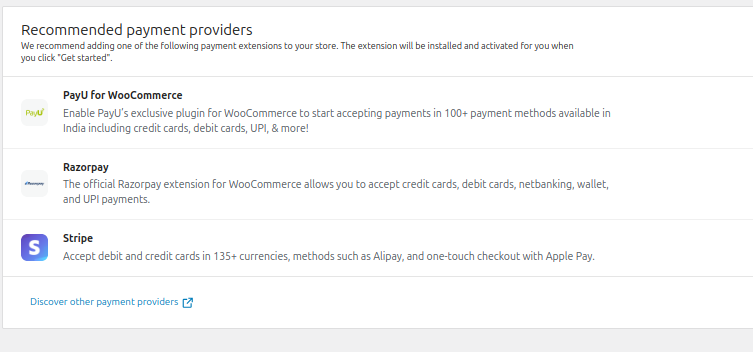
- Scrolling down further, you can see all the other available payment methods you can add to your store.
4. WooCommerce Shipping Settings
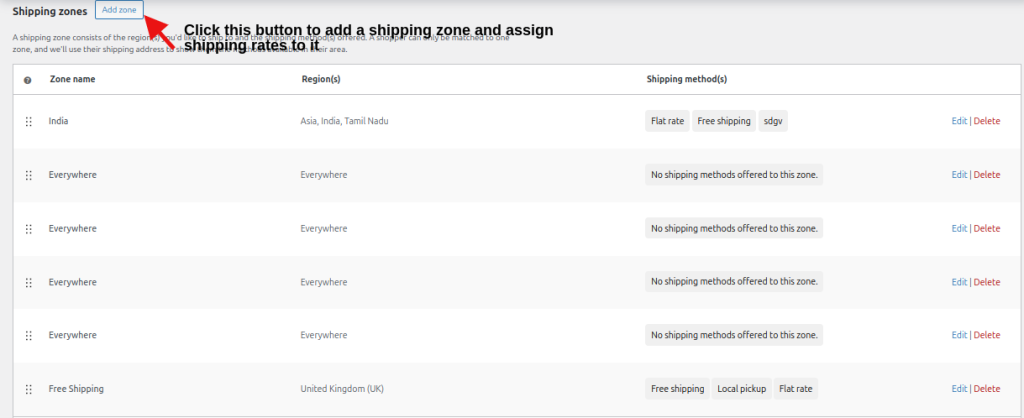
After you create a WooCommerce store and add products to it, you must provide shipping options to your customers. Store owners can add WooCommerce Shipping zones and settings, generate shipping classes, and enable/disable free shipping.
- Shipping zones: Here, you can create shipping zones by selecting the shipping area and assign shipping methods to these areas, such as free shipping, flat rate shipping, and local pickup. The created shipping zones can be edited/deleted further.
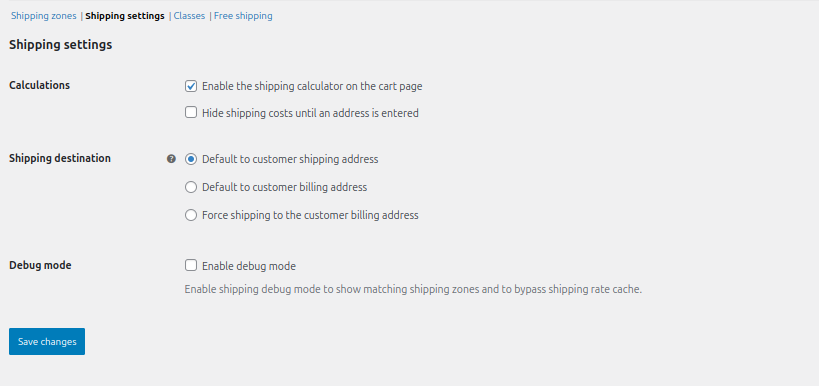
- Shipping settings: Select whether you want to display the shipping calculation on the cart page. Select which shipping address to consider under the “Shipping destination” section.
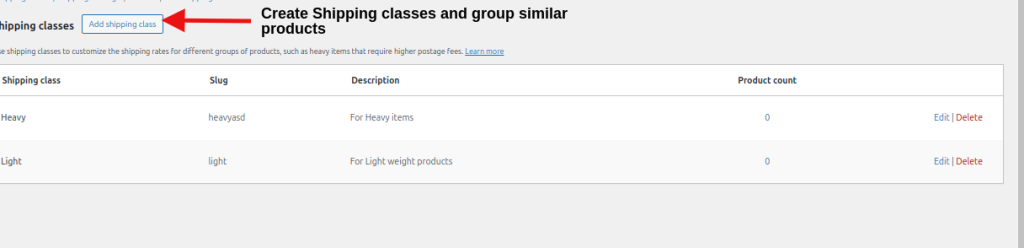
- Shipping Classes: You can create different classes and group products under each class based on similarities. You can assign individual shipping rates for each class, making it easy for store owners.
Increase customer satisfaction by providing free shipping to specific addresses and particular customers using the Discount Rules for WooCommerce – PRO plugin.
5. WooCommerce Tax Settings
Under the Tax options section, you can,
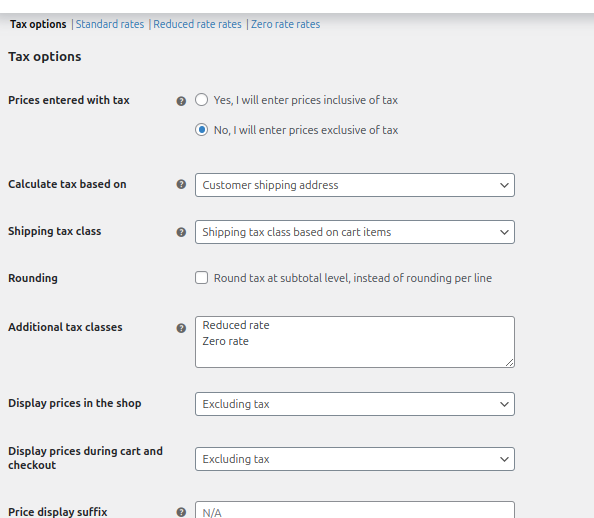
- Select whether the prices displayed on your WooCommerce store are inclusive or exclusive of taxes. If it is exclusive, taxes are shown separately.
- Select how the tax calculation should be done. You can calculate tax based on the customer’s shipping, billing, or shop-based address.
- You can also include additional tax classes like Reduced rate, Zero rate, and Standard rate classes.
- Choose whether or not to display taxes on the WooCommerce shop page, cart, and checkout page.
In addition, you can add standard-rate taxes, reduced rates, and zero rates and create your WooCommerce store.
6. Miscellaneous
Some of the other features and options that you can use to create a WooCommerce store is given below.
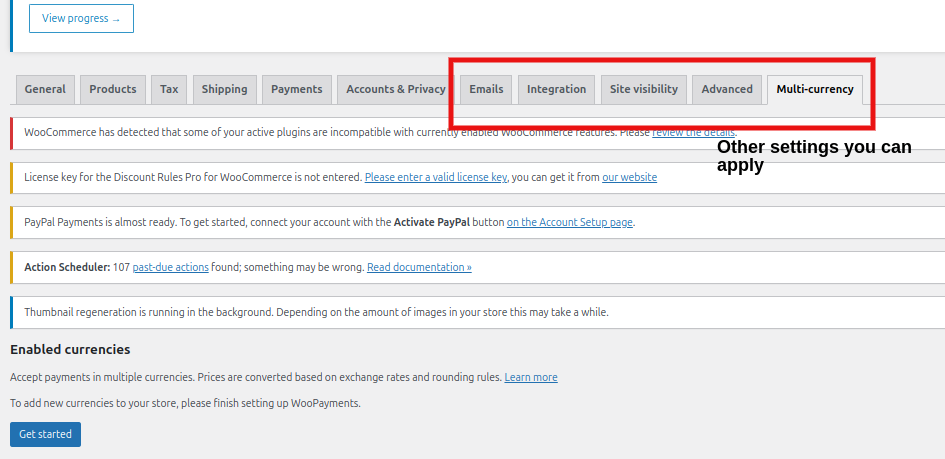
- Multi-currency: Here, you can enable multi-currency exchange. Prices are determined based on current exchange rates.
- Integrations: Integrations are provided for geolocation lookups utilizing MaxMind, which will determine the country’s location. To do this, you need to enter MaxMind license keys.
- Site visibility: You can make your WooCommerce website visible to the public by choosing the “Live” option provided. If your website is not ready, you can also display “Coming soon” to customers.
- Emails: Here, you can see the list of all the email notifications that WooCommerce sends from store owners to their customers. You must enter the sender’s and recipient’s email addresses. You can also customize how your emails look.
How to Add Products to Your WooCommerce Store
WooCommerce allows store owners to add various products, such as simple products or products with many variations, digital goods, etc. Here are the steps to add products to your WooCommerce store.
- Go to your “WordPress Dashboard” -> “Products” -> “Add New”.
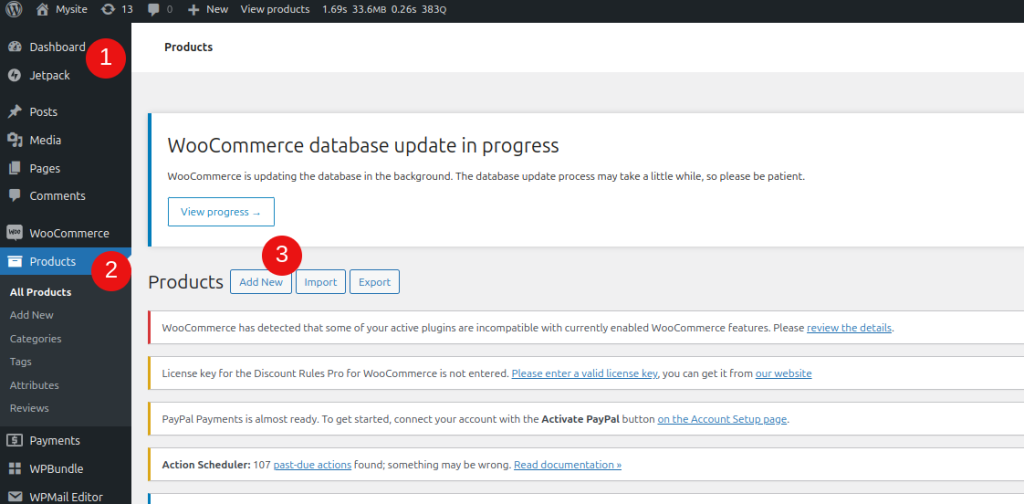
- On the following screen, enter your product’s name and add WooCommerce product descriptions and images.

- Scroll down to the “Product Data” section and select the product type. There are four types: Simple, Variable, Grouped, and External/Affiliate products.
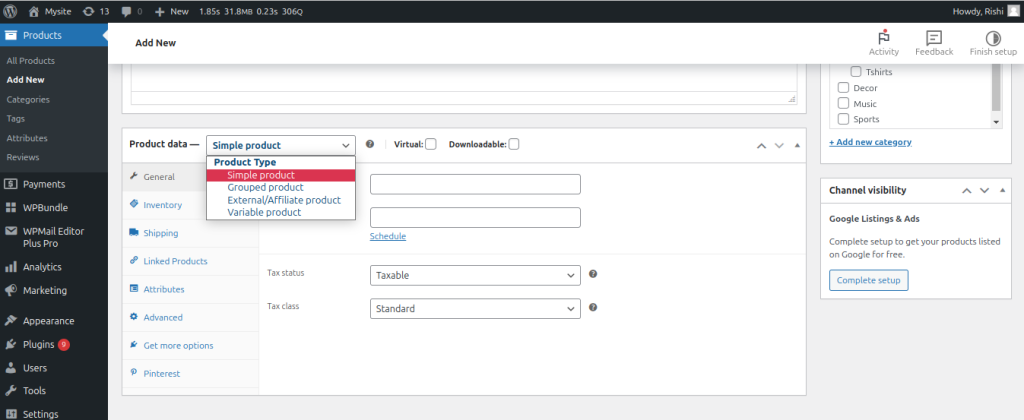
After choosing the products, you must enter information about the products, which varies to an extent for each product type. Here’s the list of WooCommerce product information you need to enter.
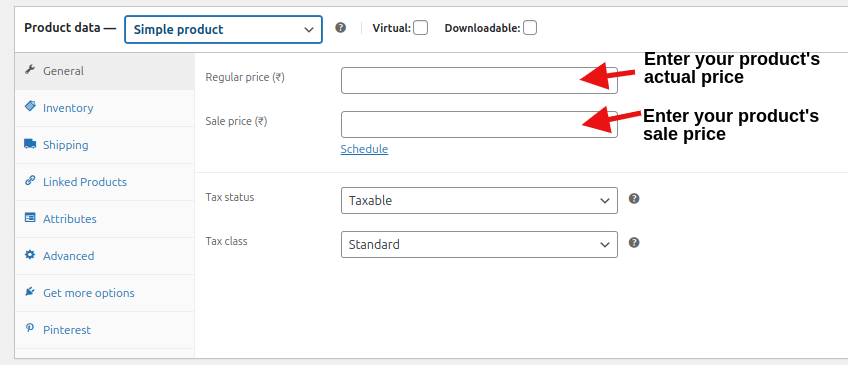
- General: Enter your WooCommerce product’s regular price, sale price, tax status, and class. The regular price is the product’s actual price, and the sale price is its strikeout price.
- Inventory: Enter your product’s unique SKU (Stock Keeping Unit) and maintain it for inventory use. You can also display the stock status and limit the purchase quantity to one per customer.
- Shipping: Enter the product’s weight and dimensions and choose the shipping class you created in WooCommerce’s Settings.
- Linked Products: You have two sections, Upsells and Cross-sells. Products can be added to each section and displayed on the WooCommerce cart page.
- Attributes: Each product you add to your store has a unique trait. For example, a t-shirt’s color, collar type, sleeve length, etc., can be considered its attributes. So, pick out the attribute of your product, add it, and display it to your customers.
- Variations: This section appears only for “Variable Products”. Once you have added attributes to the product, variations can be automatically generated and displayed on your WooCommece store.
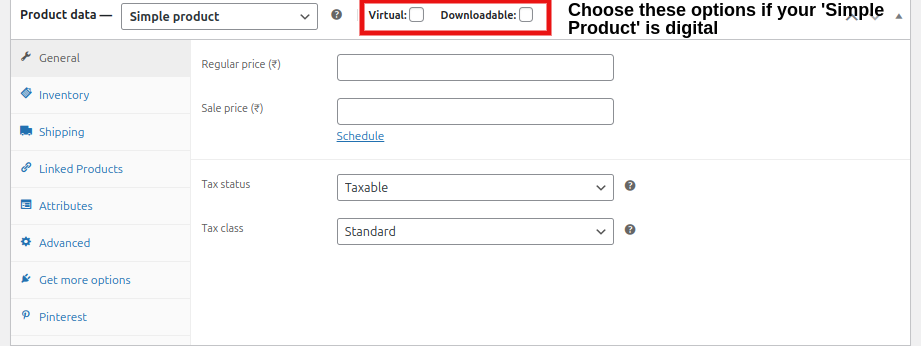
- Downloadable/Variable Product: Enable this option if the simple product you create is digital. Store owners can use this to sell subscription goods, software, or any downloadable files.
- External/Affiliate product: By setting this as a product type, you’ll list the product on your website but sell it elsewhere and earn commission through it. Here, you need to enter the product URL, which redirects customers to the respective third-party website.
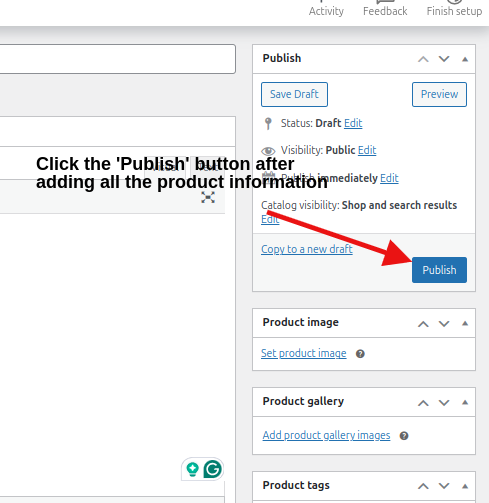
After this, add product information, such as product images, categories, tags, etc., click the “Publish” button at the top, and display it on your WooCommerce store.
How to Customize Your WooCommerce Store
After you create a WooCommerce store, you can change how it appears to your customers by changing its theme and product layout.
Step 1: Choose a WooCommerce Theme
WooCommerce offers a set of default store templates that you can use it. You can also find several WooCommerce themes for stores online for
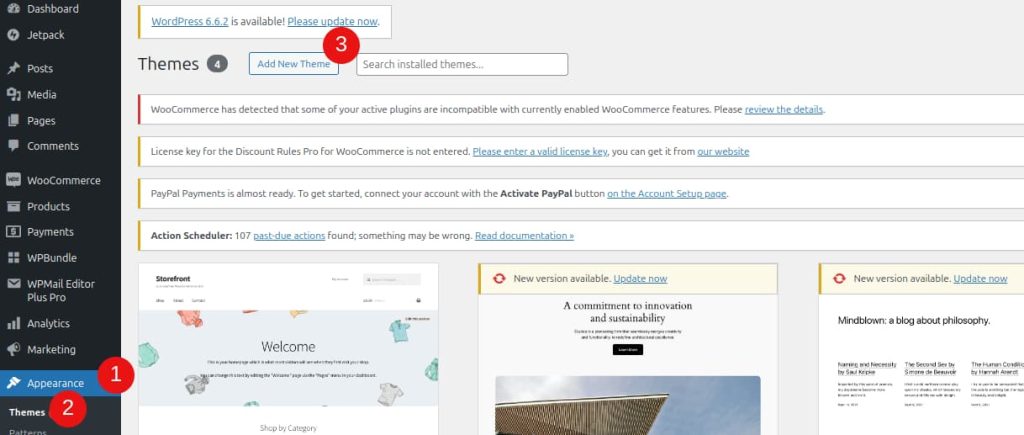
- Go to “WordPress” -> “Appearance” -> “Themes” -> “Add New Theme”. There, you can find several WooCommerc themes for stores.
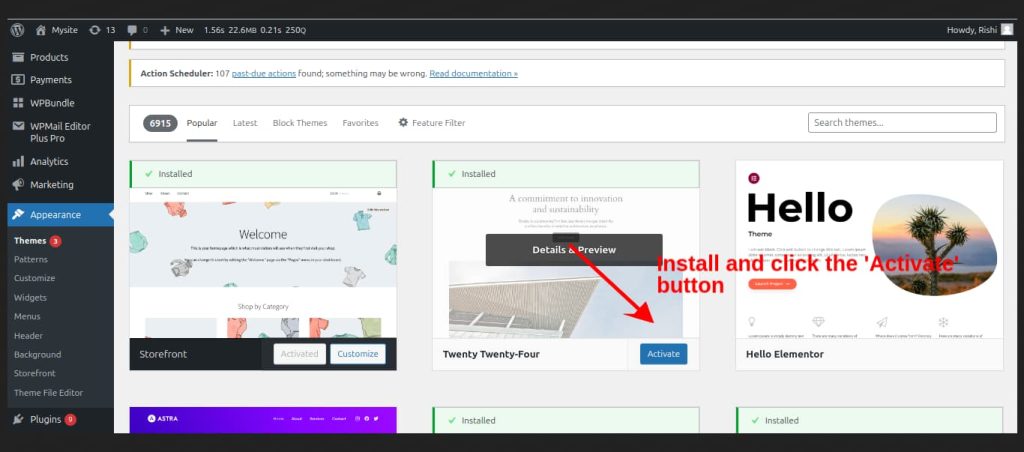
- Scroll to the theme you want, click “Install”, and download the theme you want.
- Click the “Activate” button and apply it to your WooCommerce store.
Step 2: Customize WooCommerce Product Page
Customizing your WooCommerce store doesn’t end with choosing a theme. Store owners can make it more personalized by changing the entire layout of their website.
You can change the entire appearance of the product, from how it appears to the position of buttons. Here are the steps to do WooCommerce customization.
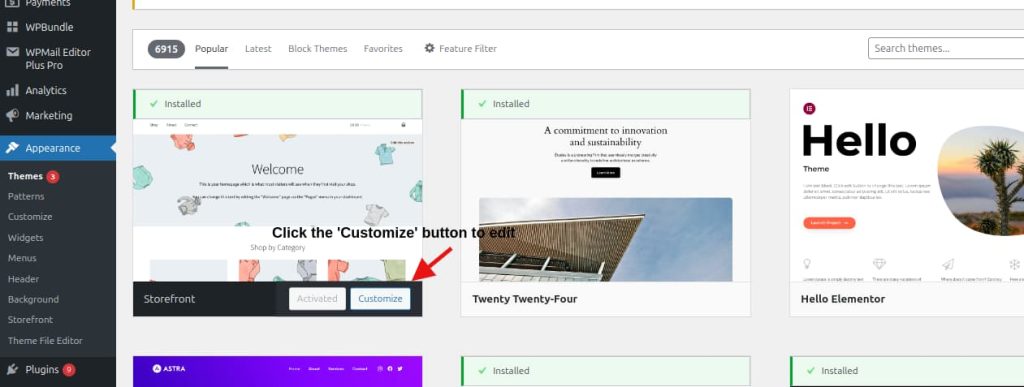
- Once activated, tap on the “Customize” button to go to the “Editor” page, where you can make changes and customize it to your liking.
This is how the editor page looks.
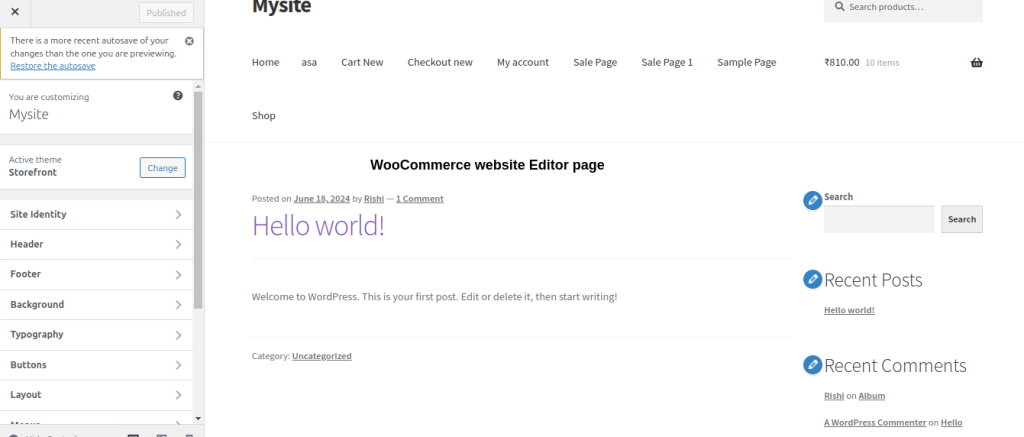
- Click on the “WooCommerce” option to edit your store’s layout, product page, product images, catalog, checkout page, etc.
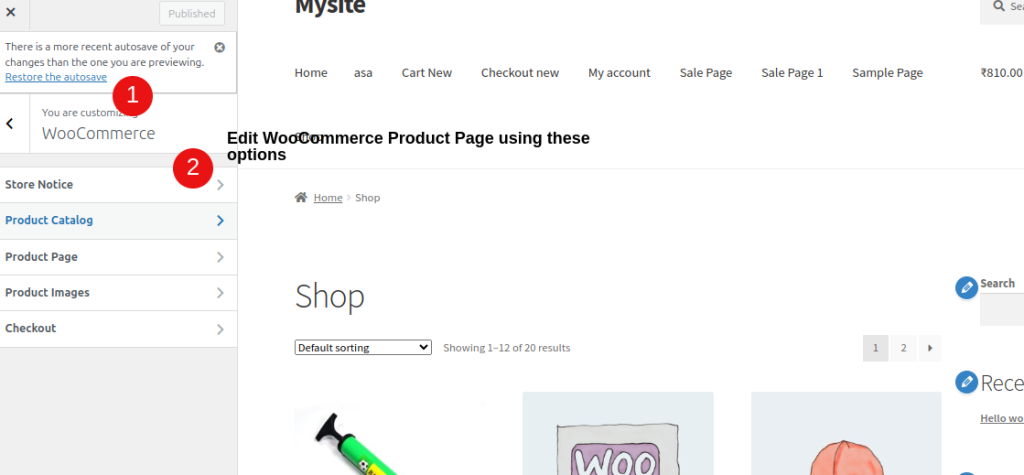
- You can also change your WooCommerce store’s background color, buttons, and many more by clicking on the options.
Why Choose WooCommerce for Your Online Store?
The Following features make WooCommerce your best bet in creating your WordPress online store.
- Open-source: WooCommerce is one of the best WordPress e-commerce plugins because it is free to download, and anyone can use it without a licensing fee.
- Customizability: The right plugins and extensions can customize WooCommerce to suit your store’s needs, including theme customization, checkout customization, and more.
- Control: Owners can completely own their online store as WooCommerce is a self-hosted service. Owners have complete freedom to do WooCommerce store optimization.
- Payment Gateways: WooCommerce payment integration is one of the best as it supports many payment gateways like Stripe, PayPal, etc. This makes it easy for customers to do transactions without much hassle.
- SEO-Friendly: With SEO-friendly WooCommerce products, store owners can make their products easily known to customers worldwide. There are many WooCommerce plugins for SEO, like Yoast, which you can use to optimize your website.
- Scalability: What if your store grows by following WooCommerce best practices? You don’t need to worry, as WooCommerce can handle stores of any size, from small businesses to large-scale operations. There’s no need to shift your operations anywhere.
How to Install WooCommerce Plugins in WordPress
Plugins are software add-ons that improve the functionality of your WordPress website. In WordPress, store owners can install plugins designed explicitly for WooCommerce to enhance the functionality of their WooCommerce website.
Plugins can be used for many applications, and the WordPress plugin store offers many WooCommerce SEO plugins, Security plugins, Design plugins, and plugins to optimize WooCommerce store speed.
To install WooCommerce Plugins in WordPress,
- Go to “WordPress Dashboard” -> “Plugins” -> “Add New Plugin”.
- Enter the plugin’s name in the “Search plugins” tab and search.
- Select the plugin from the search results and click the “Install Now” button.
- Once installed, click the “Activate” button and add the plugin to your store. This plugin can be seen on the left-side menu on your WordPress dashboard.
WordPress Plugins for WooCommerce and WooCommerce Extensions are used interchangeably. A plugin is a broader term for any software that adds more functionality, while a WooCommerce extension is specifically designed to enhance the functionality of just WooCommerce.
In short, all WooCommerce Extensions are Plugins, but not all WordPress plugins are WooCommerce extensions.
To add a WooCommerce Extension, go to “WordPress” -> “WooCommerce” -> “Extensions” and search and download it to your store.

Build customer loyalty and increase store conversions by providing payment method-based discounts using the Discount Rules for WooCommerce – PRO plugin.
Conclusion
By now, you should have known how to create a WooCommerce store in WordPress and add products to it. However, the WooCommerce WordPress store setup doesn’t end here; store owners must market their store and make it known to customers.
Optimizing your WooCommerce store for SEO and following the right WooCommerce sales strategies can help your online store reach a broader audience.
Yoast SEO, Schema Pro, and others are some of the best SEO plugins for WooCommerce that you can use to drive organic traffic and increase your store’s rankings.
In addition to the above, you can follow WooCommerce marketing strategies, such as email marketing for abandoned cart recovery and creating WooCommerce bundle discounts.
Related Articles
- How to Create a WooCommerce Simple Product
- 5 Best WooCommerce Sale Plugins
- 5 Best WooCommerce Offers Plugins
Frequently Asked Question
WooCommerce is a WordPress eCommerce platform with which you can create an online store in WordPress. All you need to do is create a WordPress domain, install WooCommerce, and add products to build a WooCommerce store.
WooCommerce Payments, PayPal, Stripe, etc, are some of the best payment gateways that can be integrated with WooCommerce.
To add products to your WooCommerce store, go to WordPress -> Products -> Add New and enter the product’s description, image, and details such as price, dimensions, SKU, etc. Then, click on the “Publish” button to make it live.
To add WooCommerce to an existing WordPress site, go to your WordPress Dashboard -> Plugins -> Add New. Search for the WooCommerce plugin and click “Install” Then, click “Activate” to add it to your WordPress site.
Affordability and flexibility are the main reasons why WooCommerce is suitable for small businesses. Its extensive plugin ecosystem lets store owners make necessary changes and customizations without spending much.
To integrate WooCommerce with Google Analytics, go to WordPress -> WooCommerce -> Settings -> Integration and enter your “Google Analytics tracking ID”. Then, enable “Enhanced Ecommerce tracking” for both WooCommerce and Google Analytics and save the changes. Now, you can track your store’s performance quickly.
Optimizing images involves using the correct image format (JPG or PNG), compressing it to the right file size and dimensions, etc. This procedure is also helpful in WooCommerce speed optimization.
WordPress product categories can be set up by going to the product page of your WooCommerce store and selecting the respective Categories and Tags. You can add categories and tags to a new product or an existing one.
WooCommerce SEO optimization can be done by using the best and suitable WooCommerce plugins for SEO. Some of the SEO tips for WooCommerce include using SEO friendly URLs, product descriptions, enabling breadcrumbs, building backlinks, etc.
To sell digital products in your WooComerce store, go to WordPress -> Products -> Add New. Scroll down to the “Product Type” dropdown and set the product to “Simple Product”. Then, select either the Virtual or Downloadable option provided just below it. By choosing this, the product becomes “Digital”, and you can add it to your store and sell it.
You can use Elementor or Divi’s drag-and-drop features to customize WooCommerce product pages easily. In addition, several WooCommerce store themes are available, which you can download and use as a template for your product pages.
Some of the best plugins for WooCommerce product management are WooCommerce Product Add-Ons, Smart Manager, etc. For WooCommerce inventory management, WooCommerce Smart Manager, Trade Gecko.
Some essential WooCommerce mobile optimization tips include using mobile-responsive themes and checkout options, minimizing pop-ups, and optimizing images.
Offers are the best way to increase WooCommerce store sales. By offering product discounts, Buy One Get One deals, WooCommerce Bulk discounts, etc., you can increase average order value and boost sales.
Here’s how to use WooCommerce Plugin in WordPress step by step.
Go to “WordPress” -> “Plugins” -> “Add New” -> “WooCommerce” -> “Install Now” -> “Activate.”