Are you failing to get more customers and sales for your WooCommerce store? Coupons can be a powerful way to grab customers’ attention and increase revenue.
Even more, setting a coupon expiry date allows you to create urgency and make customers purchase immediately without abandoning their cart. It drives more sales and revenue by urging customers to purchase within a limited time before the deal is missed.
WooCommerce has a built-in coupon feature that allows you to set the expiry date for your coupons easily. This feature helps restrict customers from claiming coupons after a certain promotional period, leading to a profitable sales strategy.
In this blog, you’ll learn how to set the WooCommerce coupon expiry date. You’ll also learn how to set expiry dates for advanced and smart coupons in WooCommerce using the “Discount Rules for WooCommerce -Pro” plugin, such as setting expiry dates for first-order coupons.
At the end of the guide, you’ll have full control over your WooCommerce coupons and get more sales.
Set Expiry Dates To Advanced WooCommerce Coupons Using The Discount Rules Plugin And Urge Customers To Purchase Quickly.
Why Set Expiry Dates To WooCommerce Coupons?
Setting expiration dates to WooCommerce coupons is indeed beneficial in more ways:
- Create Urgency: Even though coupons bring traffic to your store, customers may take time to complete a sale. Expiration dates create a sense of urgency, urging customers to purchase before the deal ends. This leads to immediate purchases within a specific time.
- Restrict Customers: Offering discounts is crucial to increase sales, yet extending the deal for a long time is impossible. To avoid losses, and increase profit margin, you can set expiration dates and restrict customers from claiming it for more times.
- Turn off Coupon Automatically: Running a promotional event involves more work. It’s even more difficult if you are a small business owner, as you must focus on everything independently. In this case, setting an expiry date for the coupon can automatically end the promotions, helping you save time manually turning off the coupon.
- Schedule Holiday Sales: Coupons can significantly increase sales during holidays or specific “peak time” sales events. Scheduling coupons with expiration dates in advance can help you plan upcoming events without stress, helping you achieve more sales.
How To Set Coupon Expiry Date In WooCommerce?
Setting the WooCommerce expiry date is a simple task. You can simply follow these steps:
- Open your “WordPress/ WooCommerce” dashboard.
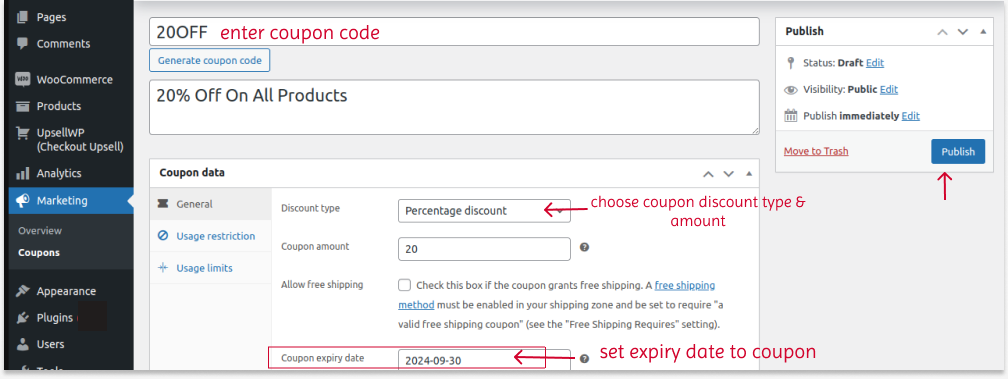
- Go to “Marketing” -> “Coupons” -> “Add Coupon”. You can also edit existing coupons.
- Create your coupon code.
- Scroll to the “Coupon Data” section and check the “General” tab.
- Now, select coupon discount type and amount.
- Optionally, allow “free shipping” option.
- Set the coupon expiry date.
- You can also set coupon usage limits in the “Usage Restrictions” tab.
- Finally, publish (or) schedule the coupon.

How To Set Expiry Dates To Advanced WooCommerce Coupons?
Setting expiry dates to advanced coupons requires a plugin like “Discount Rules for WooCommerce -Pro”. This plugin allows you to create smart and advanced coupons, such as:
- BOGO Coupons
- Bulk discount coupons
- Auto-Apply Coupon URL
- First-Order Coupons
- Flash sales coupons, and more.
Check the installation guide for instructions on installing and activating this freemium plugin in your WooCommerce dashboard. After installing the plugin, you can follow the below steps.
Set Expiry Dates To First-Order Coupons In WooCommerce Using Discount Rules To Enhance Customer Experience And Loyalty.
For example, let’s set the expiration date for a First-Order coupon.
To set the expiry date for first-order coupons in WooCommerce:
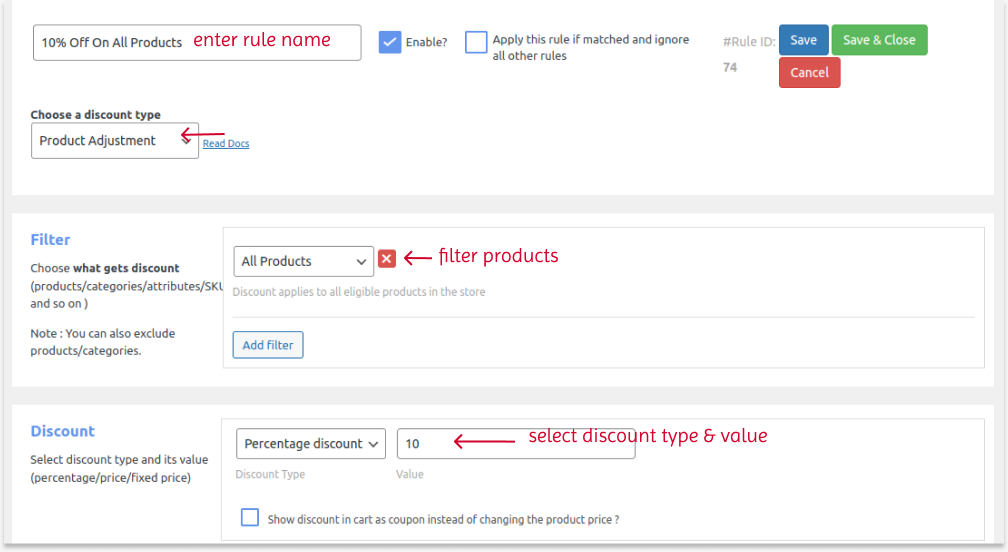
- Go to “WooCommerce” -> “Discount Rules”.
- Add a new rule.
- Select the discount type. For example: “Product Adjustment”.
- Filter specific products to apply discounts.
- Choose the discount type and set the value. For example: “10% discount”.

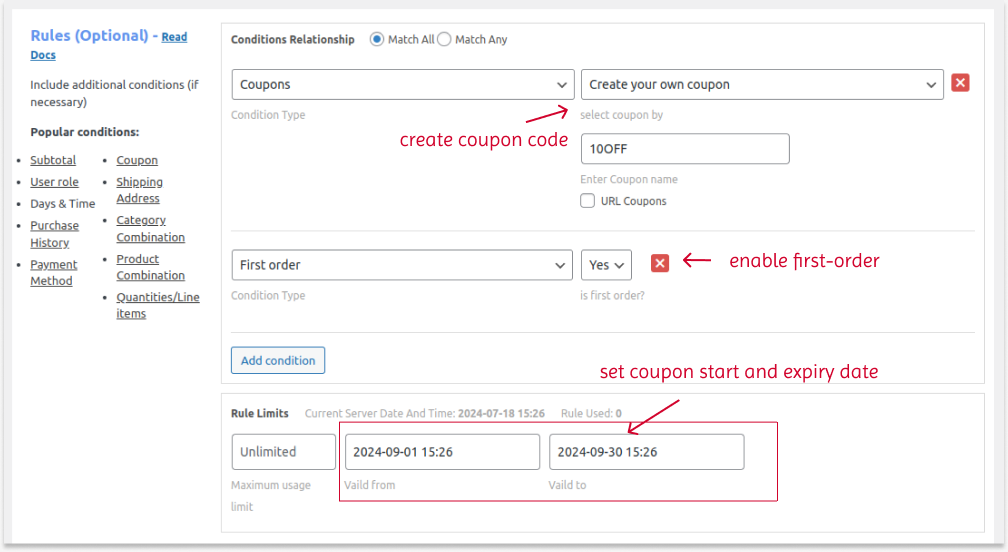
- In the “Rules” section:
- Choose the first condition as “Coupon” and create a coupon code.
- Choose the second condition as “First Order” and “Yes”.
- In the “Rules Limits” section, select the date and time for “Rule Valid From and Rule Valid To”.
- Save and enable the rule.

The coupon will apply only to first orders and expire after the selected “To” date.
Create Smart Coupons With Expiration Dates Using Discount Rules To Drive More Sales Within A Specific Time.
Conclusion
Setting WooCommerce coupons with an expiry date can be a powerful feature to drive more customers and urge them to purchase quickly.
Utilize the free built-in WooCommerce coupon feature to set expiration dates and increase your sales within a specific time.
Also, you can try “Discount Rules for WooCommerce -Pro” to control your smart and advanced coupon deals.
Also Read
- WooCommerce Coupons – The Complete Guide
- How to Create Bulk Discounts in WooCommerce? (Different Types)
- How to Create a First Order Discount in WooCommerce?
Frequently Asked Question
To add a coupon in WooCommerce:
1. Go to “Marketing” -> “Coupon” -> “Add Coupon.”
2. Create coupon code.
3. Set coupon discount type and amount.
4. Publish coupon.
To use a smart coupon in WooCommerce, install and activate the “Discount Rules for WooCommerce -Pro” plugin.
1. Go to “WooCommerce” -> “Discount Rules.”
2. Select the discount type and filter products.
3. Set discount type and value.
4. In the “Rules” section, select the “Coupon” condition and create your coupon code.
5. Save and enable the rule.
To edit a coupon in WooCommerce:
1. Go to “Marketing” -> “Coupon.”
2. Edit the coupon you want to make changes.
3. Edit the details and publish the changes.
To bulk edit coupons,
1. Go to “Marketing” -> “Coupons.”
2. Select all the coupons you want to edit.
3. In the top drop-down menu, select “Bulk Actions -> Edit” and click “Apply” to bulk edit coupon changes.
4. Finally, update the changes.
Coupon codes are random alphanumerical codes you can provide customers to offer discounts. After adding the products to the cart, customers enter the coupon code to claim discounts. It influences customers to purchase more by saving more with discounts.
To discount all products on WooCommerce, simply install and activate the “Discount Rules for WooCommerce -Pro” plugin.
1. Go to “WooCommerce” -> “Discount Rules.”
2. Add a new rule.
3. Select the discount type.
4. In the “Filter” section, choose “All Products” to provide discounts on all WooCommerce products.
5. Set the discount type with value.
6. Optionally set the purchase conditions to the discounts in the “Rules” section.
7. Save and activate the rule.


